By: Team T09-4 Since: Sep 2019 Licence: MIT
- 1. Introduction
- 2. Quick Start
- 3. Features
- 4. Tab Panels
- 5. Commands
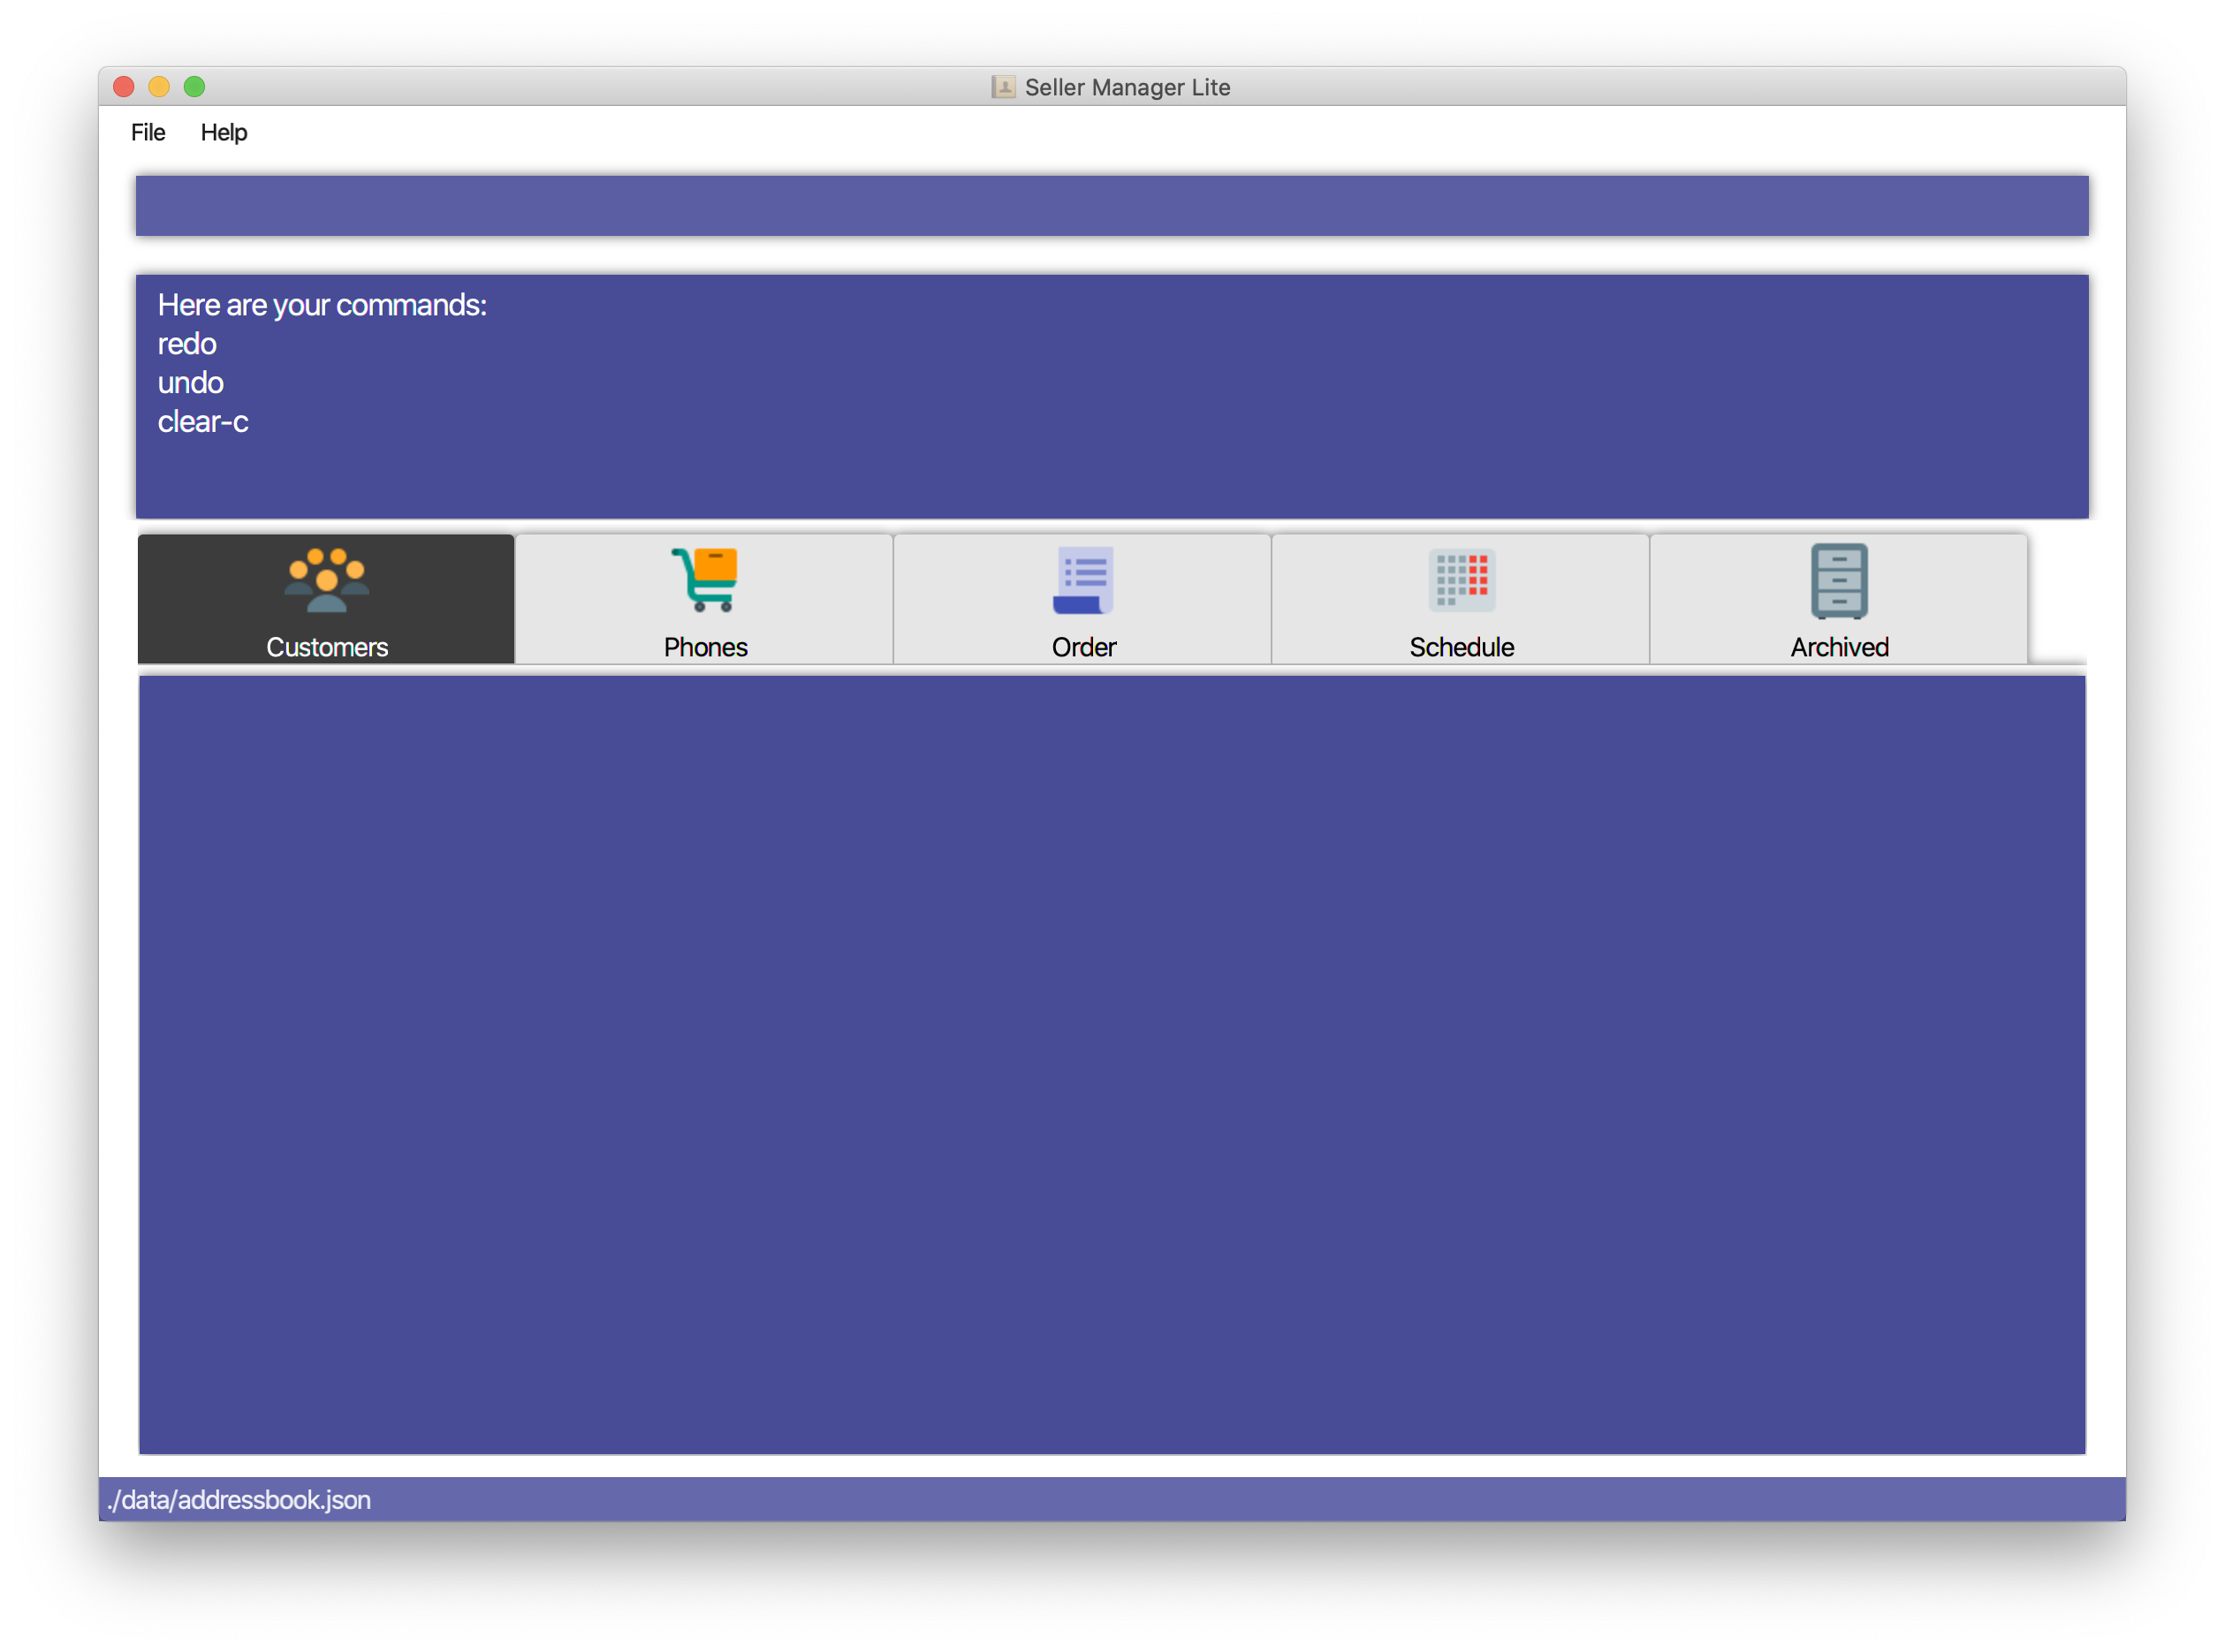
- 5.1. Viewing help:
help - 5.2. Customer Commands
- 5.2.1. Switch to Customer Tab Panel:
switch-c - 5.2.2. Add a customer:
add-c - 5.2.3. Delete a customer:
delete-c - 5.2.4. Find a customer:
find-c - 5.2.5. List the customers:
list-c - 5.2.6. Clear the customers:
clear-c - 5.2.7. Edit a customer:
edit-c - 5.2.8. Copy customer:
copy-c - 5.2.9. Email customer:
email-c[coming in v2.0]
- 5.2.1. Switch to Customer Tab Panel:
- 5.3. Phone Commands
- 5.3.1. Switch to Phone Tab Panel:
switch-p - 5.3.2. Add a phone:
add-p - 5.3.3. Delete a phone:
delete-p - 5.3.4. Find a phone:
find-p - 5.3.5. List the phones:
list-p - 5.3.6. Clear the phones:
clear-p - 5.3.7. Edit a phone:
edit-p - 5.3.8. Copy phone:
copy-p - 5.3.9. Add photo to phone:
addphoto PHONE_INDEX fc/[coming in v2.0]
- 5.3.1. Switch to Phone Tab Panel:
- 5.4. Order Commands
- 5.4.1. Switch to Order Tab Panel:
switch-o - 5.4.2. Add an order:
add-o - 5.4.3. Find an order:
find-o - 5.4.4. Complete an order:
complete - 5.4.5. Cancel an order:
cancel - 5.4.6. List the orders:
list-o - 5.4.7. Clear the orders:
clear-o - 5.4.8. Edit an order:
edit-o - 5.4.9. Copy order field:
copy-o - 5.4.10. Print orders:
print-o[coming in v2.0]
- 5.4.1. Switch to Order Tab Panel:
- 5.5. Schedule Commands
- 5.6. Archived Orders Commands:
- 5.7. General Commands
- 5.8. Generate stats:
generate-s - 5.9. Export data:
export - 5.10. Autocomplete
- 5.11. Other commands
- 5.11.1. Import data :
import[coming in v2.0] - 5.11.2. Saving the data
- 5.11.3. Encrypting data files
[coming in v2.0] - 5.11.4. Notification for reminders/alerts
[coming in v2.0] - 5.11.5. Export data to PDF
[coming in v2.0] - 5.11.6. Add a new product
[coming in v2.0] - 5.11.7. Add fields to a new product
[coming in v2.0] - 5.11.8. Autocomplete integrated with command history
[coming in v2.0] - 5.11.9. Alias
[coming in v2.0]
- 5.11.1. Import data :
- 5.1. Viewing help:
- 6. FAQ
- 7. Command Summary
1. Introduction
Seller Manager Lite (SML) is for those who prefer to use a desktop app for managing their sales. More importantly, SML is optimized for those who prefer to work with a Command Line Interface (CLI) while still having the benefits of a Graphical User Interface (GUI). If you can type fast, SML can get your contact management tasks done faster than traditional GUI apps. Interested? Jump to Section 2, “Quick Start” to get started. Enjoy!
2. Quick Start
Get started on this journey by installing SML and take a quick tour of our main features.
2.1. Installation
-
Ensure you have Java
11or above installed in your Computer. -
Download the latest
sellermanagerlite.jarhere. -
Copy the file to the folder you want to use as the home folder for your Seller Manager Lite.
-
Double-click the file to start the app. The GUI should appear in a few seconds.
-
If Double-clicking does not work, open your command line prompt/terminal, navigate to it and input
java -jar [filename]to run the file
2.2. User Interface

Type the command in the command box and press Enter to execute it.
e.g. typing help and pressing Enter will open the help window.
. Some example commands you can try:
-
list-c: lists all customer contacts -
add-cn/John Doe c/98765432 e/johnd@example.com: adds a customer namedJohn Doeto SML. -
delete-c1: deletes the 1st customer shown in the current list -
exit: exits the app
Refer to Section 3, “Features” for details of each command.
3. Features
3.1. Overview
3.1.1. Clutter-free
SML helps you to organize your customers, phones, orders and schedules without clutter.
-
Use our smart tab view to toggle between customers, phones, orders, schedules and archives.
-
Search for the customer, phone and order you want with our find function.
3.1.2. Save Time
SML allows you to save time by:
-
allowing you to export to Microsoft Excel.
-
update your inventory with a single command.
-
find and copy information easily.
-
undo and redo when you make mistakes.
3.1.3. Track your sales performance
SML generates real-time sales charts for you:
-
Total Revenue (monthly)
-
Total Profit (monthly)
-
Total Cost (monthly)
3.2. Glossary
3.2.1. Common Terms
-
SML
An initialism for our application, Seller Manager Lite. -
Customer
A person who buys from the seller. -
Phone
Multi-purpose mobile computing device. Also known as smartphones. -
Order
A request for goods. -
Schedule
A meetup with a buyer to pass the goods. There can only be 1 schedule associated with an order at any one time. Duration of the schedule is set to be 1 hour.
3.2.2. SML-specific Terms
-
Command
An instruction that will produce an output once entered in SML. -
CustomerBook
A CustomerBook is a list that stores Customer(s) that have been added into SML. Each customer entry comprises of CustomerName, ContactNumber and Email fields and others. -
PhoneBook
A PhoneBook is a list that stores Phone(s) that have been added in SML. Each phone entry comprises of IdentityNumber, SerialNumber, Brand, PhoneName, Colour, Cost and Capacity. -
OrderBook
An OrderBook is a list that stores Order(s) that have been added in SML. Each order entry comprises of a customer, a phone, OrderID, Price and OrderStatus. -
ScheduleBook
A ScheduleBook is a list that stores Schedules(s) that have been added in SML. Each schedule entry comprises a Venue and Calendar with date and time. -
Archived
Archived is a list that stores Completed or Cancelled orders ONLY. -
TabPanel
A view that is similar to web browser Tabs. -
Add
The action of putting an entry into CustomerBook, PhoneBook, OrderBook or ScheduleBook. -
Edit
If you want to make changes to any entry, you can do so with this command. -
Delete
Remove an entry from CustomerBook, PhoneBook or ScheduleBook. -
Find
The action of searching for customers, phones or orders that contains the keywords that you specify. -
Switch
Change the Tab Panel to Customer, Phone, Order, Schedule or Archived. -
Undo
If you’ve made a mistake, you can simply revert to the previous command. -
Redo
The inverse of undoing. -
Copy
The action of copying an entry into the clipboard.
4. Tab Panels
To ensure that users wouldn’t suffer from information overload, we have divided the user interface into 5 partitions
-
Customer
-
Phone
-
Order
-
Schedule
-
Archived
Use our Switch commands ( refer to Section 7.6, “Switch Commands” ) to toggle between the tab panels! The cool thing about our commands is that it will automatically toggle to the Tab Panel that it belongs to.
5. Commands
Command Format
-
Words in
UPPER_CASEare the parameters to be supplied by the user e.g. inadd-c n/NAME,NAMEis a parameter which can be used asadd-c n/John Doe. -
Items in square brackets are optional e.g
n/NAME [t/TAG]can be used asn/John Doe t/friendor asn/John Doe. -
Items with
… after them can be used multiple times including zero times e.g.[t/TAG]…can be used ast/friend,t/friend t/familyetc. -
Parameters can be in any order e.g. if the command specifies
n/NAME c/CONTACT_NUMBER,c/CONTACT_NUMBER n/NAMEis also acceptable. Note that this applies only to Customer, Phone, Order and statistics commands.
5.1. Viewing help: help
Lists out the commands you need to navigate SML.
Format: help
5.2. Customer Commands
Commands that work on customers in SML.
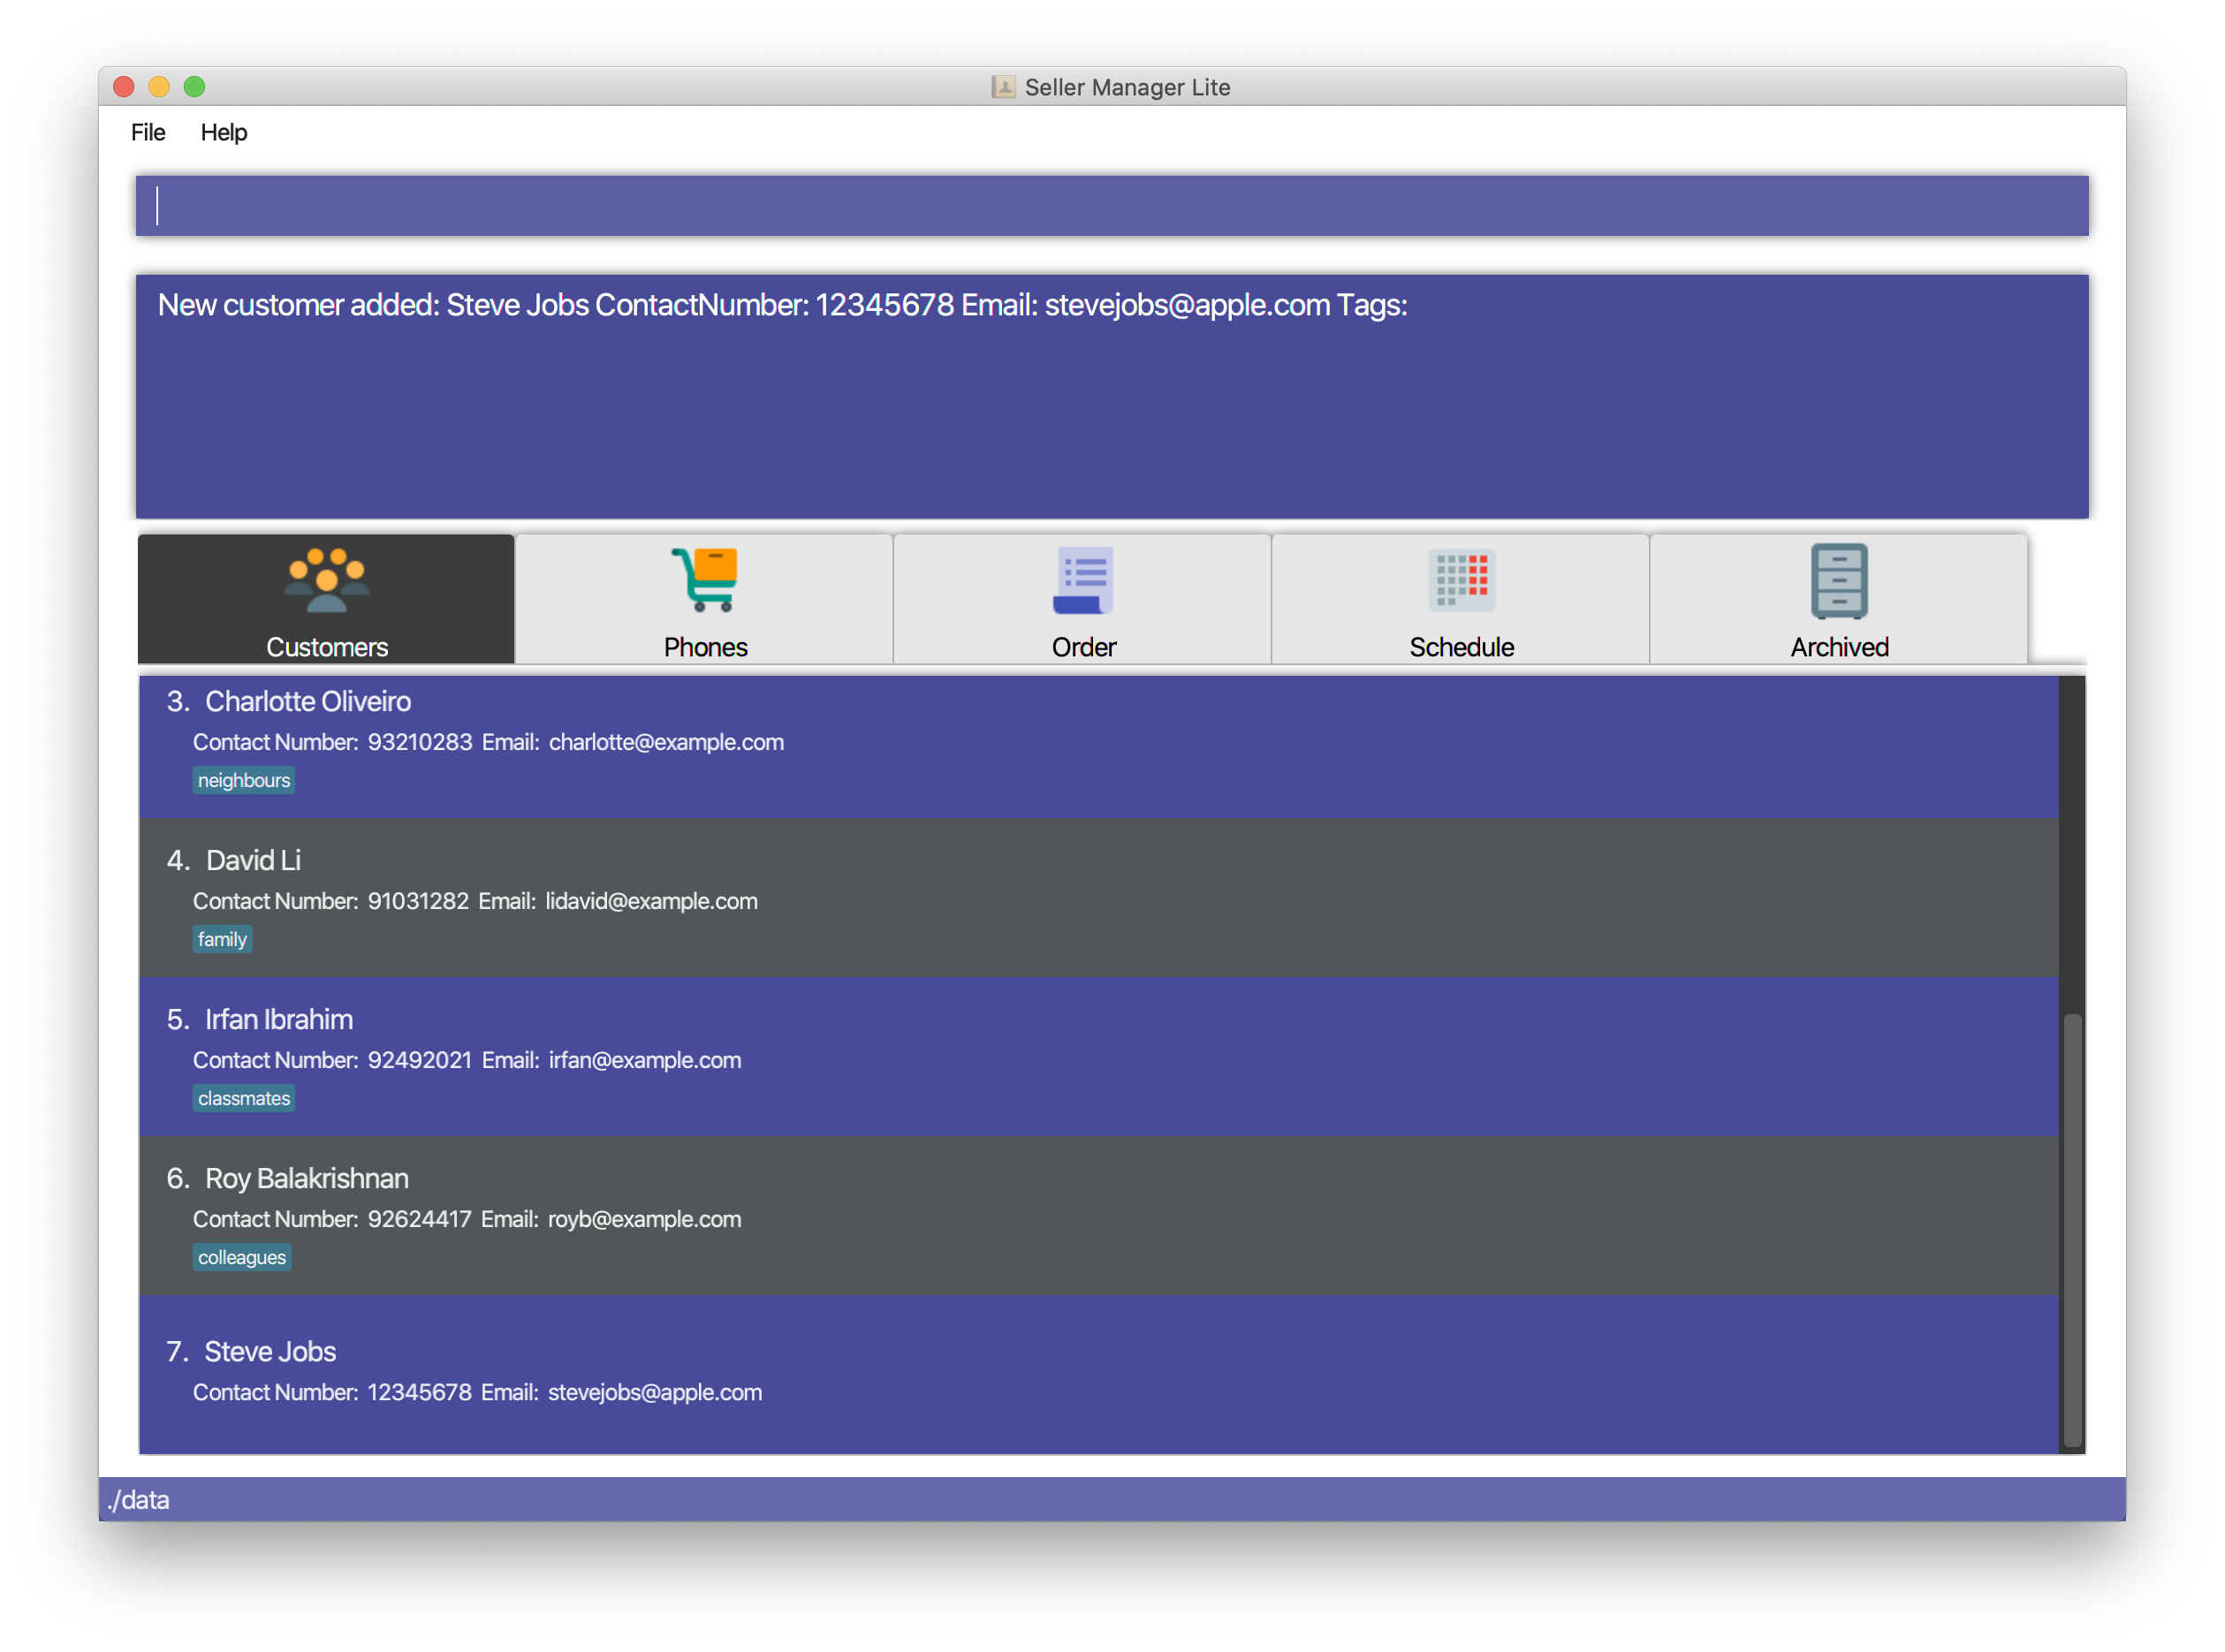
5.2.2. Add a customer: add-c
Adds a Customer to the CustomerBook.
This can be done in any Tab Panel.
Format: add-c n/NAME c/CONTACT_NUMBER e/EMAIL [t/TAG]…
| Contact numbers should be 8-digits long. |
| A customer can have any number of tags, including 0. |
| Customers can share the same name. |
| Customers cannot share the same contact number or email. |
Examples:
-
Adds a single customer
-
add-c n/Steve Jobs c/12345678 e/stevejobs@apple.com
-
5.2.3. Delete a customer: delete-c
Deletes a customer in SML. Note that deleting a customer will also delete the orders and schedules associated with the customer.
Format: delete-c INDEX
Examples:
-
Delete the 2nd customer.
-
list-c -
delete-c 2
-
-
Delete the 1st customer after performing a find customer command.
-
find-c alice -
delete-c 1
-
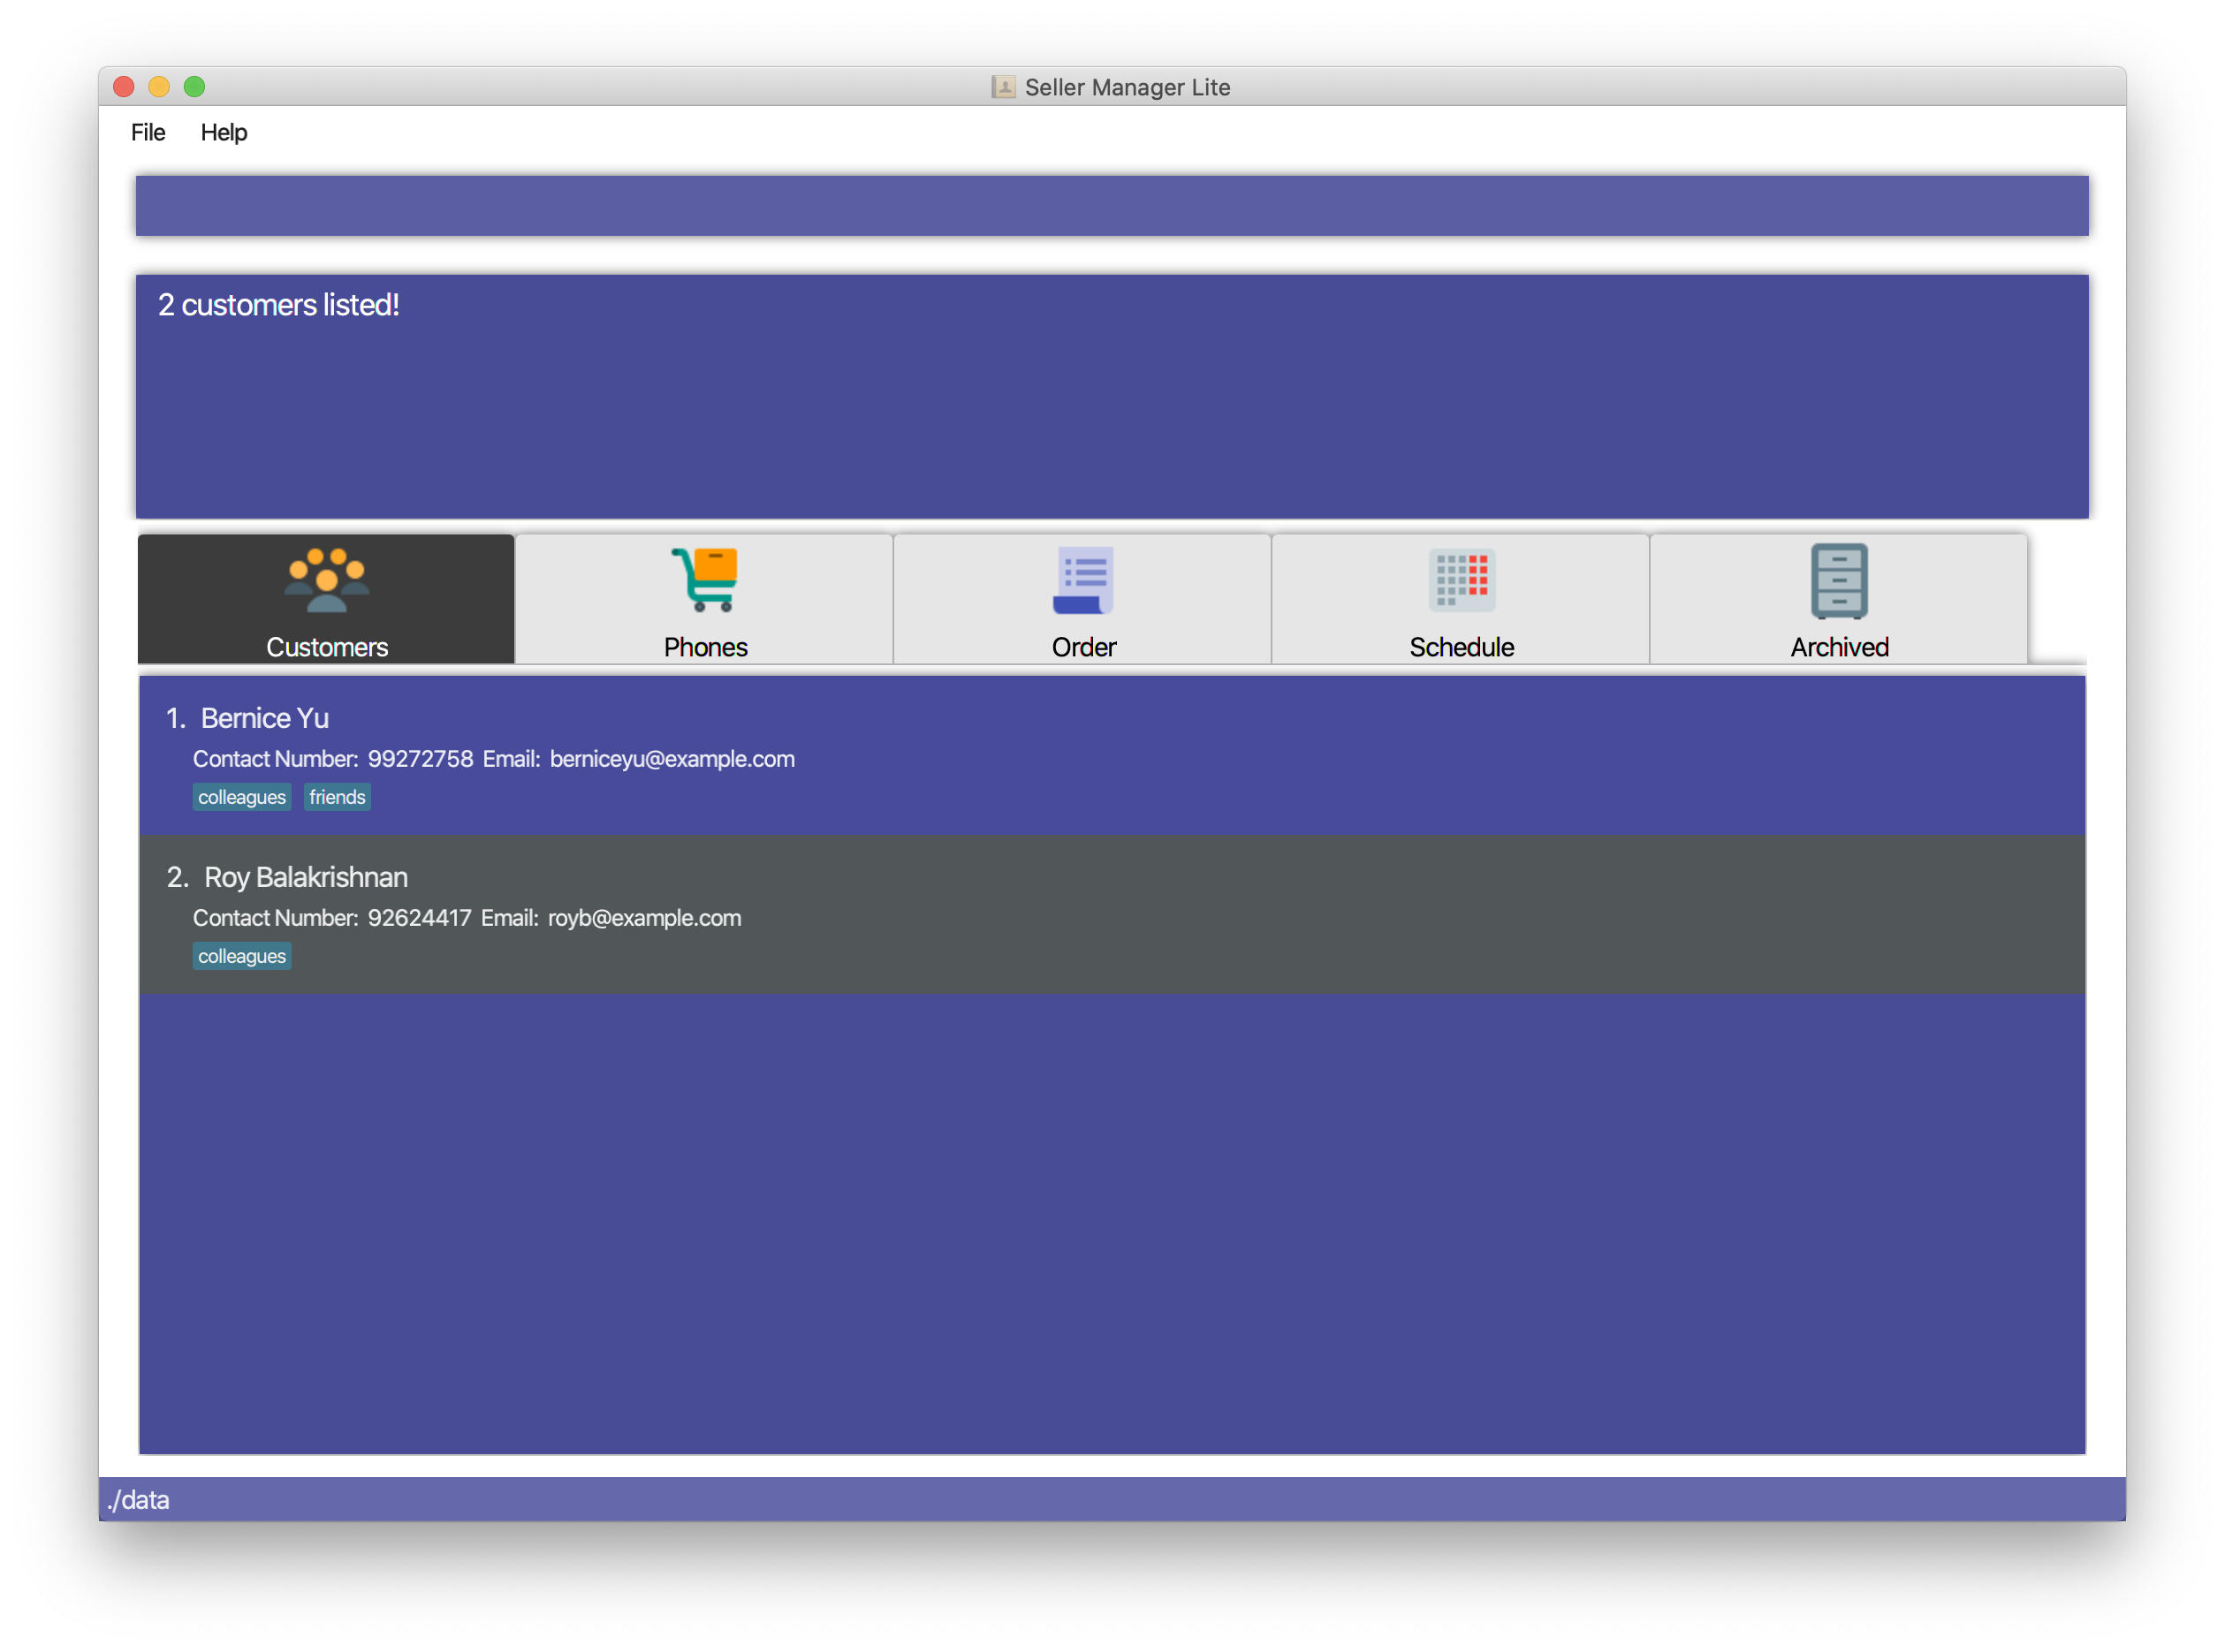
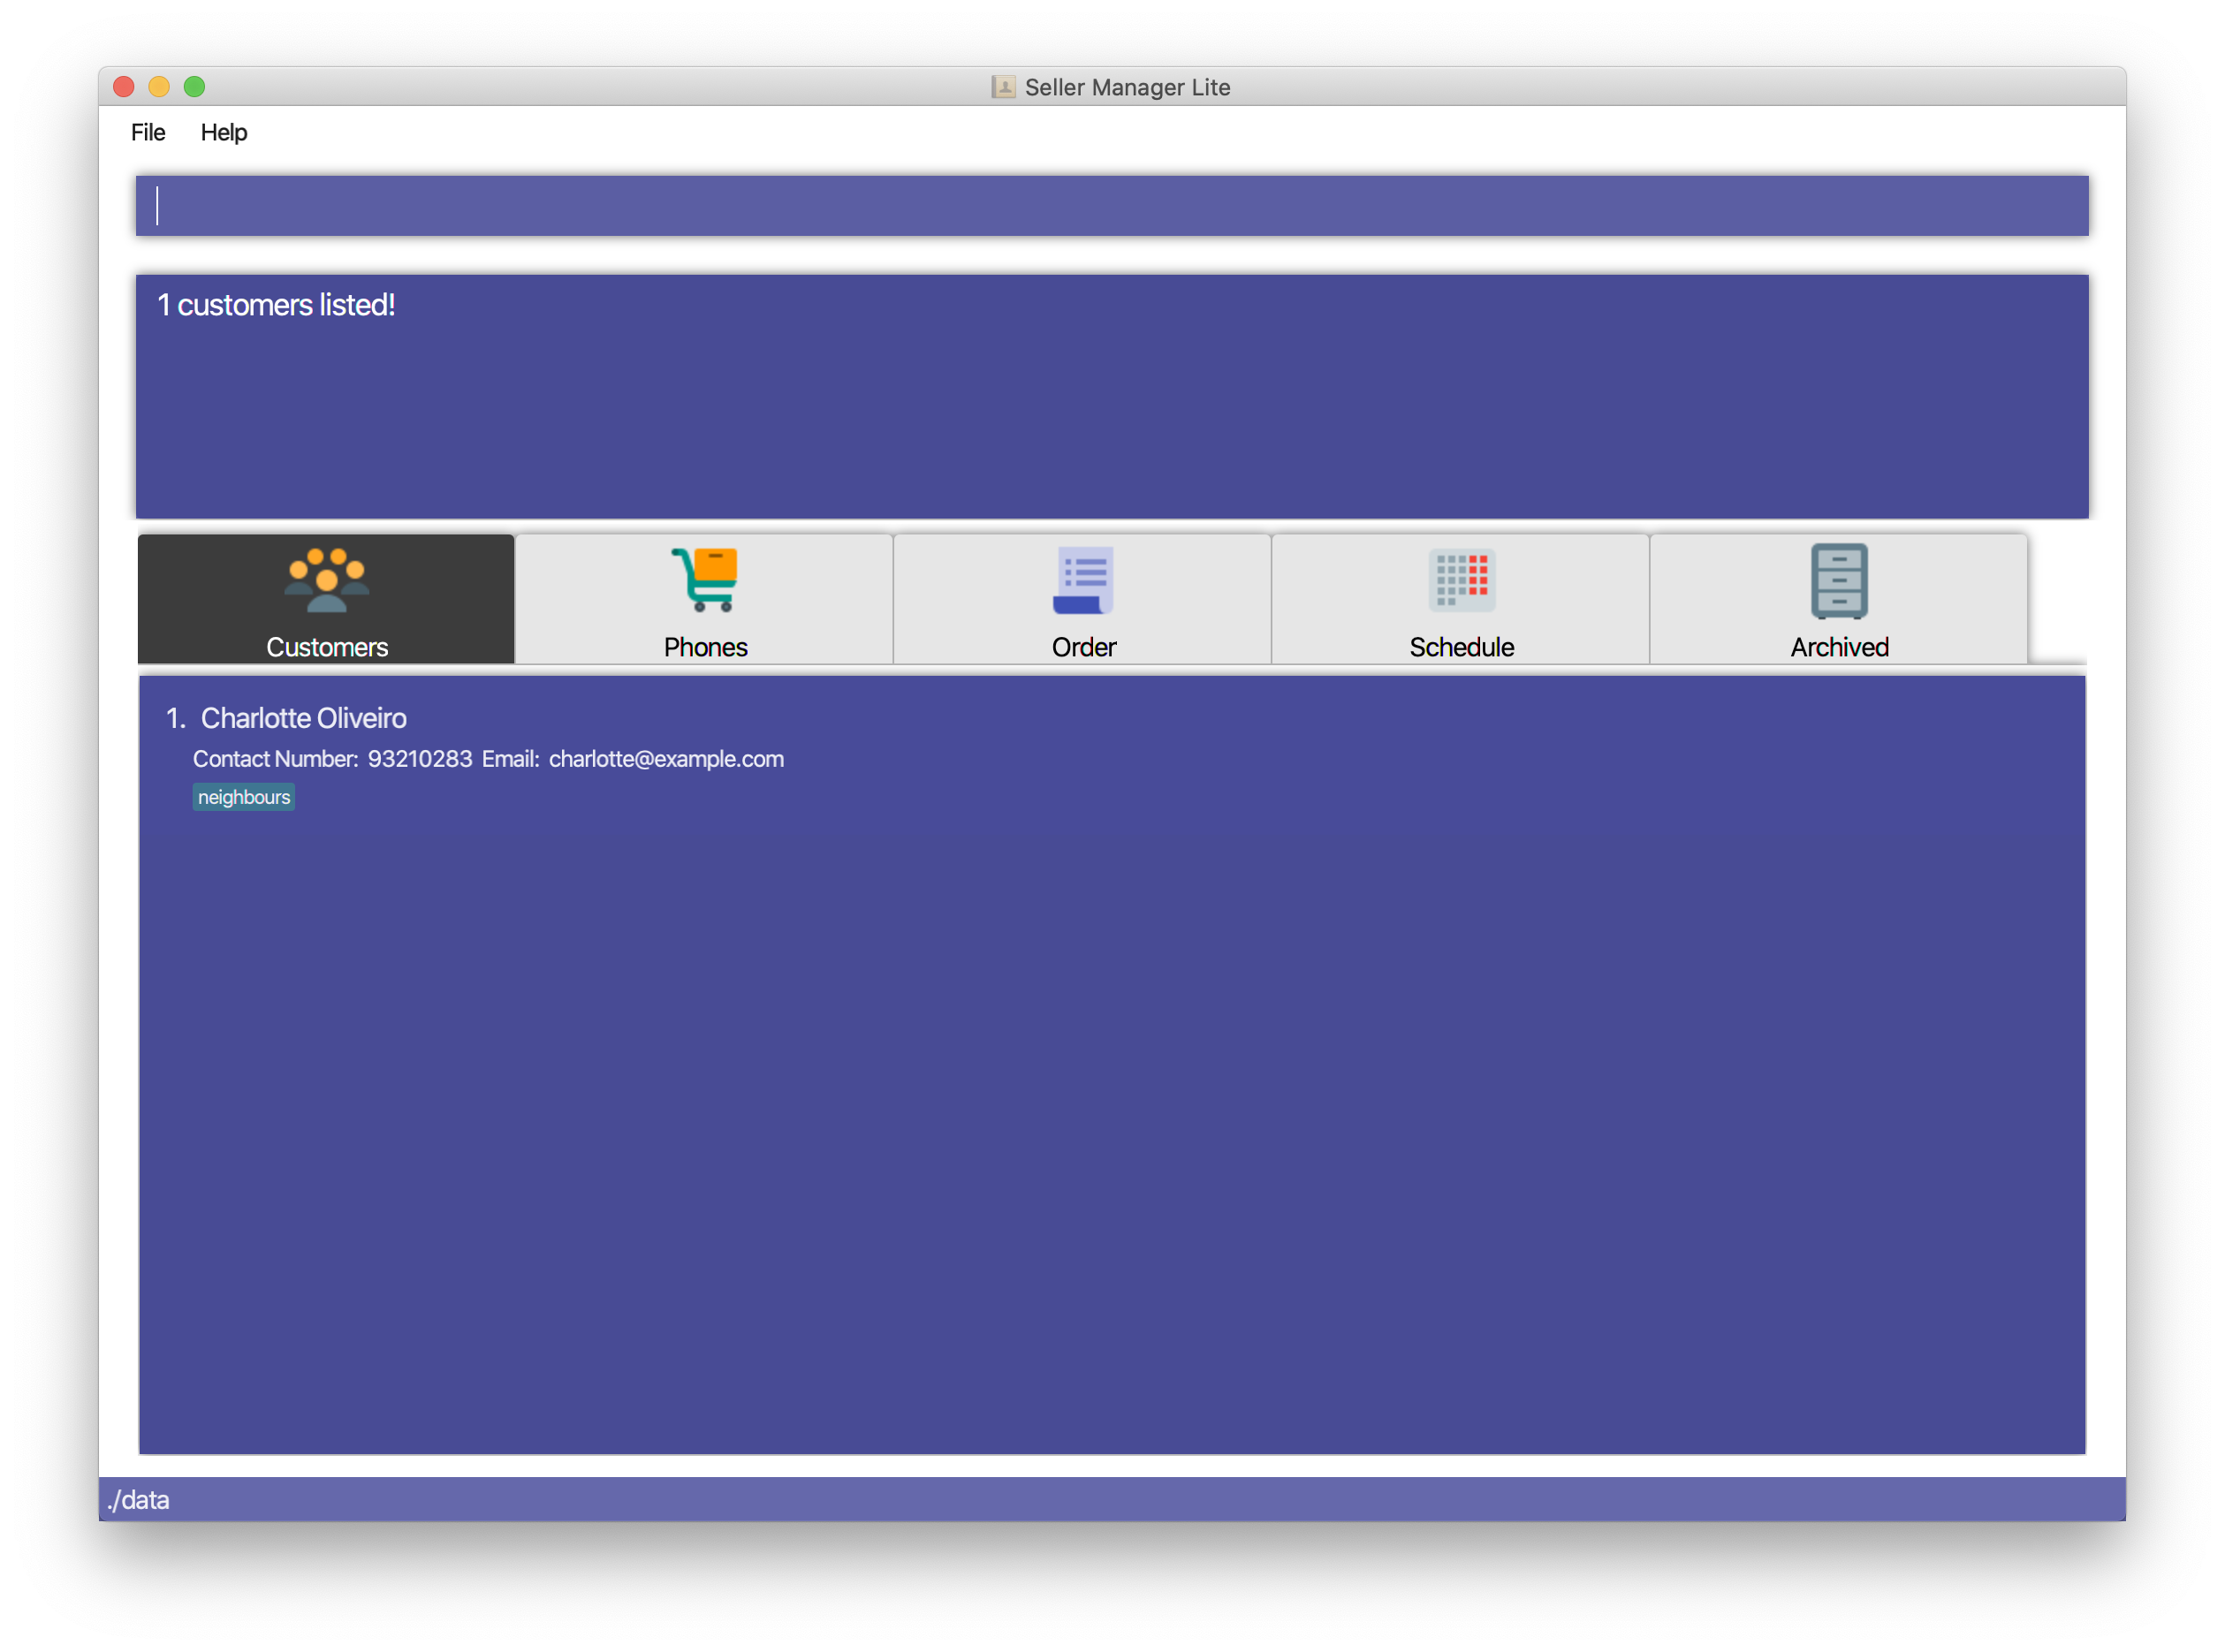
5.2.4. Find a customer: find-c
Finds customers whose fields contain any of the given keywords.
Format: find KEYWORD [MORE_KEYWORDS]…
Examples:
-
Find customers with keyword
colleague-
find-c colleague
-
-
Find customers with keywords
charlotteoliveiro-
find-c charlotte oliveiro
-
5.2.5. List the customers: list-c
List every customer in SML. Acts as a switch customer command as well.
Format: list-c
-
list-c
5.2.7. Edit a customer: edit-c
Edits an existing customer in CustomerBook. Note that orders in the order tab panel associated with the same customer will also be edited accordingly.
Format: edit-c INDEX [n/NAME] [c/CONTACT_NUMBER] [e/EMAIL] [t/TAG]…
Examples:
-
Edit the contact number and email of the 1st customer.
-
edit-c 1 c/98721928 e/happygolucky@gmail.com
-
-
Clear all existing tags from the 2nd customer.
-
edit-c 2 t/
-
5.2.8. Copy customer: copy-c
Copies a customer in SML to clipboard.
Format: copy-c INDEX
Examples:
-
Copy the 1st customer.
-
copy-c 1
-
-
Copy the 1st customer after performing find.
-
find-c Lee -
copy-c 1
-
5.2.9. Email customer: email-c [coming in v2.0]
Emails a customer in SML. Opens Gmail on a web browser and drafts an email to a customer.
Format: email-c INDEX
5.3. Phone Commands
Commands that work on phones that you have in SML.
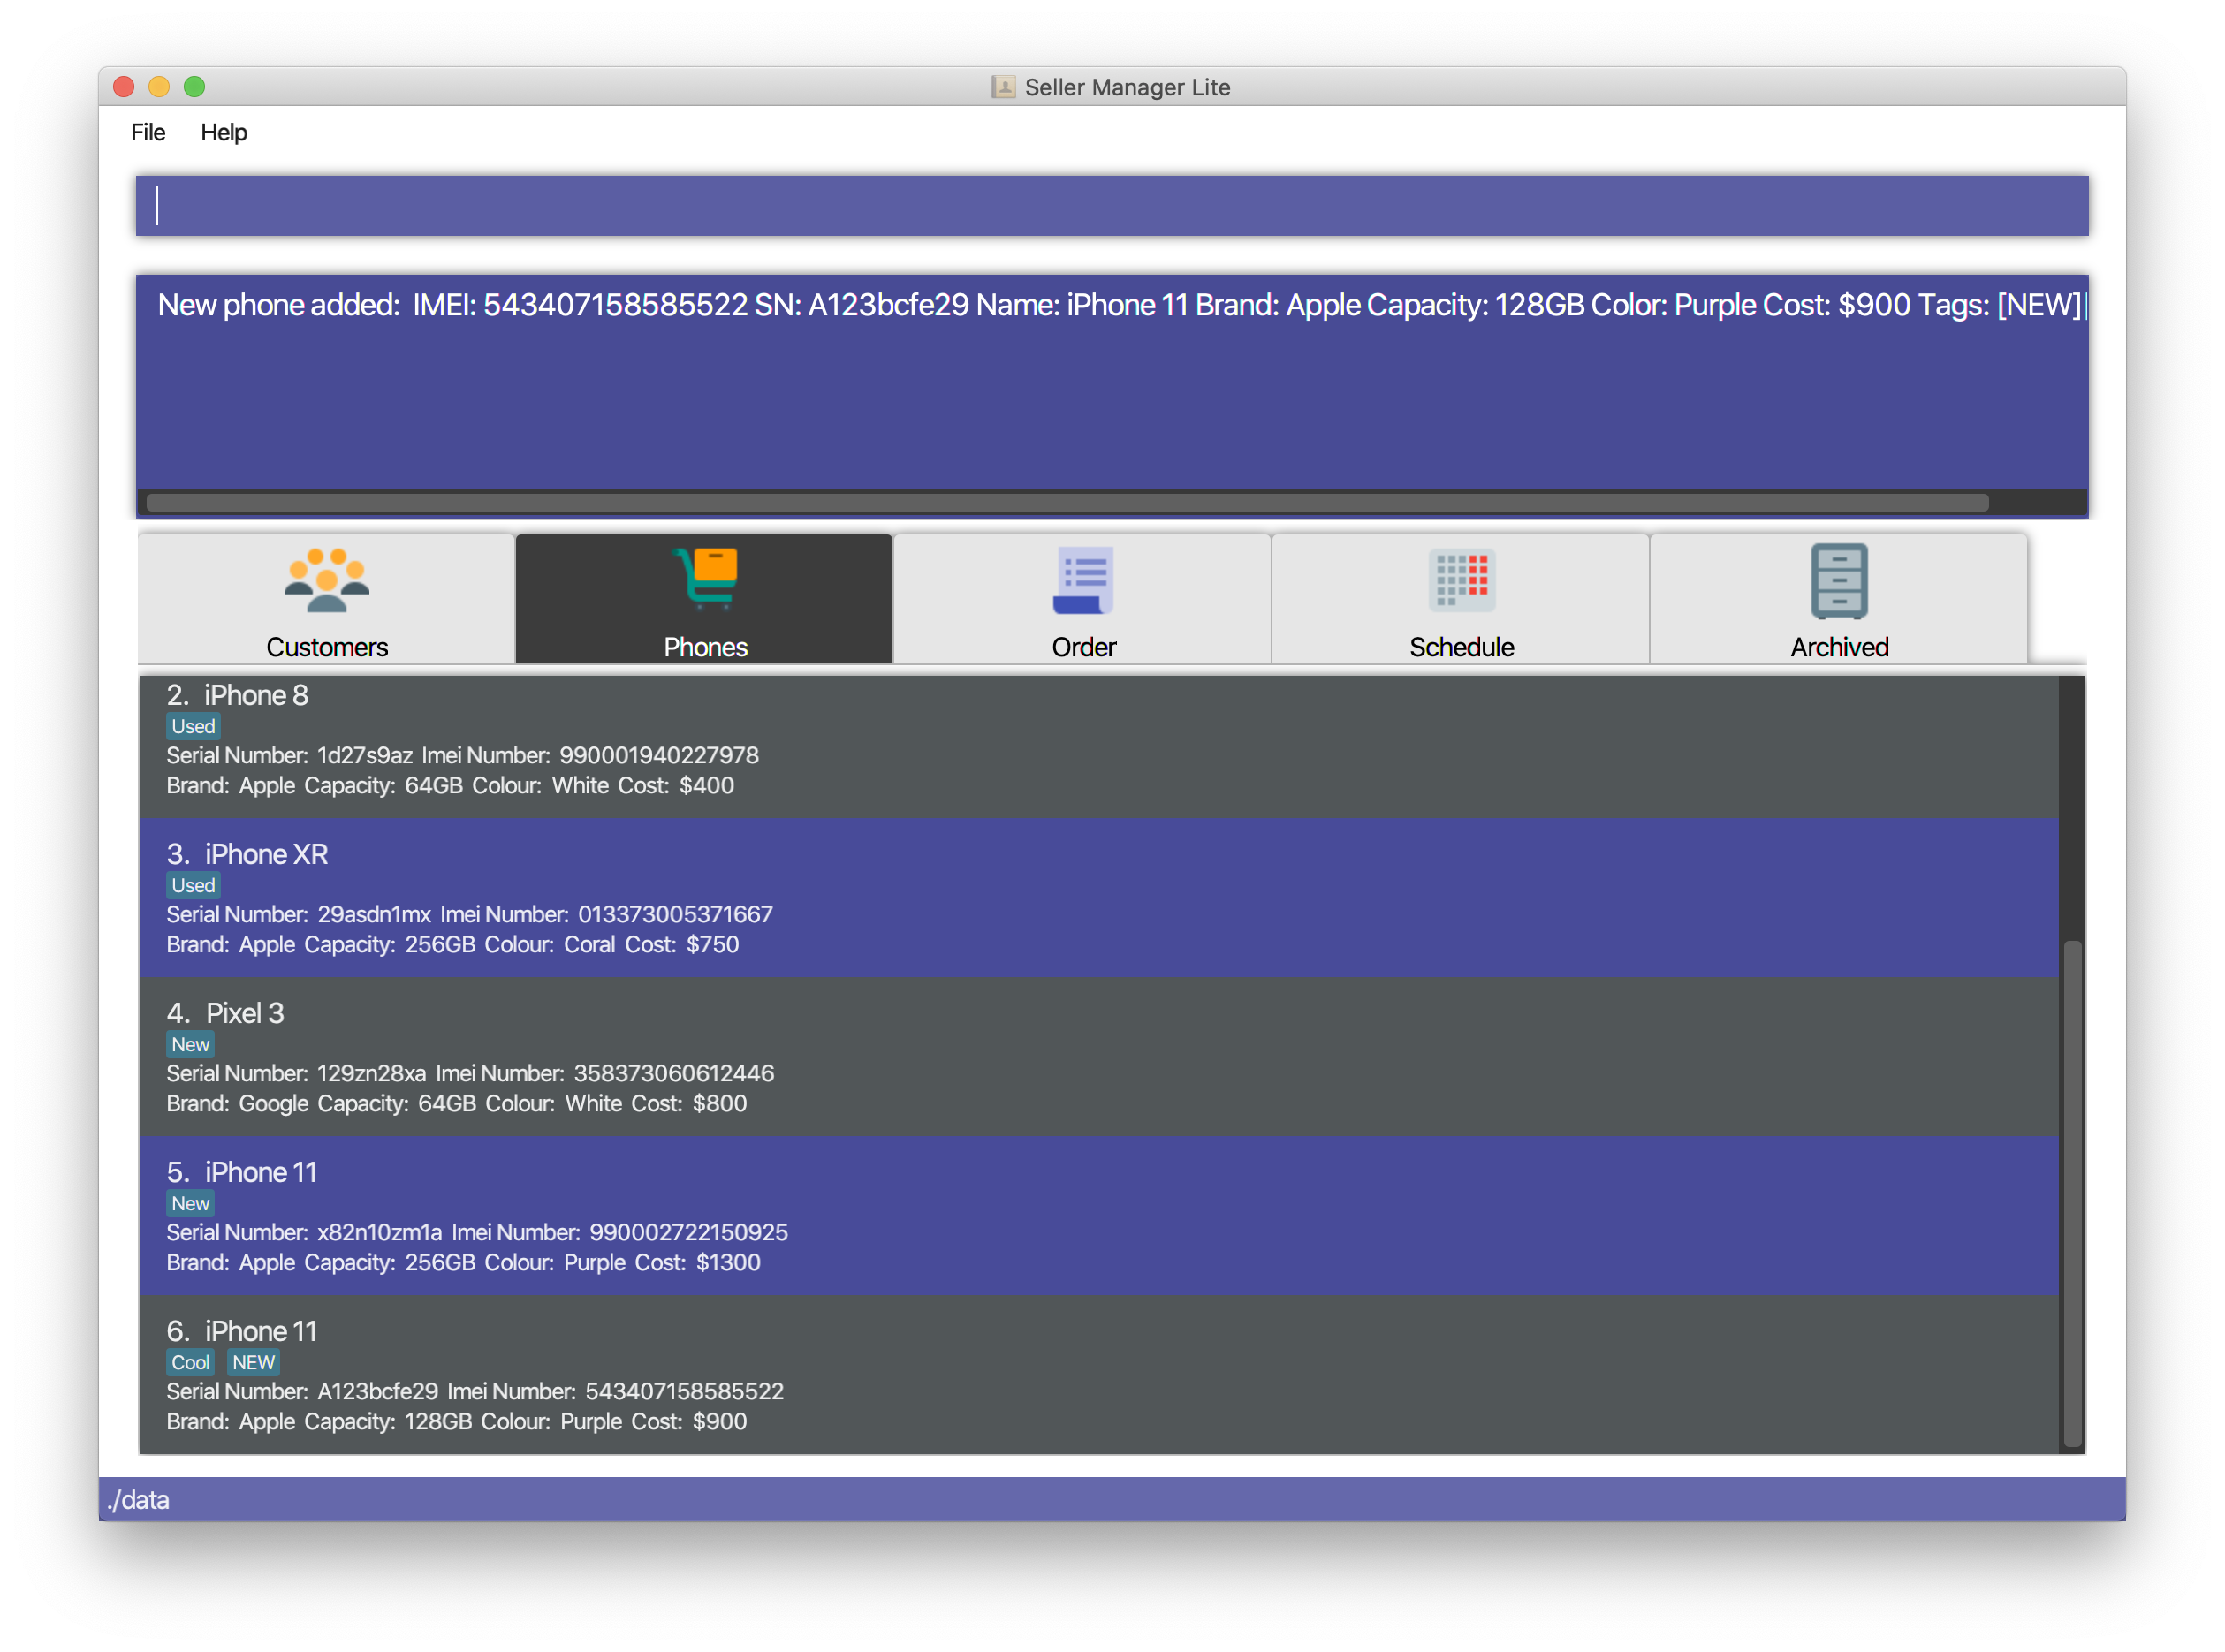
5.3.2. Add a phone: add-p
Adds a phone. Similar to adding a customer.
Format: add-p i/IDENTITY_NUMBER s/SERIAL_NUMBER n/NAME b/BRAND cp/CAPACITY (in GB) cl/COLOUR $/COST [t/TAG]…
| Identity Number (IMEI) should be 15 digits long. |
| Capacity can be 8GB, 16GB, 32GB, 64GB, 128GB, 256GB, 512GB or 1024GB. You do not need to type GB after the prefix cp/. |
| Cost must start with $ and can only have a maximum of 2 decimal place. |
| The maximum cost allowed is $999999999.99. |
| A customer can have any number of tags, including 0. |
Examples:
-
Adds a single phone
-
add-p i/543407158585522 s/A123bcfe29 n/iPhone 11 b/Apple cp/128 cl/Purple $/$900 t/NEW t/Cool
-
5.3.3. Delete a phone: delete-p
Deletes a phone in SML. Note that deleting a phone will also delete the orders and schedules associated with the phone.
Format: delete-p INDEX
Examples:
-
Delete the 2nd phone.
-
list-p -
delete-p 2
-
-
Delete the 1st phone after performing a find phone command.
-
find-p alice -
delete-p 1
-
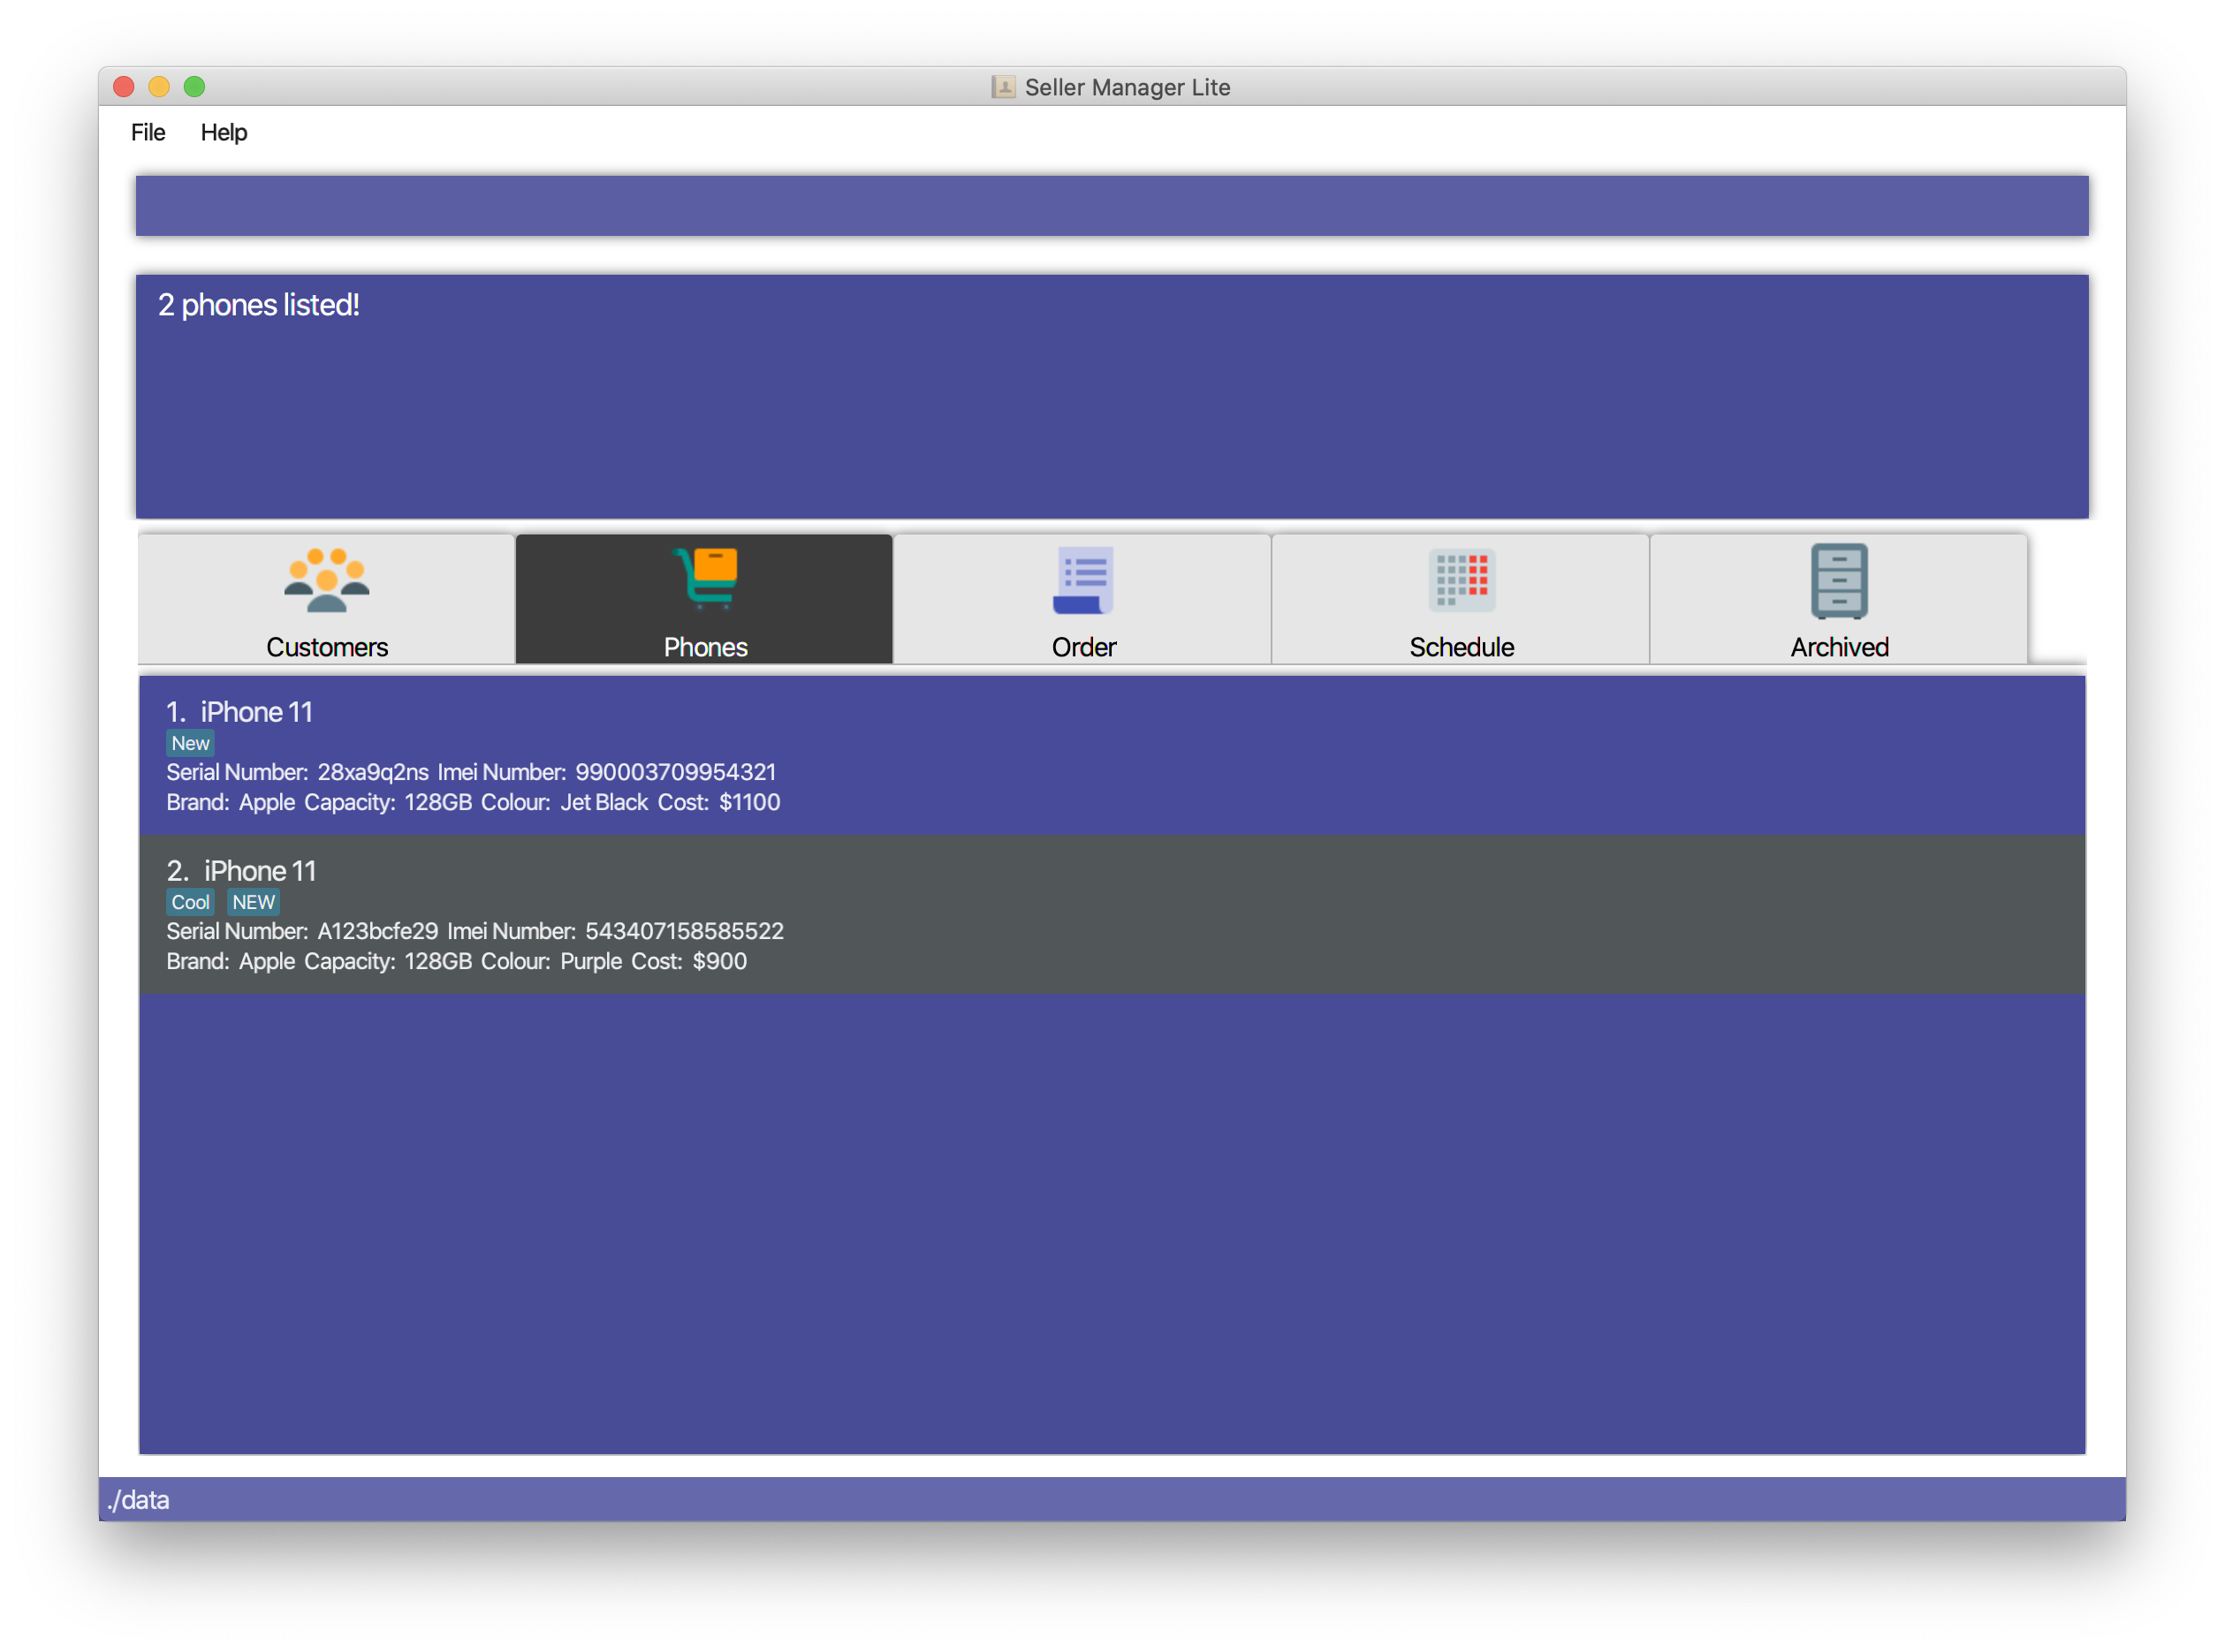
5.3.4. Find a phone: find-p
Finds phones whose fields contain any of the given keywords.
Format: find-p KEYWORD [MORE_KEYWORDS]…
Examples:
-
Find phones with keyword
apple-
find-p apple
-
-
Find phones with keywords
128iphone-
find-p 128 iphone
-
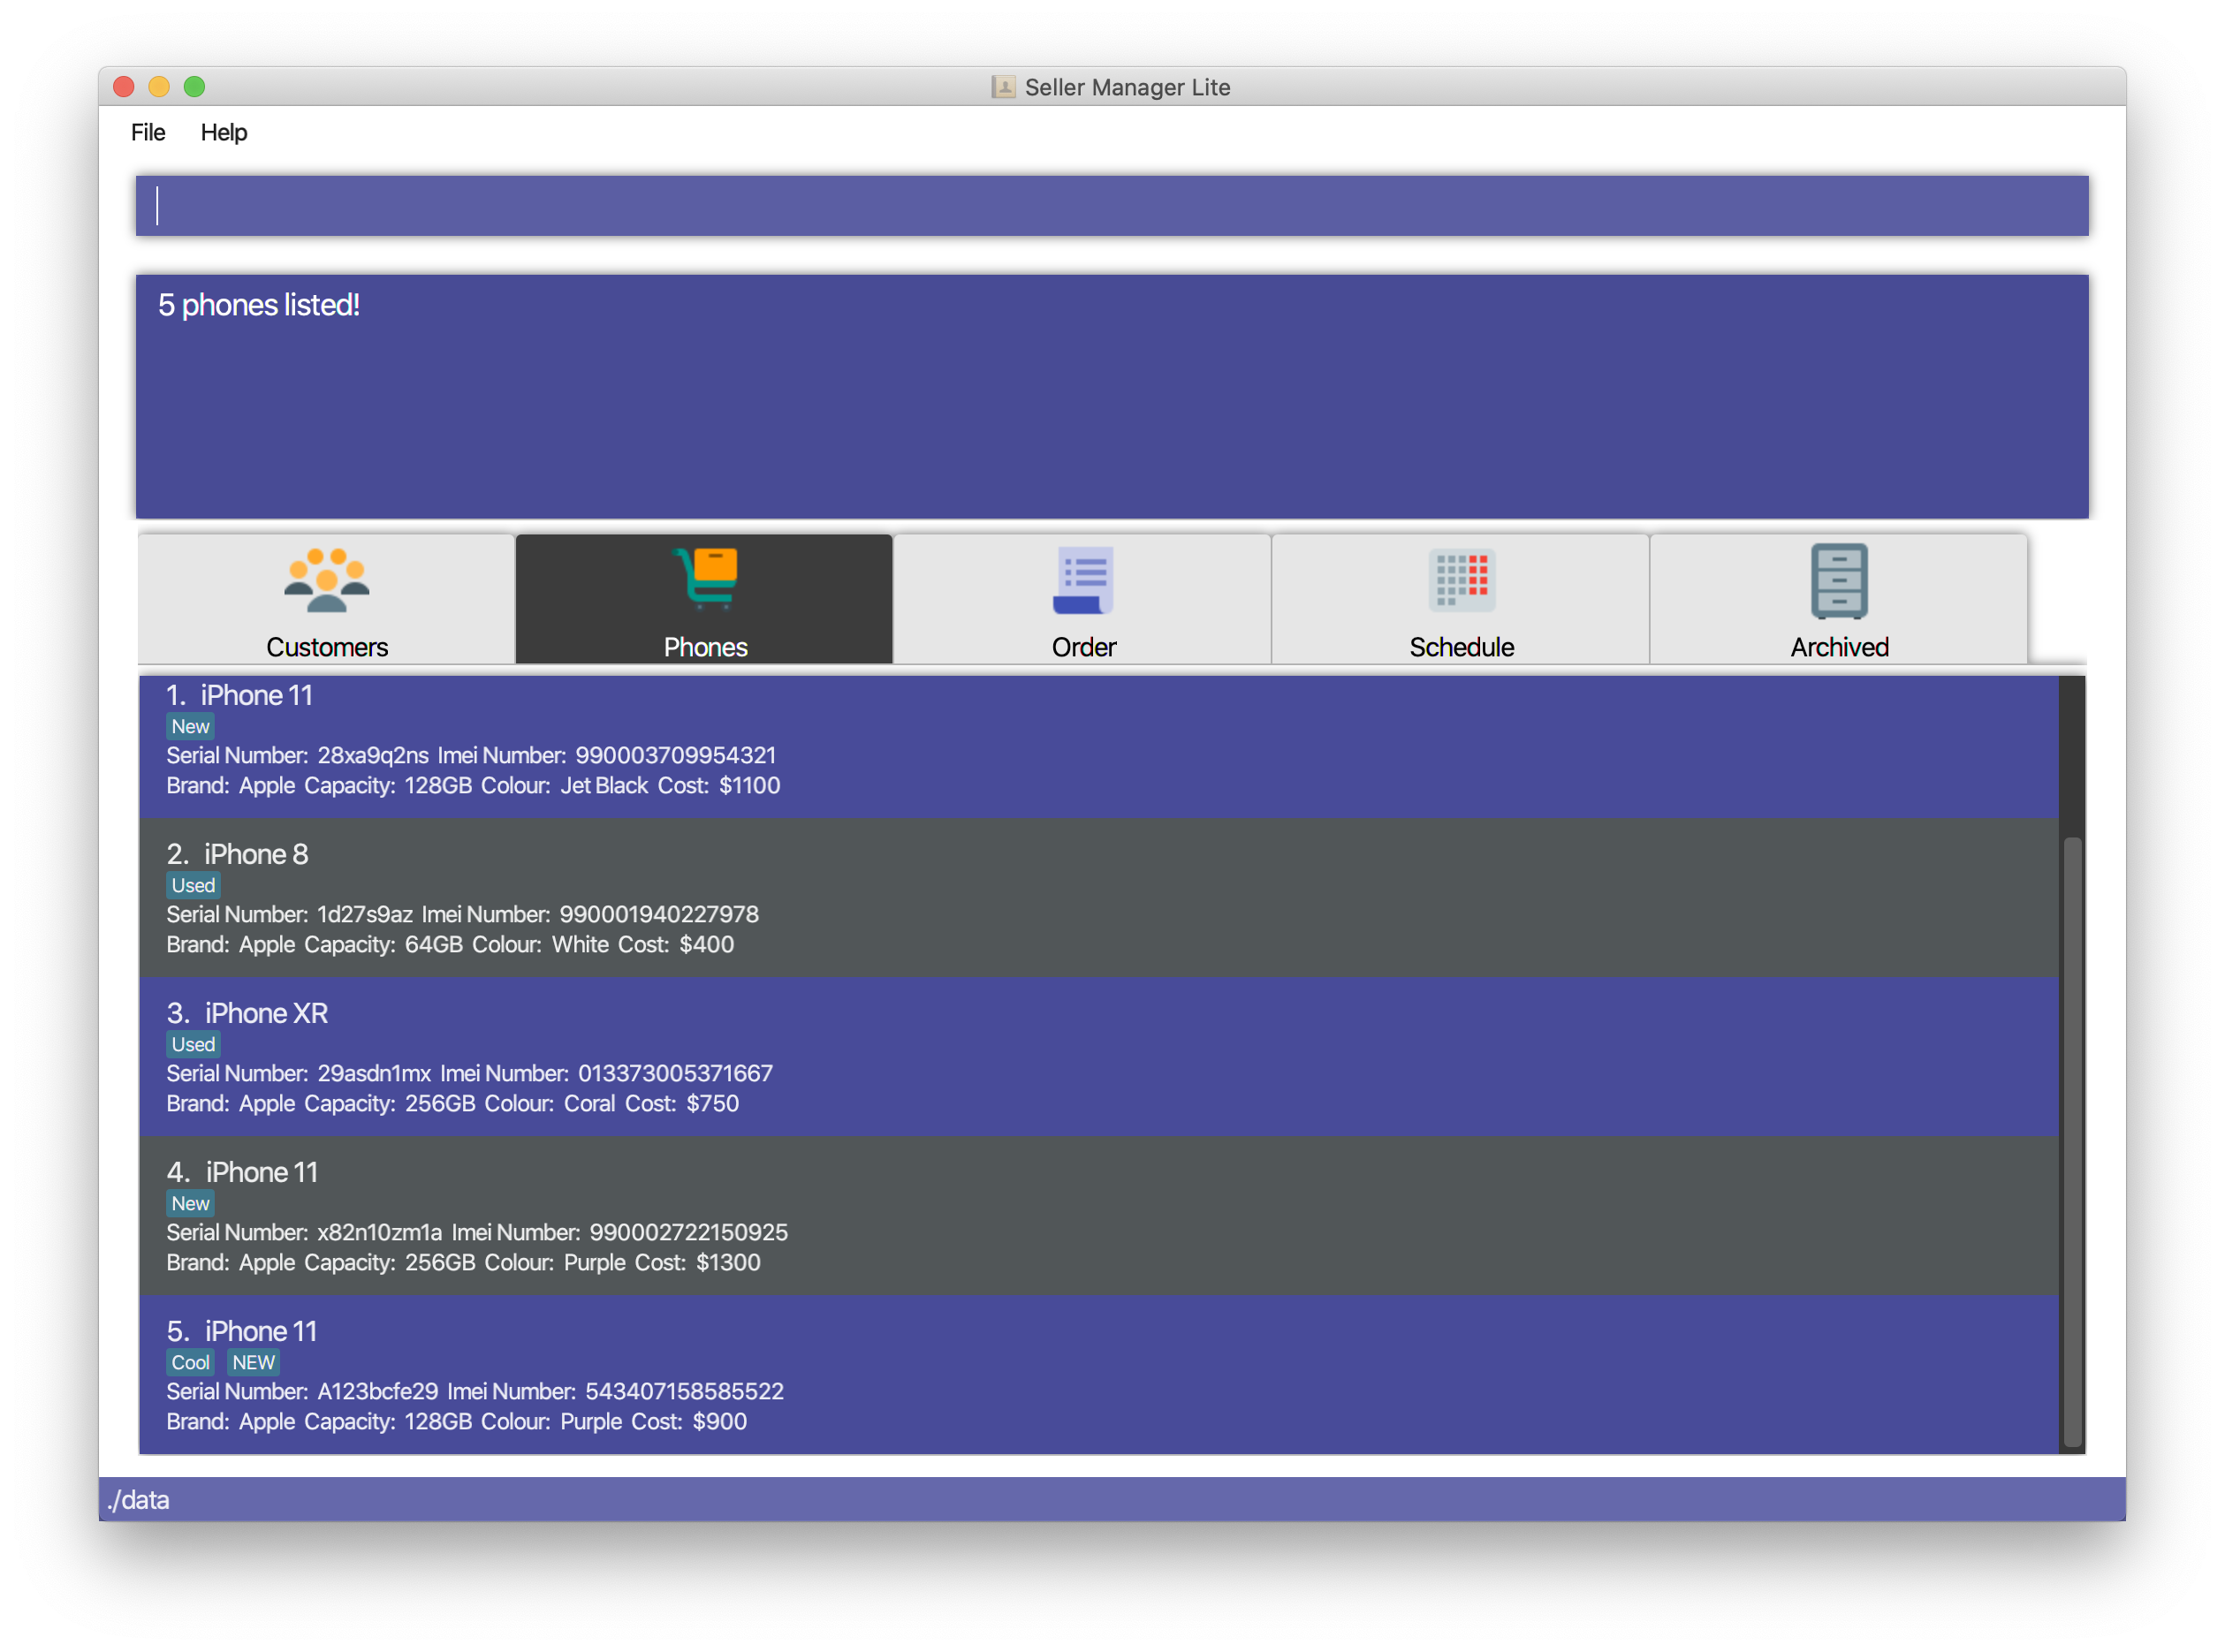
5.3.5. List the phones: list-p
List every phone in SML. Acts as a switch phone command as well.
Format: list-p
-
list-p
5.3.7. Edit a phone: edit-p
Edits the data fields of a phone. Note that orders in the order tab panel associated with the phone will also be edited.
Format: edit-p INDEX [i/IDENTITY_NUMBER] [s/SERIAL_NUMBER] [n/NAME] [b/BRAND] [cp/CAPACITY] [cl/COLOUR] [$/COST] [t/TAG]…
Examples:
-
Edit the phone name and colour of the 1st phone.
-
edit-c 1 n/iPhone 11 cl/Green
-
-
Clear all existing tags from the 2nd phone.
-
edit-c 2 t/
-
5.3.8. Copy phone: copy-p
Copies a phone in SML to clipboard.
Format: copy-p INDEX
Examples:
Examples:
-
Copy the 1st phone.
-
copy-p 1
-
-
Copy the 1st phone after performing find.
-
find-p apple -
copy-p 1
-
5.3.9. Add photo to phone: addphoto PHONE_INDEX fc/ [coming in v2.0]
Adds a photo to a phone in the database using the system’s user interface dialogue.
5.4. Order Commands
Commands that work on orders that you have.
5.4.1. Switch to Order Tab Panel: switch-o
Switches to Order Tab Panel.
Format: switch-o
5.4.2. Add an order: add-o
Adds an order to the list of orders.
Format: add-o c/CUSTOMER_INDEX p/PHONE_INDEX $/PRICE [t/TAG]…
5.4.3. Find an order: find-o
Finds orders whose fields contain any of the given keywords.
Format: find-o KEYWORD [MORE_KEYWORDS]…
Examples:
-
Find orders with keyword
iphone-
find-o iphone
-
5.4.4. Complete an order: complete
Completes the order, order status changed to COMPLETED.
COMPLETED orders will be shifted into the archived order tab panel.
Only SCHEDULED orders can be completed.
Phone associated with the order will also be deleted.
Format: complete INDEX
5.4.5. Cancel an order: cancel
Cancels the order at the specified index.
CANCELLED orders will be shifted into the archived order tab panel.
Format: cancel INDEX
5.4.8. Edit an order: edit-o
Edits the data fields of order.
Format: edit-o INDEX [c/CUSTOMER_INDEX] [p/PHONE_INDEX] [$/PRICE] [t/TAG]…
Examples:
-
Edit the price of the 1st order.
-
edit-o 1 $/$1000
-
-
Clear all existing tags from the 2nd order.
-
edit-o 2 t/
-
5.4.9. Copy order field: copy-o
Copies an order to clipboard.
Format: copy-o INDEX
Examples:
Examples:
-
Copy the 1st order
-
copy-o 1
-
5.4.10. Print orders: print-o [coming in v2.0]
Prints the order lists with formatting that is appropriate for stock-take or order tracking.
The order list is converted into PDF format before being printed.
Format: print-o
5.5. Schedule Commands
Commands that work on schedules you have.
5.5.1. Switch to Schedule Tab Panel: switch-s
Switches to Schedule Tab Panel.
Format: switch-s
5.5.2. Go to a specific date in the calendar: schedule
Shows the week of the date specified by the user.
Format: schedule cd/DATE
| Date should be in the format YYYY.MM.DD with valid year, month and date. Only dates from the year 1970 onwards are valid. |
| Month and date can be single digits where applicable. |
5.5.3. Add a schedule: add-s
Adds a schedule.
If there are conflicts with the existing schedules, use the -allow flag to allow clashing schedules.
Format: add-s ORDER_INDEX cd/DATE ct/TIME v/VENUE [t/TAG]… [-allow]
Example:
-
add-s 3 cd/2018.7.25 ct/18.00 v/Starbucks t/freebie -allow

| Order index should be a positive integer and must exist in the order list. |
| Date should be in the format YYYY.MM.DD with valid year, month and date. Only dates from year 1970 onwards are valid. Month and date can be single digits if applicable. |
| Time should be in the 24-hour format HH.MM with valid hour and minute. Hour and minute can be single digits if applicable. |
| Schedule can have any number of tags, including 0. |
5.5.4. Delete a schedule: delete-s
Deletes a schedule.
Format: delete-s ORDER_INDEX
Example:
-
Delete the schedule of the 2nd order.
-
list-o -
delete-s 2
-
5.5.5. Edit a schedule: edit-s
Edits an existing schedule.
If the edited schedule has conflicts with the existing schedules, use the -allow flag to allow clashing schedules.
Note: You can add multiple schedules at the same time slot but it will affect the visibility of the order index and schedule venue on the calendar.
Format: edit-s ORDER_INDEX [cd/DATE] [ct/TIME] [v/VENUE] [t/TAG]… [-allow]
Examples:
-
Edit the date of the schedule of the 1st order and allow it to clash with the existing schedules.
edit-s 1 cd/2019.12.12 -allow
5.5.7. Customise schedule duration [coming in v2.0]
There will be an additional attribute in the schedule which takes in the duration of the event (in minutes).
5.6. Archived Orders Commands:
5.6.1. Switch to Archived Tab Panel: switch-a
Switches to Archived Order Tab Panel.
Format: switch-a
5.6.3. Find Archived Order: find-a [coming in v2.0]
Finds archived orders whose fields contain any of the given keywords.
Format: find-a KEYWORD [MORE_KEYWORDS]…
5.6.4. List Archived Order: list-a [coming in v2.0]
List every archived order in SML. Acts as a switch archived order command as well.
Format: list-a
-
list-a
5.6.5. Delete Archived Order: delete-a [coming in v2.0]
Deletes an archived order in SML.
Format: delete-c INDEX
5.6.6. Copy Archived Order: copy-a [coming in v2.0]
Copies an archived order field to the clipboard.
Format: copy-a INDEX
5.7. General Commands
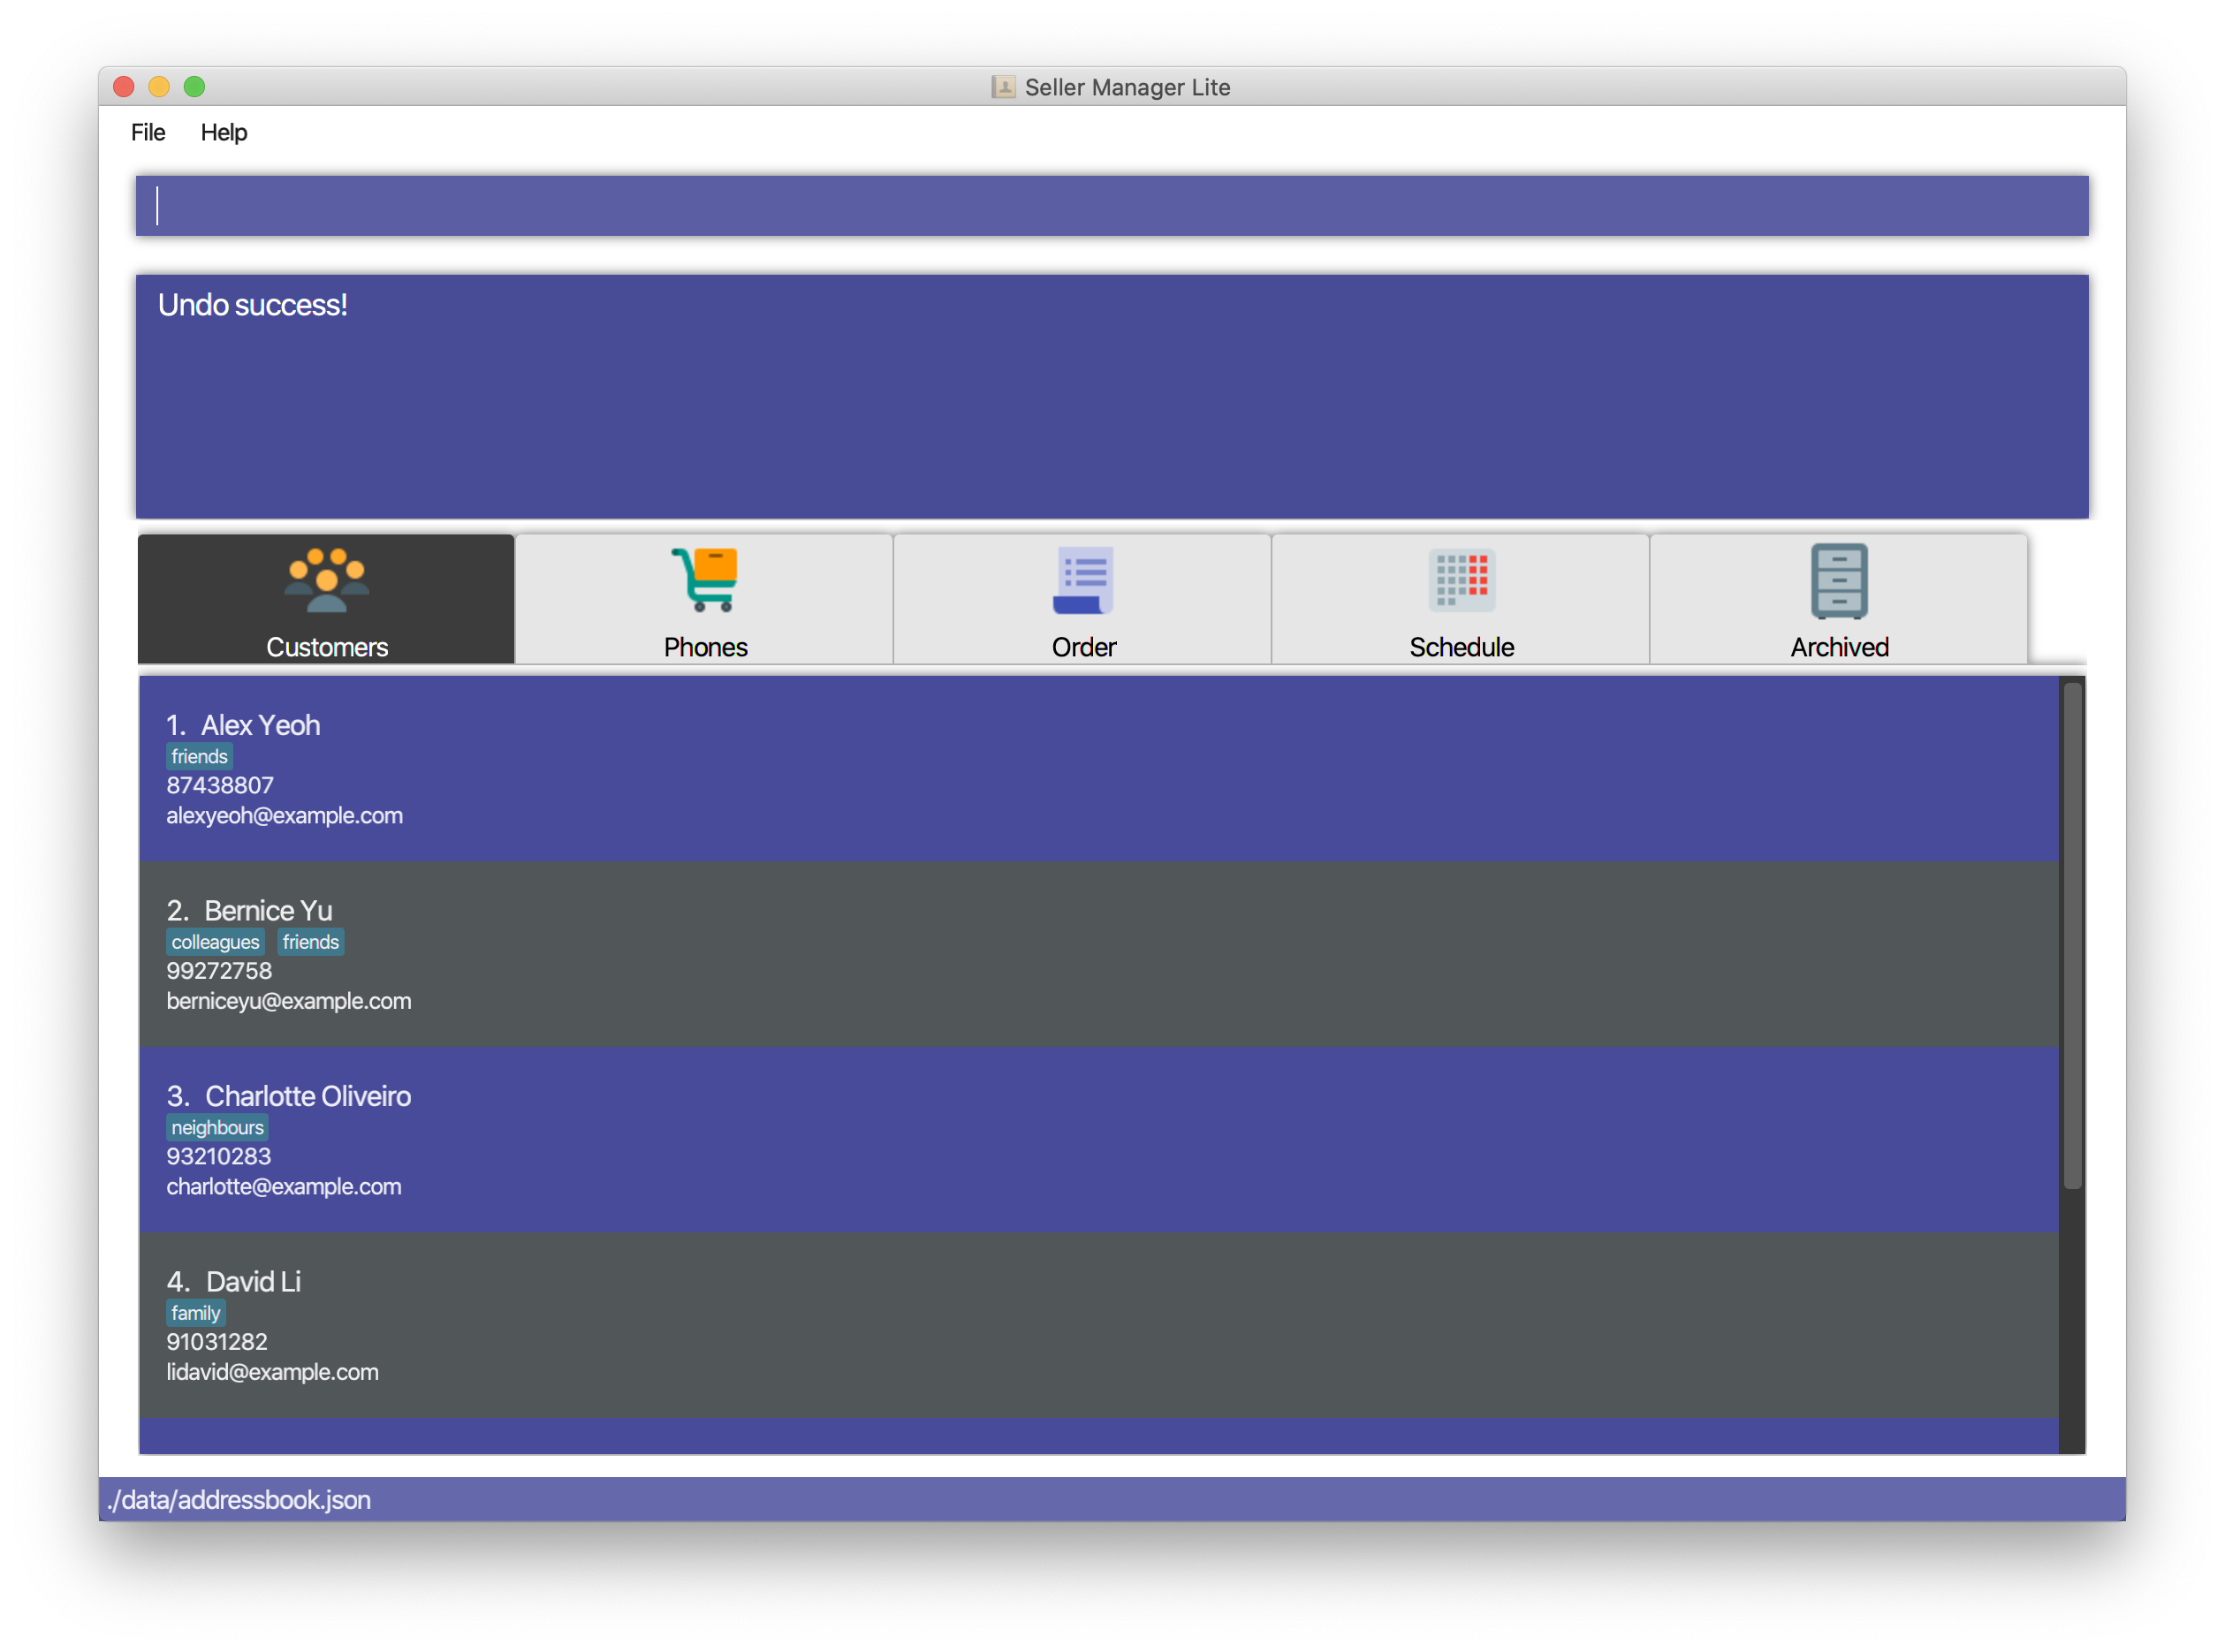
5.7.1. Undo: undo
Undo the previous command.
Currently, the following commands are undoable and redoable.
-
Add Customer
-
Edit Customer
-
Delete Customer
-
Clear Customer
-
Add Order
-
Edit Order
-
Complete Order
-
Cancel Order
-
Clear Order
-
Add Phone
-
Edit Phone
-
Delete Phone
-
Clear Phone
-
Add Schedule
-
Edit Schedule
-
Delete Schedule
-
Clear Schedule
Format: undo
Examples:
-
Undo clear Customer Book
-
clear-c -
undo
-
5.7.2. Redo: redo
Redo the previous undone command. The inverse of undoing.
When you redo a delete command, it will specifically delete the customer/phone/order that was previously deleted. When you redo an add command, it will specifically add the customer/phone/order that was previously added.
Currently, the following commands are undoable and redoable.
-
Add Customer
-
Edit Customer
-
Delete Customer
-
Clear Customer
-
Add Order
-
Edit Order
-
Complete Order
-
Cancel Order
-
Clear Order
-
Add Phone
-
Edit Phone
-
Delete Phone
-
Clear Phone
-
Add Schedule
-
Edit Schedule
-
Delete Schedule
-
Clear Schedule
Format: redo
Examples:
-
Redo clear Customer Book
-
clear-c -
undo -
redo
-
History: history
Views the command history of all your previous commands, starting from the latest to the earliest.
Format: history
Example:
5.7.3. Exiting the program: exit
Exits the program.
Format: exit
If there are any statistics window open when executing this, the application will not terminate until those windows are closed too.
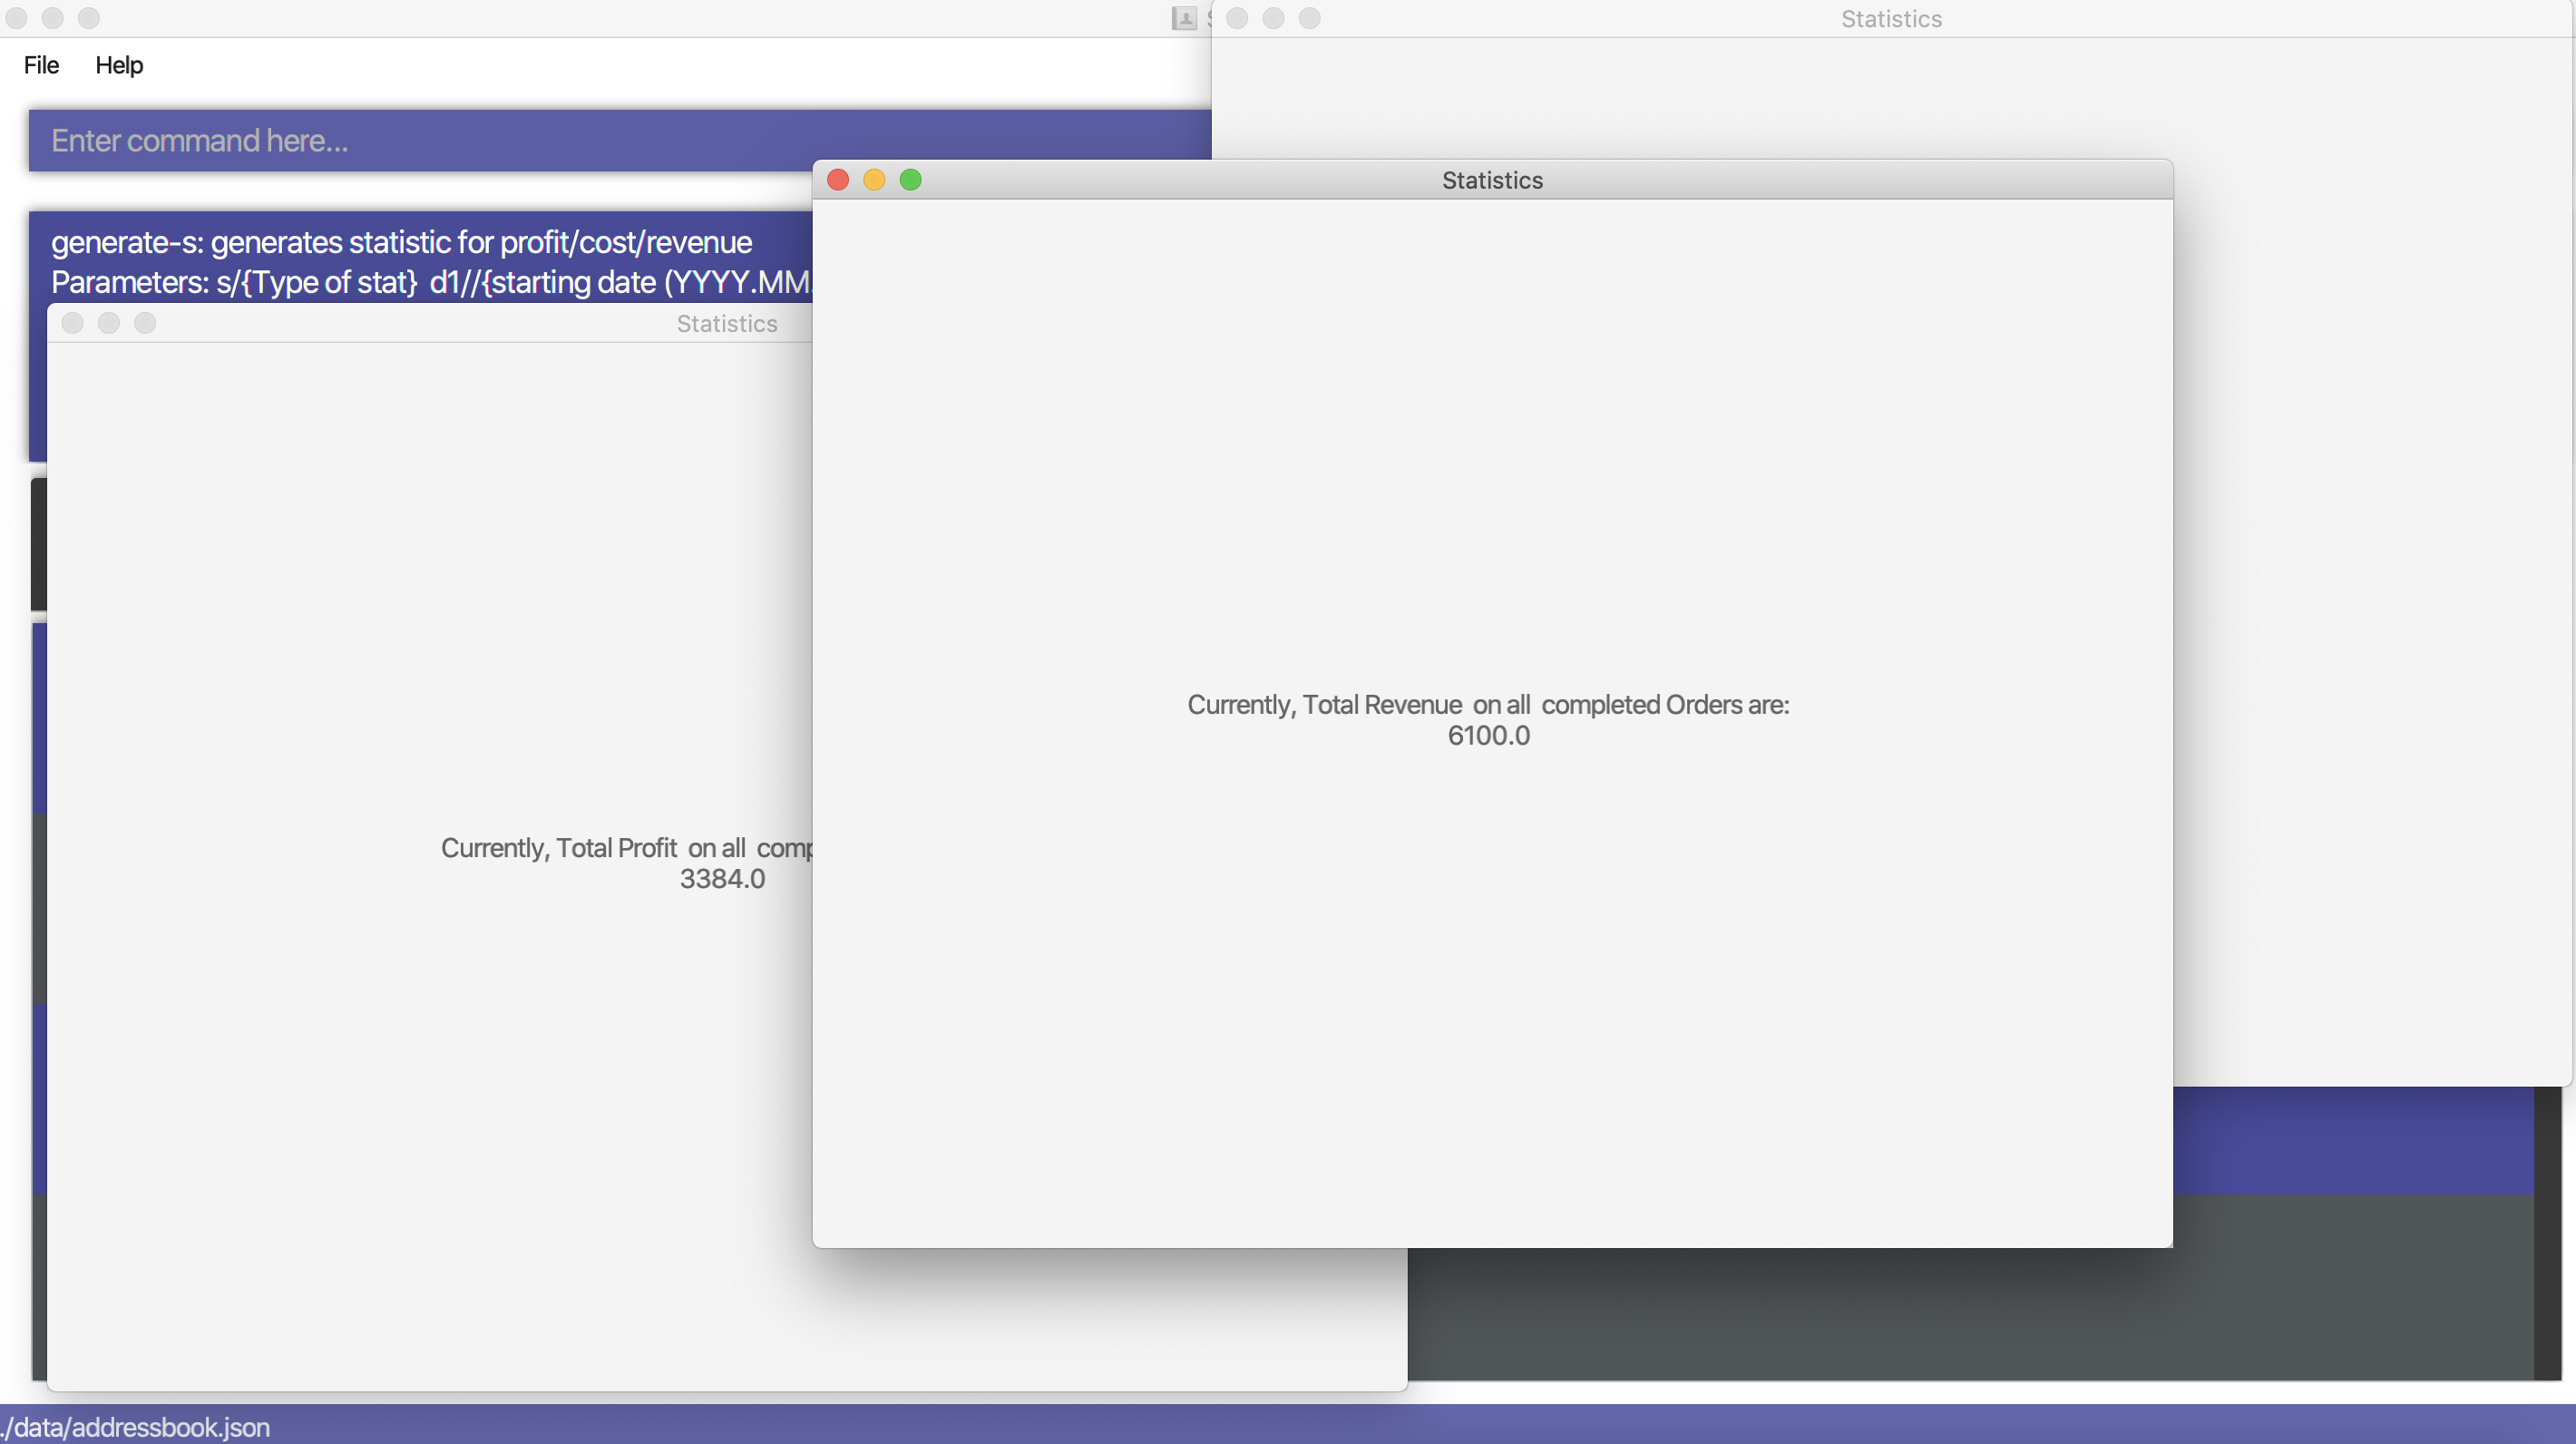
5.8. Generate stats: generate-s
v1.4 only allows statistics on orders marked as Completed and has a Schedule.
This function calculates the three type of statistics as shown below.
All statistics that are calculated are only on orders in the archived panel that has been completed and with a valid schedule.
Lacking any of this will cause its non-inclusion into the statistics calculation.
The value calculated is the sum over the total time period within a month, meaning that it will take the date period,
calculate the statistics for orders within that time period, split it by month and display it.
e.g Total revenue between 2019.11.12 and 2019.11.29 will calculate the order between these 2 dates, sum up the revenue
(as it falls within a single month) and
display this value.
-
Accepts two types of input:
-
Without date input - display total value for that particular statistics.
-
with date input - displays chart (Monthly value) and total value for that particular statistics.
-
Generates the statistics with no date input.
Used for calculating total profit, total revenue and total cost.
Format: generate-s s/stat
Type for stat includes: profit, revenue, cost
The argument must match these three words perfectly.
Shown below:
Generates the statistics with date input in chart format (in pop-up modal dialogue).
Format: generate-s s/stat d1/YYYY.MM.DD d2/YYYY.MM.DD
Example: generate-s s/revenue d1/2019.10.16 d2/2019.11.21
Format for the date is in YYYY.MM.DD e.g 2019.05.12
Shown below:
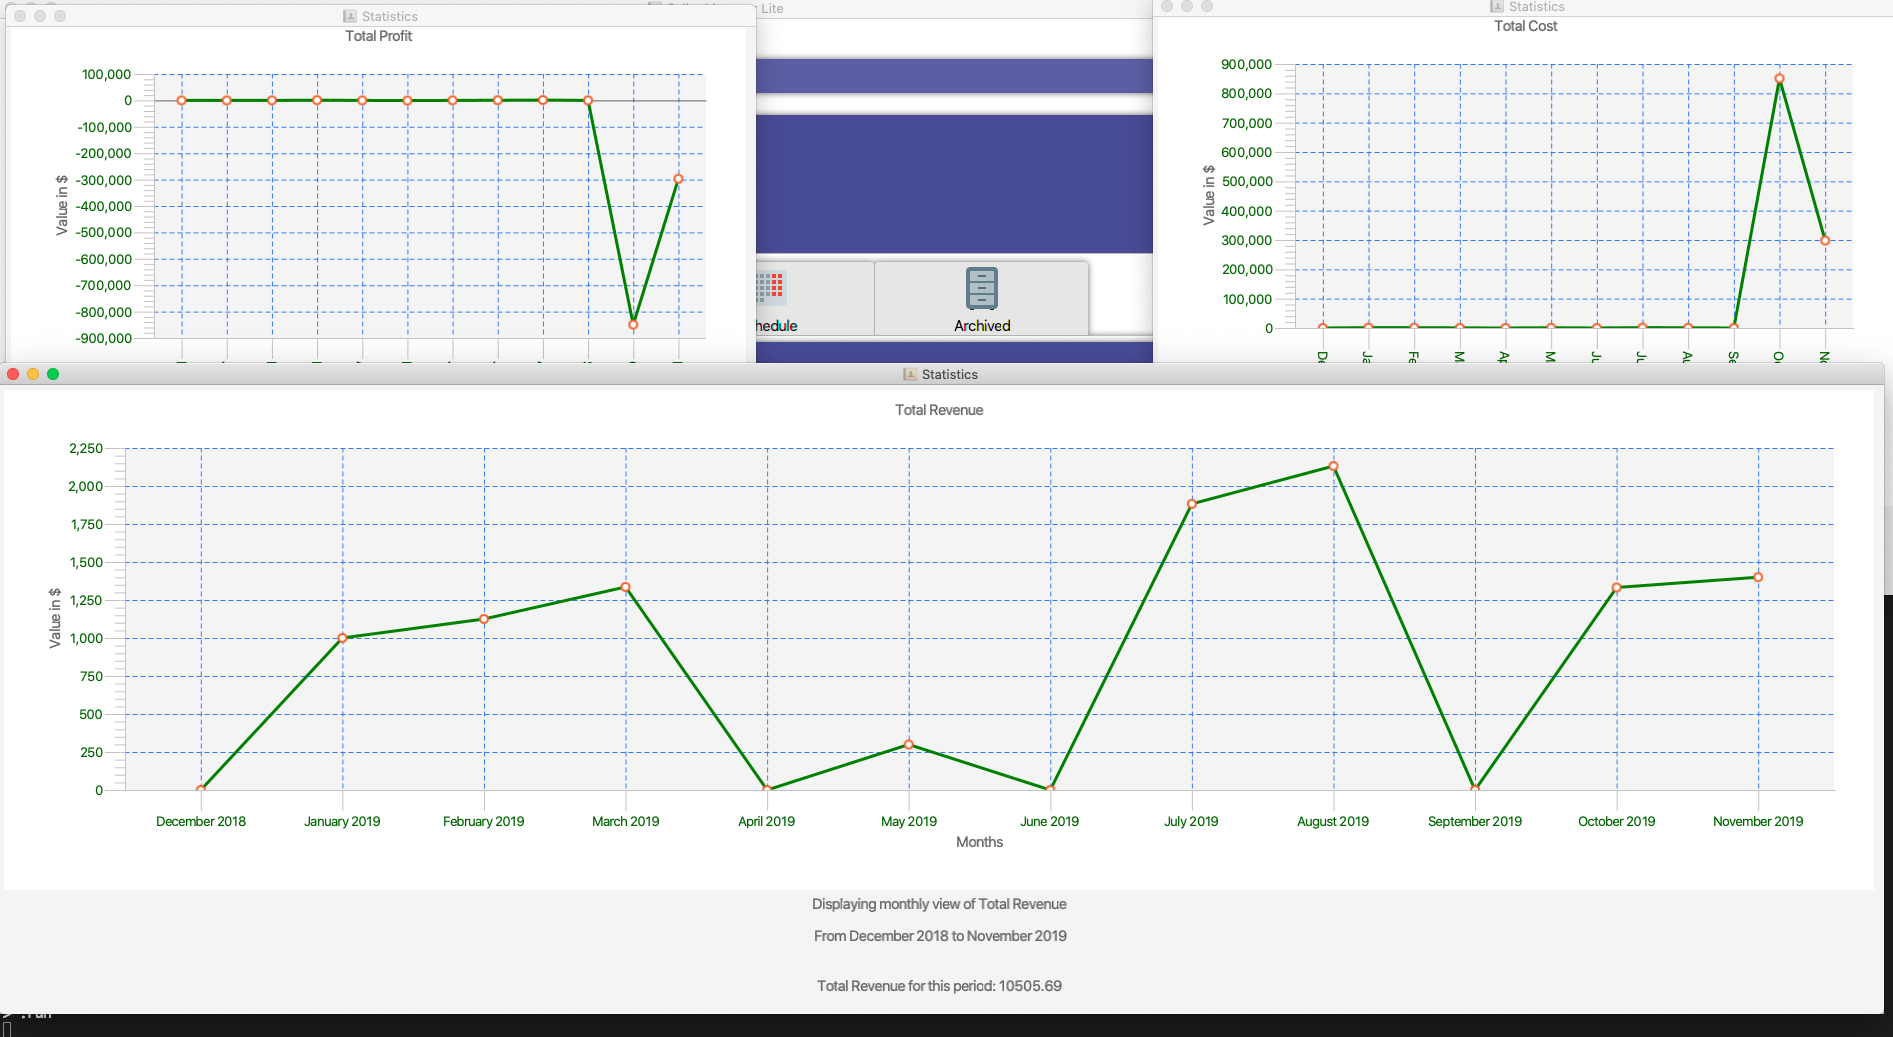
| Date should be in the format YYYY.MM.DD with valid year, month and date. Only dates from year 1970 onwards are valid. |
For dates in YYYY.MM.DD, the MM and DD argument can omit the leading 0 e.g 2019.1.1 is valid
as long as the date is valid
|
| Accuracy is guaranteed up to $0.01 only |
The statistic type argument must match profit, revenue, cost (no upper case)
|
Limitations:
-
Range of dates affecting chart display
-
The chart can accept a large range of dates, but take note that above a certain threshold the gap between the months will change, depending on how large of a range you are calculating. This behaviour is intentional and not a bug.
-
-
Date range starts from 1970 onwards
-
Date of year input starts from 1970 onwards. This is enough to fit our use case. Anything lower will be rejected.
-
-
Auto truncation of labels and values
-
the X-axis labels will adjust automatically based on the range of inputs. This is intended to give users the flexibility with regards to the range of dates to be inputted. Above a certain range the interval between x-axis data will decrease e.g 2 months. Above a certain values, labels will be replaced by standard notation e.g 9999999E8.
-
-
Stats window data not updating
-
If you already have a stats window open and you complete an order, you will have to re-enter the statistic command to update that value in another window.
-
-
Manually Close the Statistic window before typing
exiton the main app-
If you already have a stats window open before you enter the
exitcommand, the application will only stop running when the remaining statistic windows are closed manually.
-
-
Load time:
-
Do not be alarmed if the window does not pop up immediately upon click. For larger data sets we estimate at least a few seconds before the window will be loaded.
-
5.8.1. Average Statistics [coming in v2.0]
-
More advanced commands like
average profitetc.
5.8.2. Different Charts [coming in v2.0]
-
Instead of just being able to display via a line chart, users will be able to select the type of chart
5.8.3. Export Chart to PDF [coming in v2.0]
-
User will be able to export their charts to pdf with a click of a button.
5.9. Export data: export
Exports application data into csv file.
If csv file of the input file name exists, the application data will be exported to the existing file.
If csv file of the input file name does not exist, the application data will be exported into a new file.
-
Write the export command:
Export FILENAME
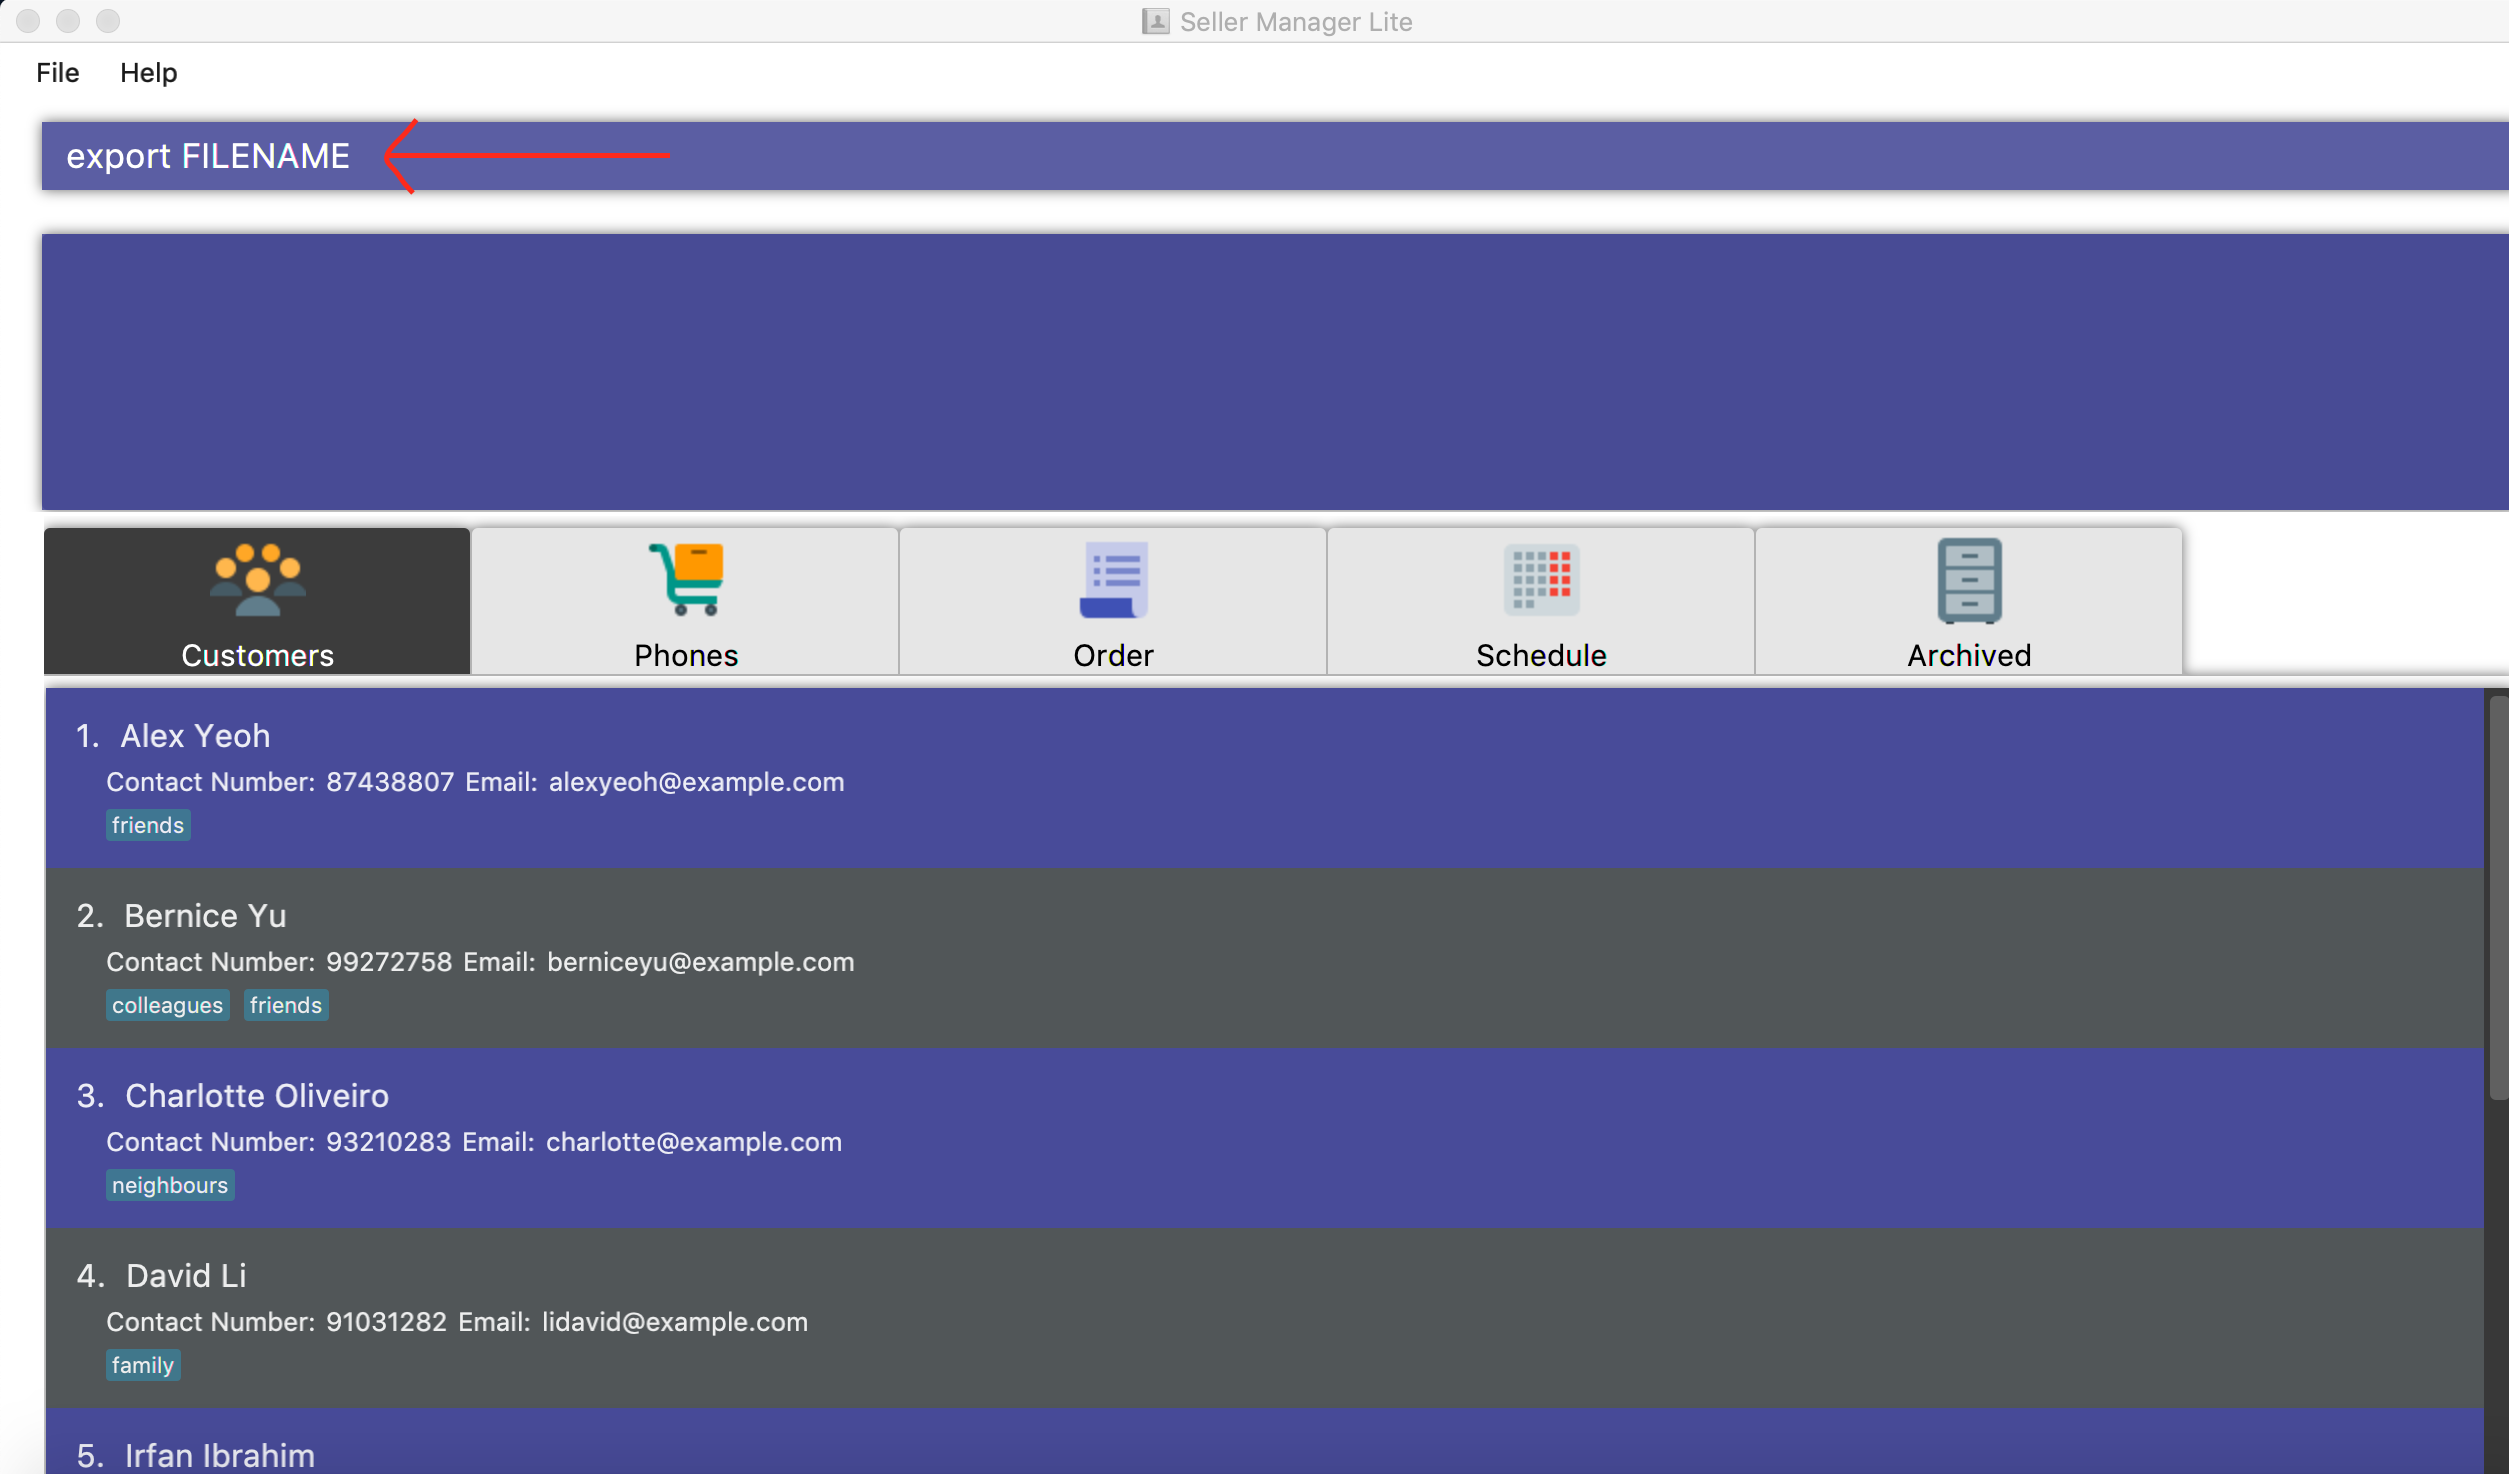
-
The CSV file of file name "FILENAME" will be created in the data folder.

Format: export FILE_NAME
5.10. Autocomplete
As you type into the command line, suggestions will appear.
A maximum of 8 suggestions will appear in a dropdown menu, sorted by their degree of similarity to the entered text.
| Suggestions in Cyan mean that the entire word is suggested. |
| Suggestions in Yellow mean that the word is partially matched. |
| The system may lag and not work if you are typing too fast. |
| The system is case-sensitive. |
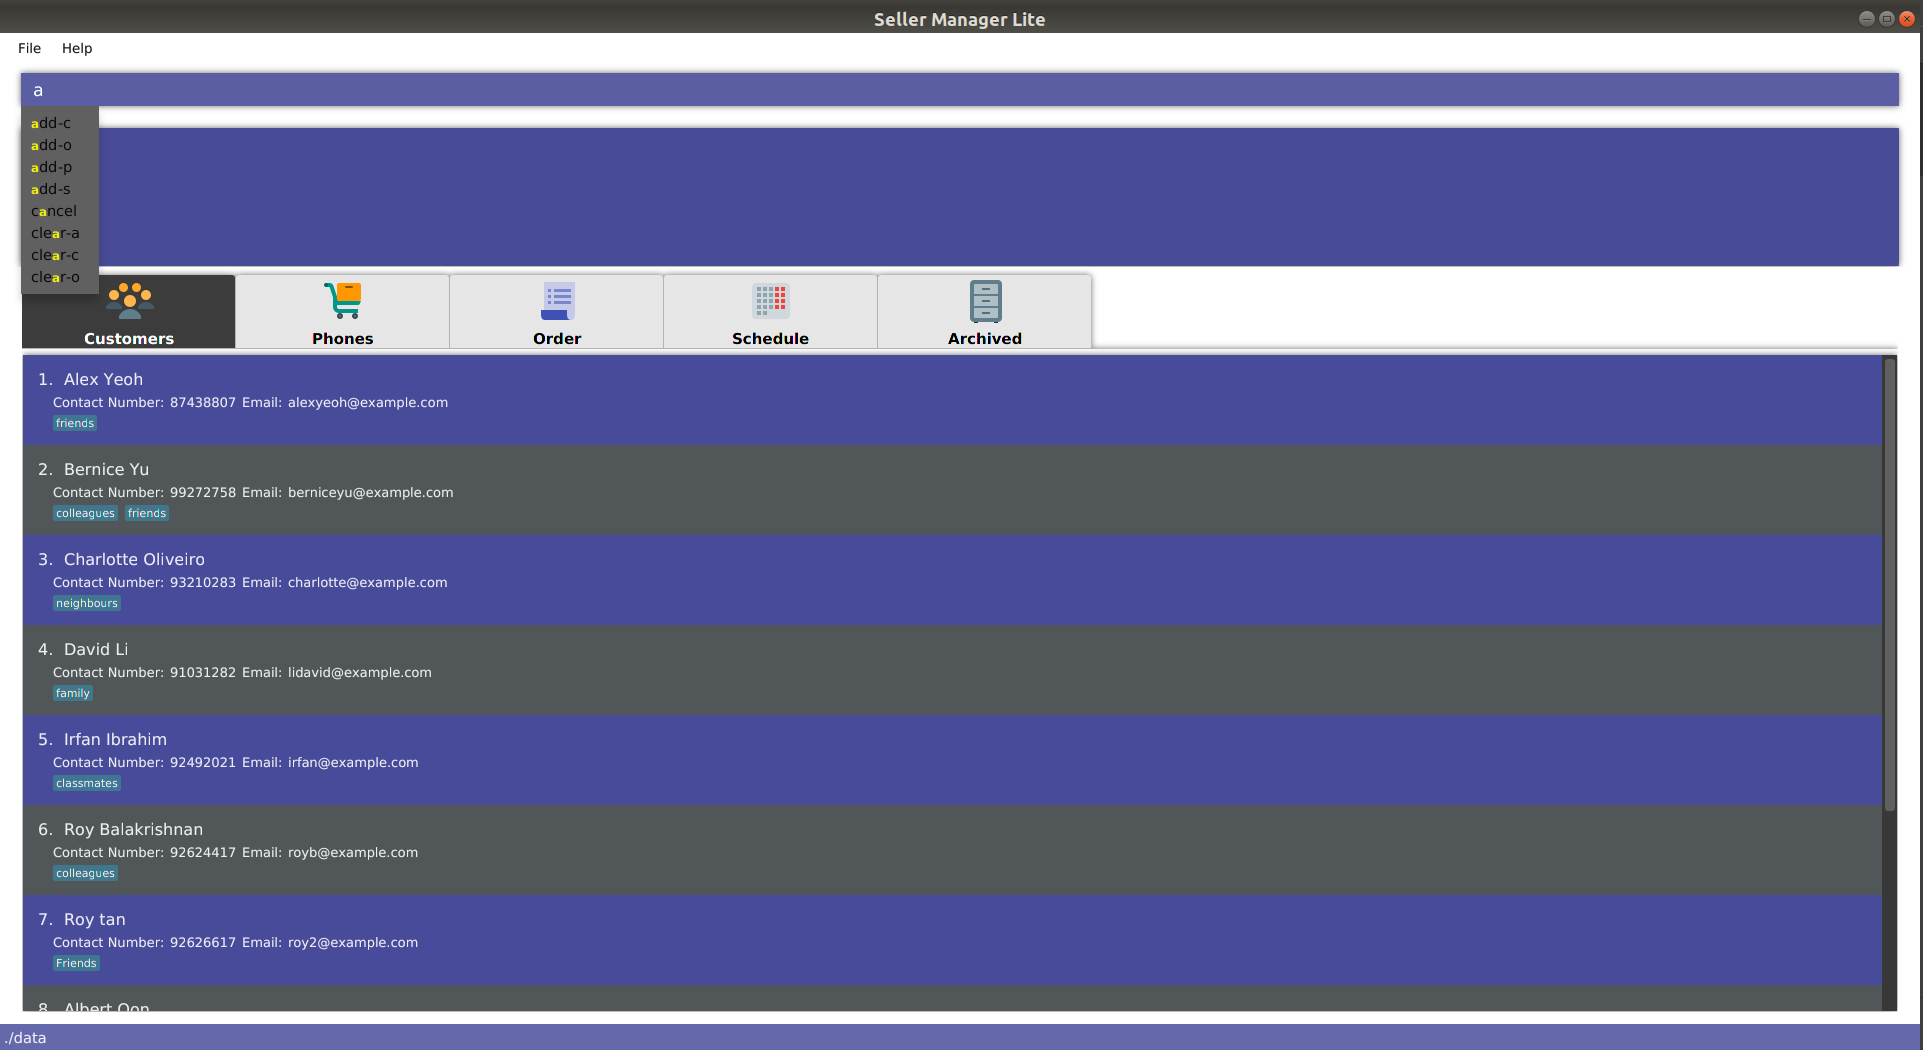
5.10.1. add

-
When you enter
add-cfollowed by a space, the system will suggest a list of prefixes you can enter, such asn/. -
When you enter
add-c n/, the system will suggest a list of names that belong to existing customers. This is helpful in checking if the data you are entering is duplicated. -
The list of data that is suggested depends on the prefix that is last entered. For instance, if the last entered prefix was
e/, it would instead suggest a list of existing emails.
5.10.2. delete
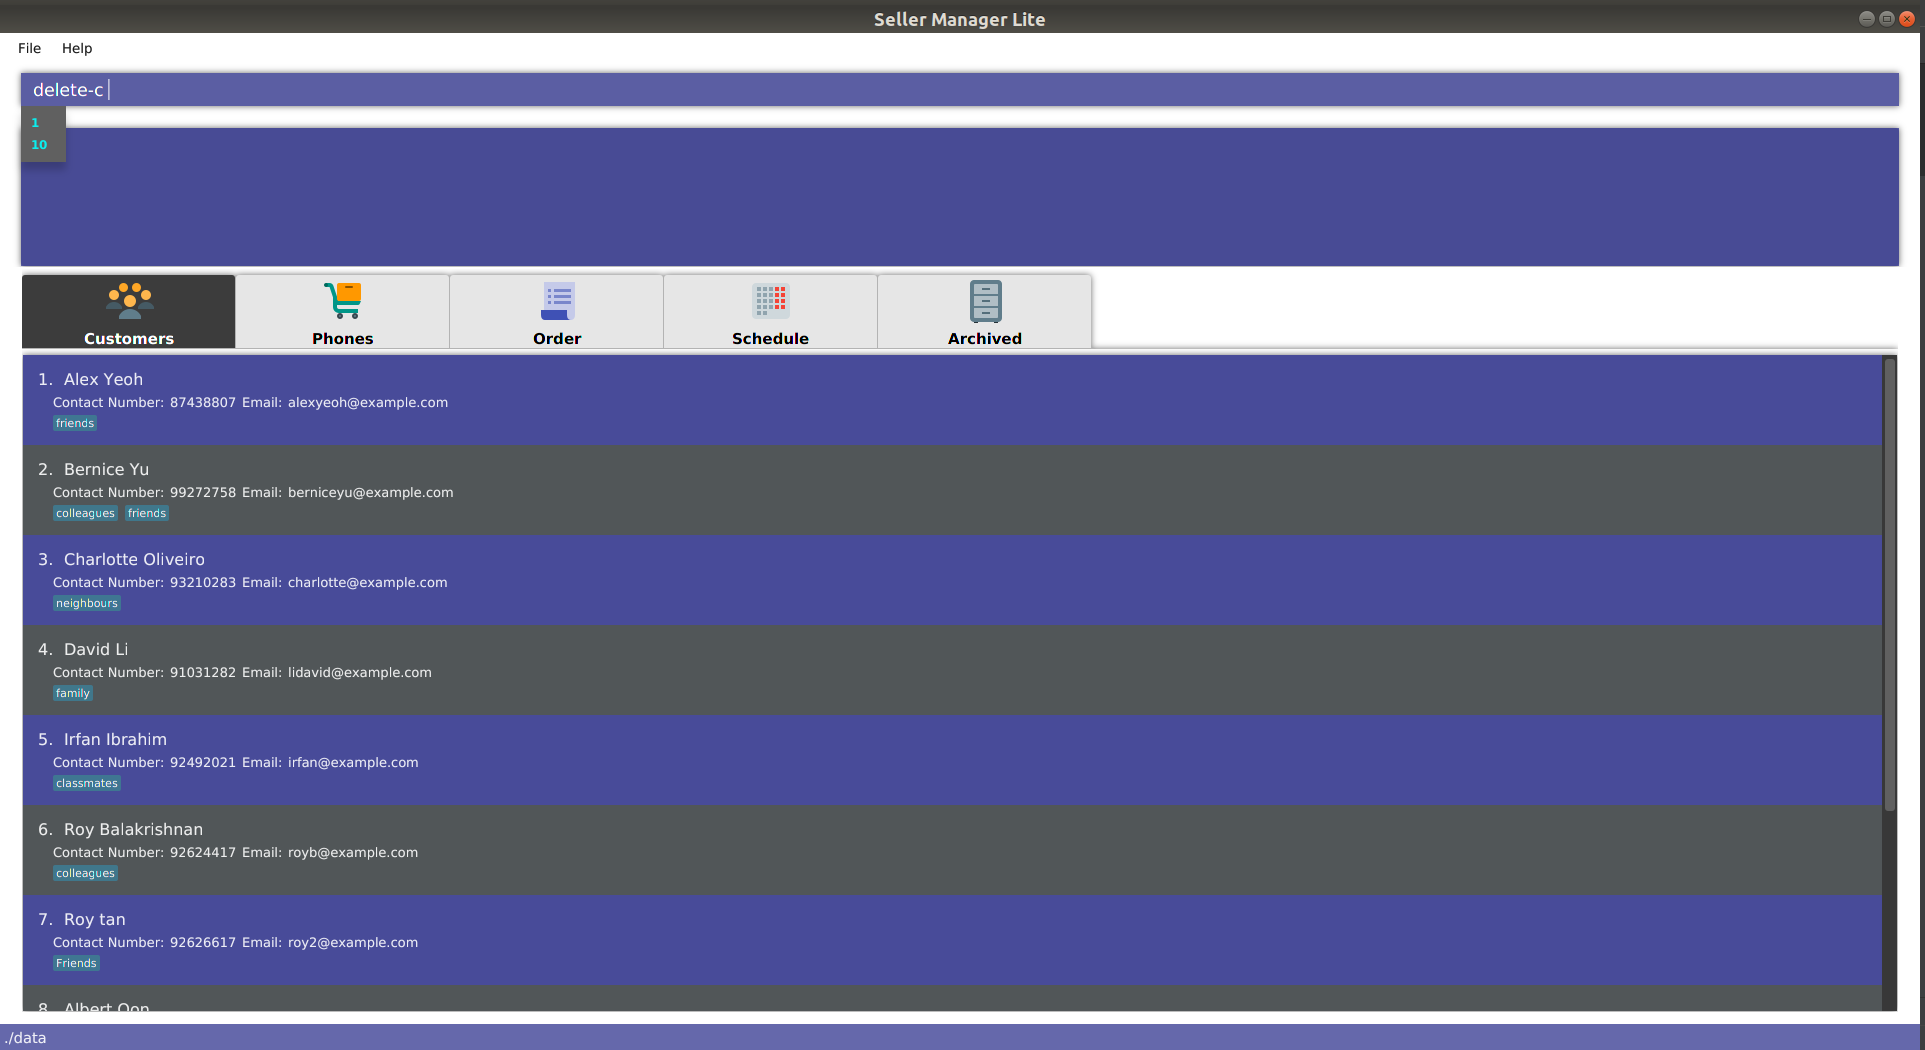
-
For commands such as
delete-cwhich take only a single index and no additional arguments, the system will suggest two numbers:1andN, whereNis the largest valid index that can be entered. In this case,Ncorresponds to the number of customers displayed on the customer panel.
5.10.3. edit
-
When you enter
edit-cfollowed by a space, the system will suggest two numbers:1andN, whereNis the largest valid index that can be entered. -
When you enter
edit-c 1followed by a space, the system will suggest a list of prefixes you can enter, such asn/,c/,e/. -
When you enter
edit-c 1 c/, the system will suggest a list of contact numbers that belong to existing customers. This is helpful in checking if the data you are editing to is duplicated. -
The list of suggestions depends on the prefix that is last entered. If the last entered prefix was
i/, it would instead suggest a list of existing identity numbers.
5.10.4. find
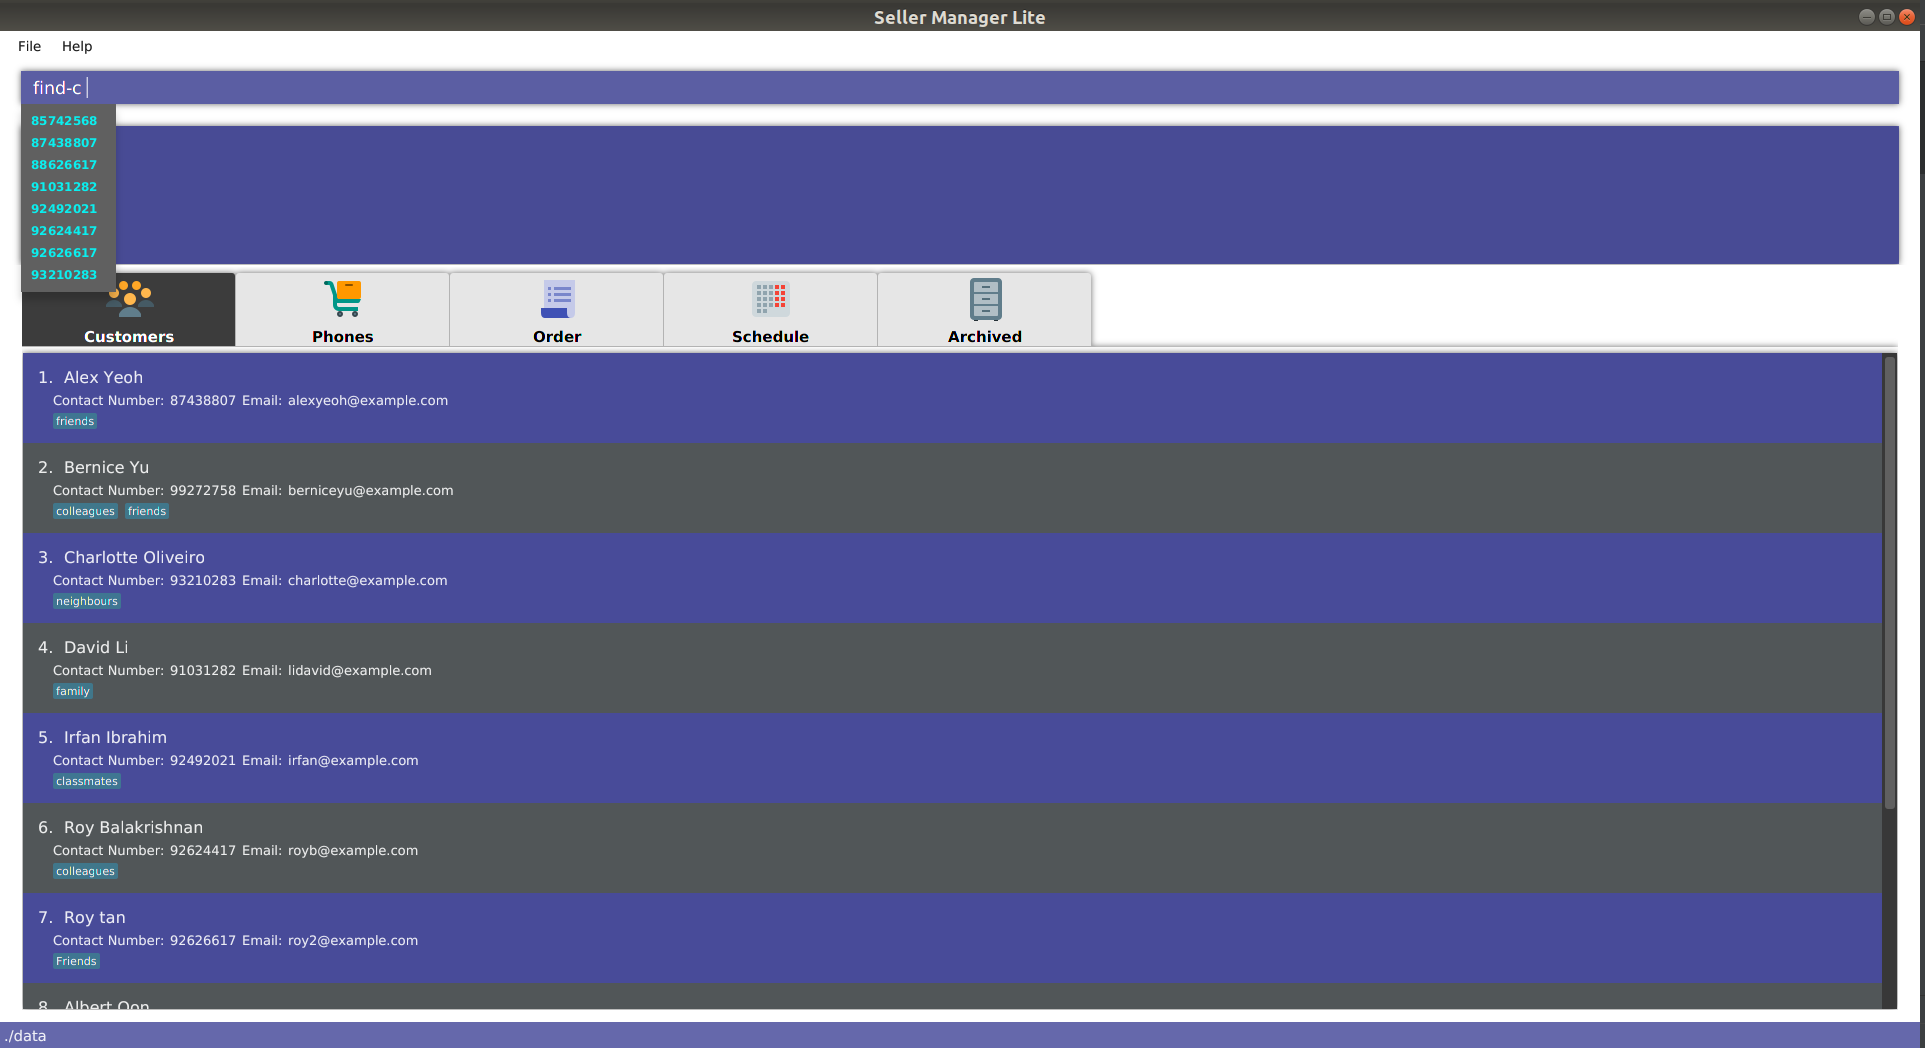
-
When you enter
find-cfollowed by a space, the system will suggest values from every attribute of every customer in the database.
5.10.5. switch
-
For simple commands such as
switch-c, the system will suggest the command word and nothing else.
5.10.6. schedule
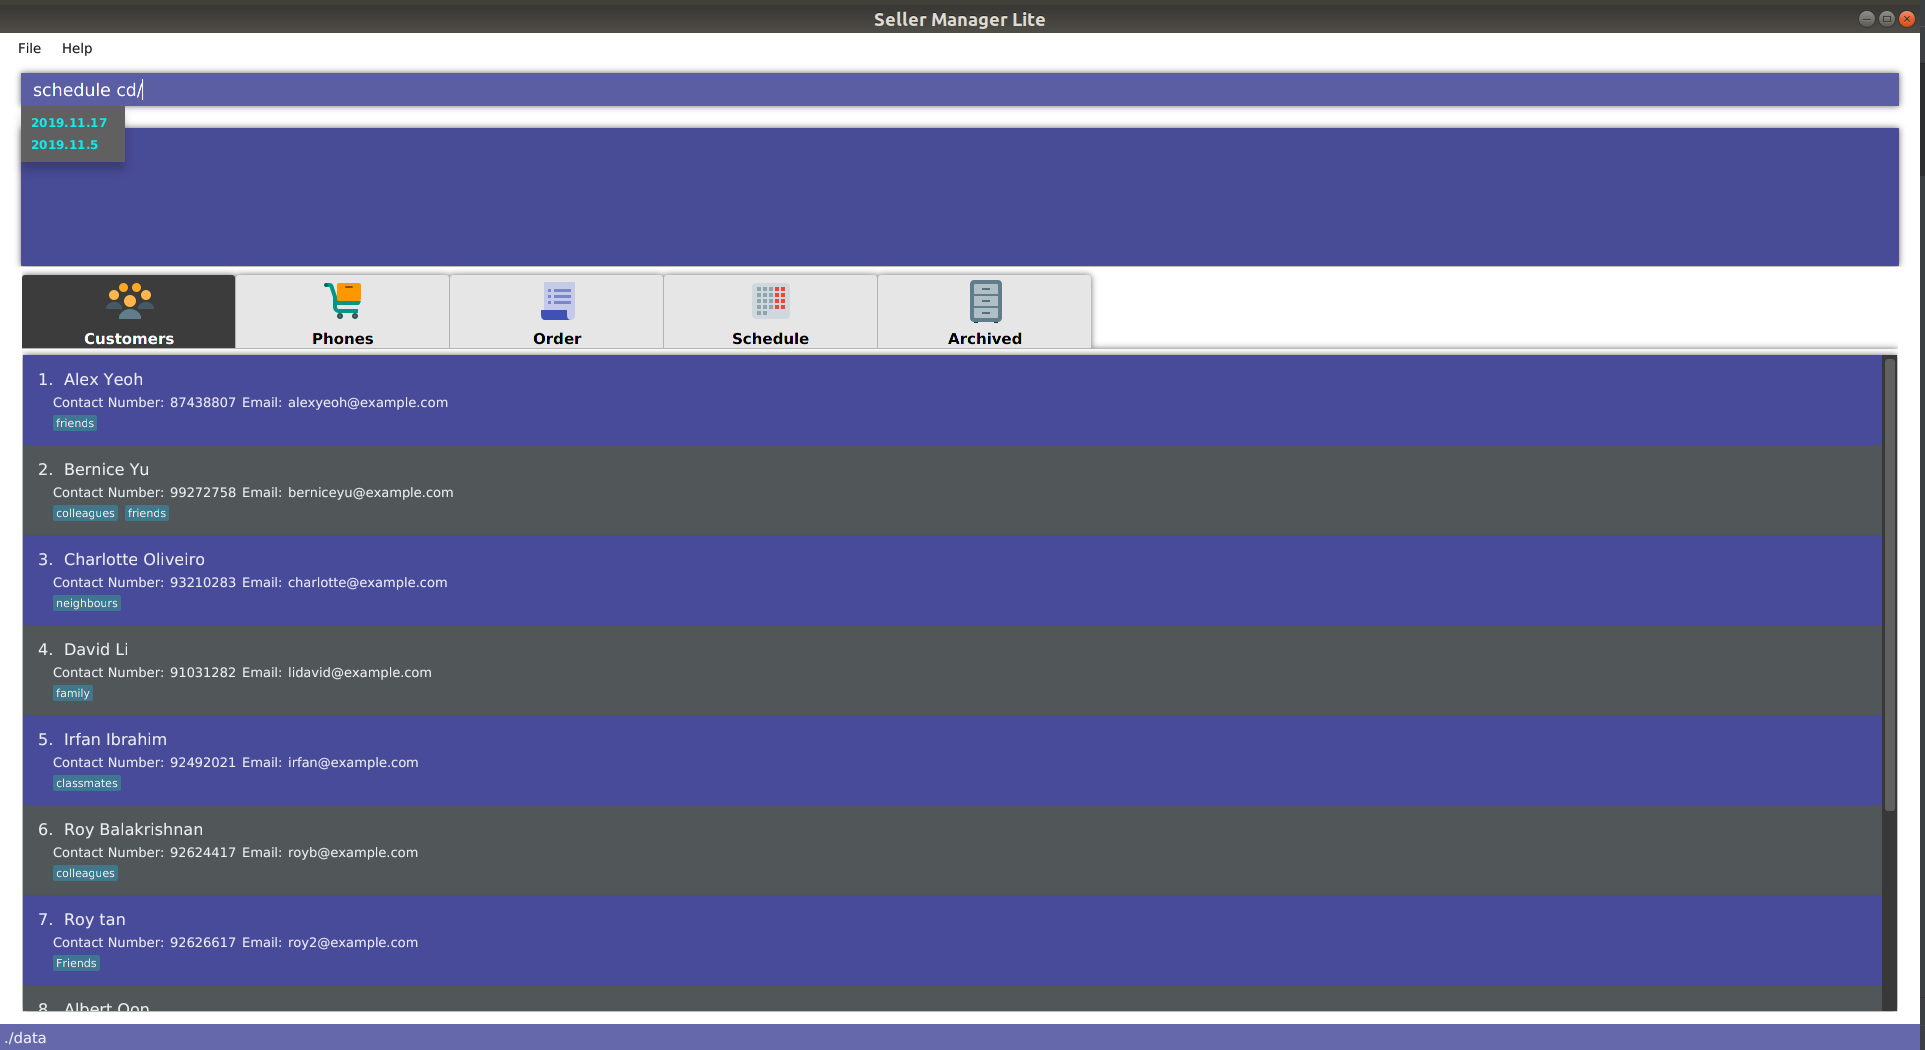
-
When you enter
schedulefollowed by a space, the system will suggest dates that already have orders scheduled on them. This is helpful in checking for duplicates.
5.11. Other commands
5.11.1. Import data : import [coming in v2.0]
Imports csv file into the application.
If csv file of the input file exists, the file will be imported.
If csv file of the input file does not exist, command will not be executed.
Format: import FILE_NAME
5.11.2. Saving the data
SML data are saved in the hard disk automatically after any command that changes the data.
There is no need to save manually.
5.11.3. Encrypting data files [coming in v2.0]
All data files will be password-protected with a unique password of at least 8 characters long.
Format: encrypt PASSWORD
5.11.4. Notification for reminders/alerts [coming in v2.0]
Notification page to show reminders or alerts of upcoming schedules.
5.11.5. Export data to PDF [coming in v2.0]
Export the application data in SML to PDF format.
Format: export pdf
5.11.6. Add a new product [coming in v2.0]
This command is to allow users to define a new product (e.g. Tablet) with its fields. Users have to first key in the primary key name. The primary key is used to uniquely identify all records. (e.g. for Tablet, the primary key could be the Serial Number) This will be followed by the data type of the primary key. The data types that will be supported are #_DIGIT, #_CHARACTERS, #_ALPHANUMERIC, and also any of the existing fields (e.g. Cost, Price) The hashtag represents the length of the valid input for the primary key.
Format: create PRODUCT_NAME PRIMARY_KEY_NAME DATA_TYPE
5.11.7. Add fields to a new product [coming in v2.0]
This command allows users to add a field to their product. Users have to first key in the field name. This will be followed by the data type of the field. The data types that will be supported are #_DIGIT, #_CHARACTERS, #_ALPHANUMERIC, and also any of the existing fields. The hashtag represents the length of the valid input for the primary key.
Format: addfield PRODUCT_NAME FIELD_NAME DATA_TYPE
5.11.8. Autocomplete integrated with command history [coming in v2.0]
This extension of the autocomplete feature is to allow users to receive suggestions based on past inputs.
5.11.9. Alias [coming in v2.0]
This feature is to allow users to define customized command words to
simplify long commands. For example, generate-s s/profit can be
simplified to gp.
6. FAQ
Q: How do I transfer my data to another Computer?
A: Install the app in the other computer and overwrite the empty data file it creates with the file that contains the data of your previous SML folder.
7. Command Summary
7.1. Customer Commands
| Command | Summary |
|---|---|
|
Switches to customer tab panel. |
|
Adds a new customer into SML. |
`edit-c INDEX [n/NAME] [p/PHONE] [e/EMAIL] [t/TAG]… ` |
Edits an existing customer. |
|
Deletes a customer and its associated orders and schedules. |
|
Deletes all customers and their associated orders and schedules. |
|
Finds the customers that contain the keywords in its field. |
|
Copies a customer into the clipboard. |
7.2. Phone Commands
| Command | Summary |
|---|---|
|
Adds a new phone into SML. |
|
Edits an existing phone. |
|
Deletes a phone and its associated orders and schedules. |
|
Deletes all phones and their associated orders and schedules. |
|
Finds the phones that contain the keywords in its field. |
|
Copies a phone into the clipboard. |
7.3. Order Commands
| Command | Summary |
|---|---|
|
Adds a new order into SML. |
|
Edits an existing order. |
|
Completes an order and shift it into Archived Order Tab. Also deletes the associated phone. |
|
Cancels an order and shift it into Archived Order Tab. |
|
Deletes all orders. |
|
Finds the orders that contain the keywords in its field. |
|
Copies an order into the clipboard. |
7.4. Schedule Commands
| Command | Summary |
|---|---|
|
Shows the week of the date specified by the user. |
|
Adds a new schedule into SML. |
|
Edits an existing schedule. |
|
Deletes a schedule. |
|
Deletes all schedules. |
7.5. Archived Order Commands
| Command | Summary |
|---|---|
|
Deletes all archived orders. |
7.6. Switch Commands
| Command | Summary |
|---|---|
|
Switches to archived order tab panel. |
|
Switches to schedule tab panel. |
|
Switches to order tab panel. |
|
Switches to phone tab panel. |
|
Switches to customer tab panel. |
7.7. General Commands
| Command | Summary |
|---|---|
|
Generates the statistics with date input in chart format (in pop-up modal dialogue). |
|
Generates the statistics with no date input. |
|
Undo the last undoable command. |
|
Redo the undone command. |
|
Views command history. |
|
Exports application data into csv file. |
|
Pops up a help window. |
|
Quits the application. |