By: Team T09-4 Since: Sep 2019 Licence: MIT
1. Setting up
Refer to the guide here.
2. Design
2.1. Architecture
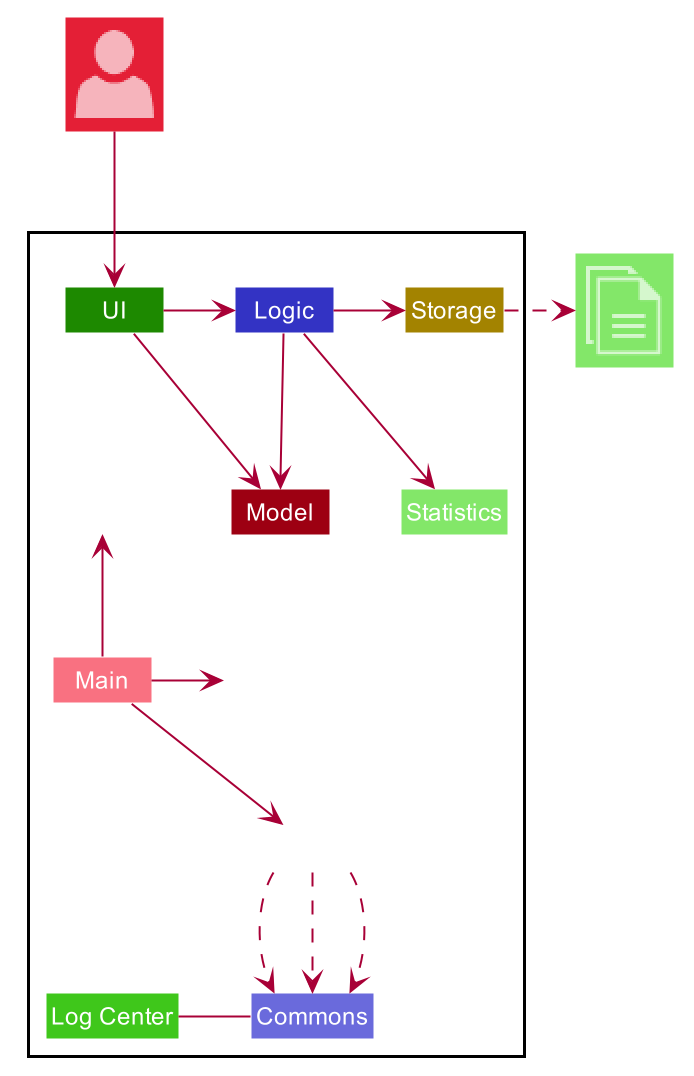
The Architecture Diagram given above explains the high-level design of the App. Given below is a quick overview of each component.
The .puml files used to create diagrams in this document can be found in the diagrams folder.
Refer to the Using PlantUML guide to learn how to create and edit diagrams.
|
-
At app launch: Initializes the components in the correct sequence, and connects them up with each other.
-
At shut down: Shuts down the components and invokes cleanup method where necessary.
Commons represents a collection of classes used by multiple other components.
The following class plays an important role at the architecture level:
-
LogsCenter: Used by many classes to write log messages to the App’s log file.
The rest of the App consists of five components.
-
UI: The UI of the App. -
Logic: The command executor. -
Model: Holds the data of the App in-memory. -
Storage: Reads data from, and writes data to, the hard disk. -
Statistics: Generate statistics and charts. (The use of this module is covered in the Statistic Section)
Each of the five components
-
Defines its API in an
interfacewith the same name as the Component. -
Exposes its functionality using a
{Component Name}Managerclass.
For example, the Logic component (see the class diagram given below) defines it’s API in the Logic.java interface and exposes its functionality using the LogicManager.java class.

How the architecture components interact with each other
The Sequence Diagram below shows how the components interact with each other for the scenario where the user issues the command delete-c 1.
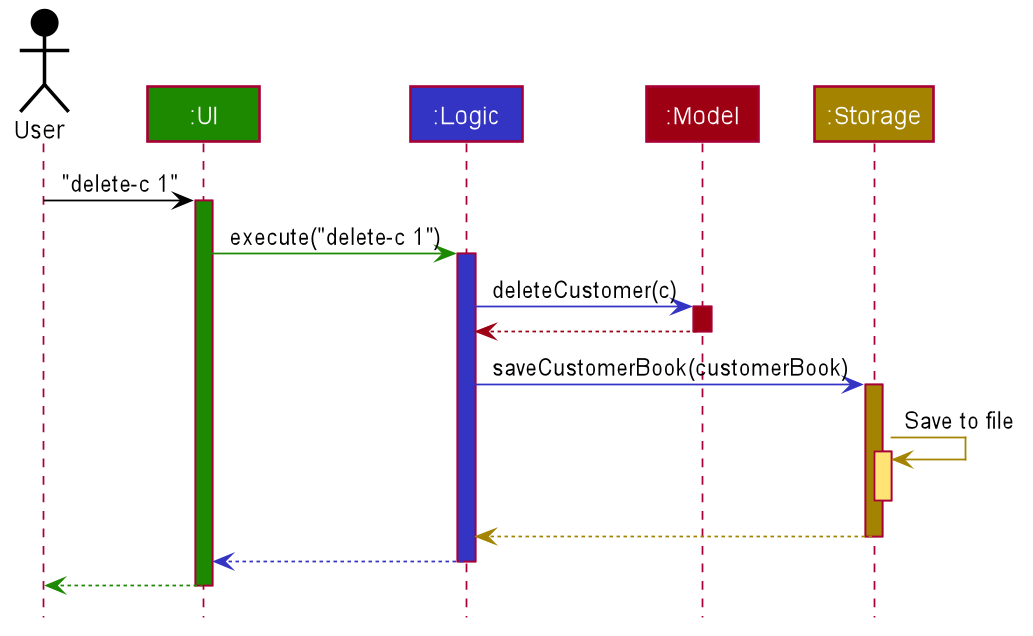
delete-c 1 commandThe sections below give more details of each component.
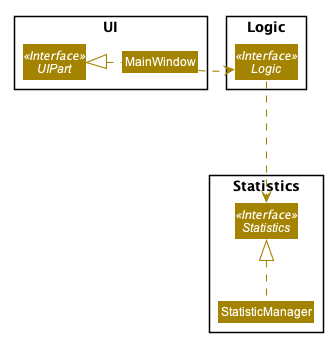
2.2. UI component
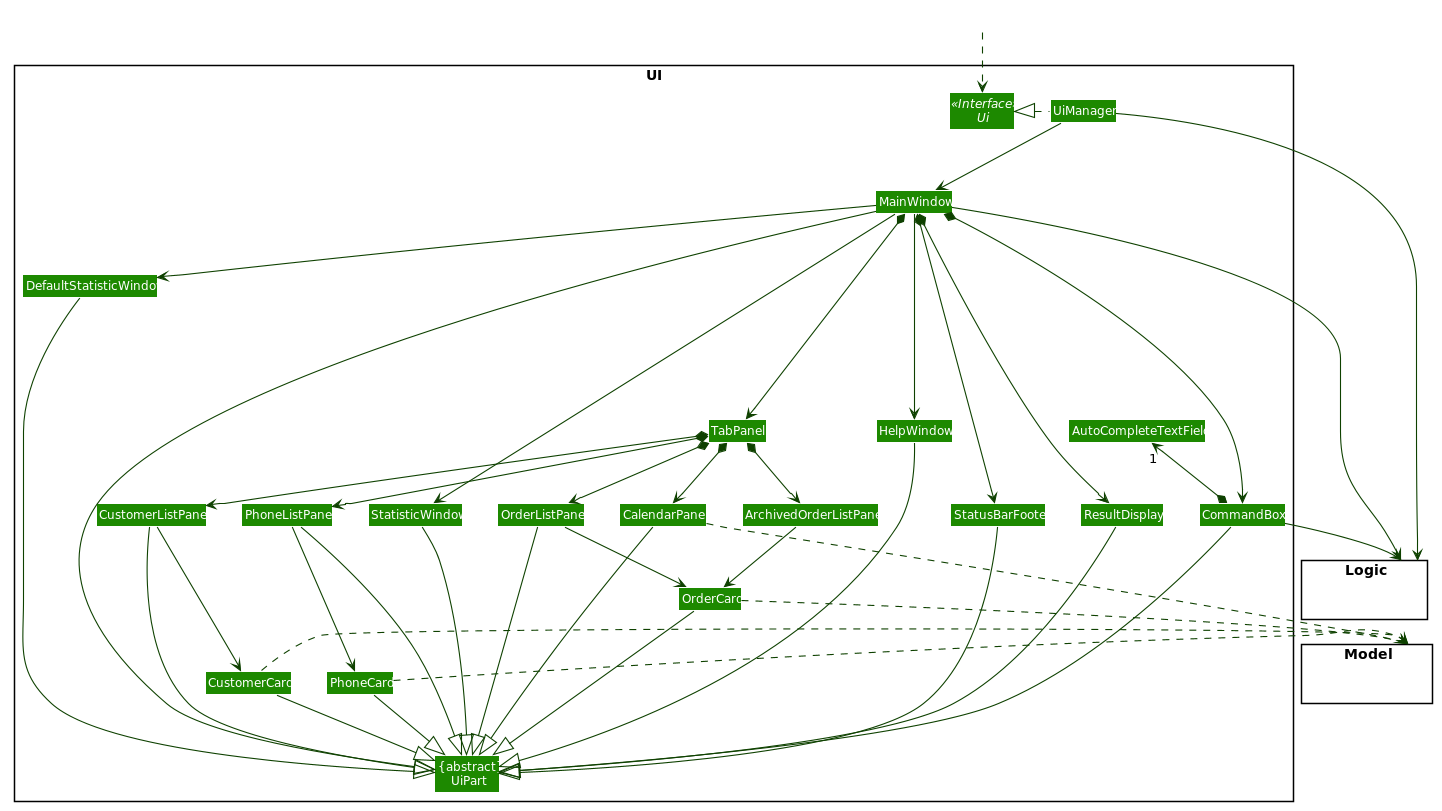
API: Ui.java
The UI consists of a MainWindow that is made up of parts
e.g.CommandBox, ResultDisplay, TabPanel, StatusBarFooter etc.
TabPanel consists of CustomerListPanel, OrderListPanel, PhoneListPanel, CalendarListPanel
and ArchivedOrderListPanel
All these, including the MainWindow, inherit from the abstract UiPart class.
The UI component uses JavaFX UI framework. The layout of these UI parts is defined in matching .fxml files that are in the src/main/resources/view folder. For example, the layout of the MainWindow is specified in MainWindow.fxml.
The UI component,
-
Executes user commands using the
Logiccomponent. -
Listens for changes to
Modeldata so that the UI can be updated with the modified data. -
Different changes in each tab or panel are controlled via the enum
UiChange.
2.3. Logic component
API:
Logic.java
-
Logicuses theSellerManagerParserclass to parse the user command. -
This results in a
Commandobject which is executed by theLogicManager. -
The command execution can affect the
Model(e.g. adding a customer/phone/order/schedule). -
The result of the command execution, a
Stringmessage andUiChangeenum is encapsulated as aCommandResultobject which is passed back to theUi. -
In addition, the
UiChangeenum in theCommandResultobject can also instruct theUito perform certain actions, such as displaying the respective panels or help/statistics window.
Given below is the Sequence Diagram for interactions within the Logic component for the execute("delete-c 1") API call.
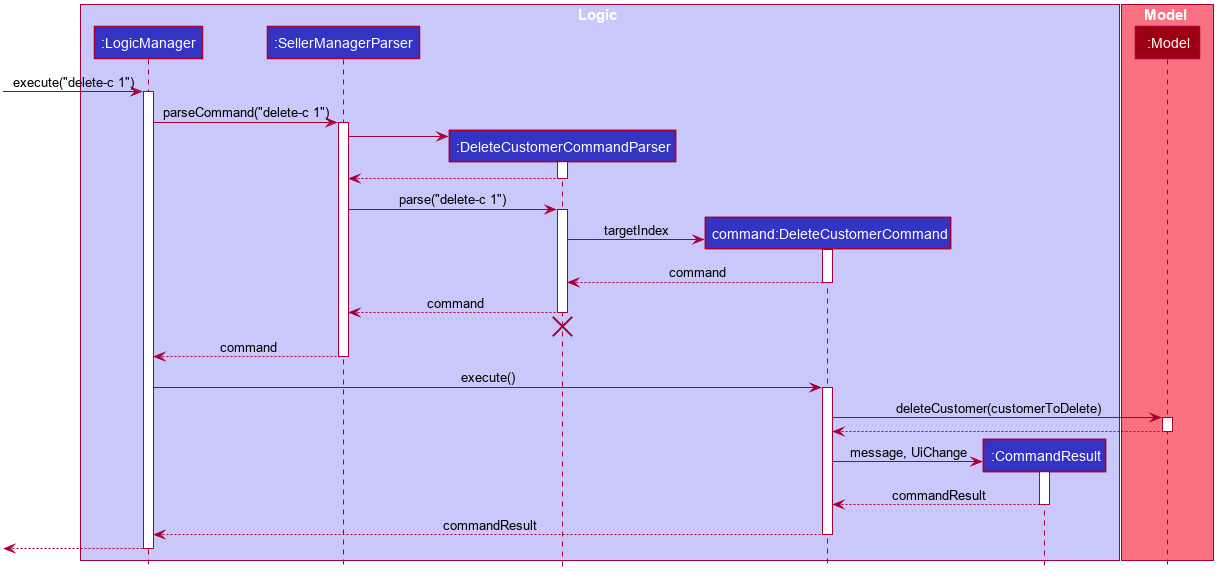
delete-c 1 Command
The lifeline for DeleteCustomerCommandParser should end at the destroy marker (X) but due to a limitation of PlantUML, the lifeline reaches the end of diagram.
|
2.4. Model component
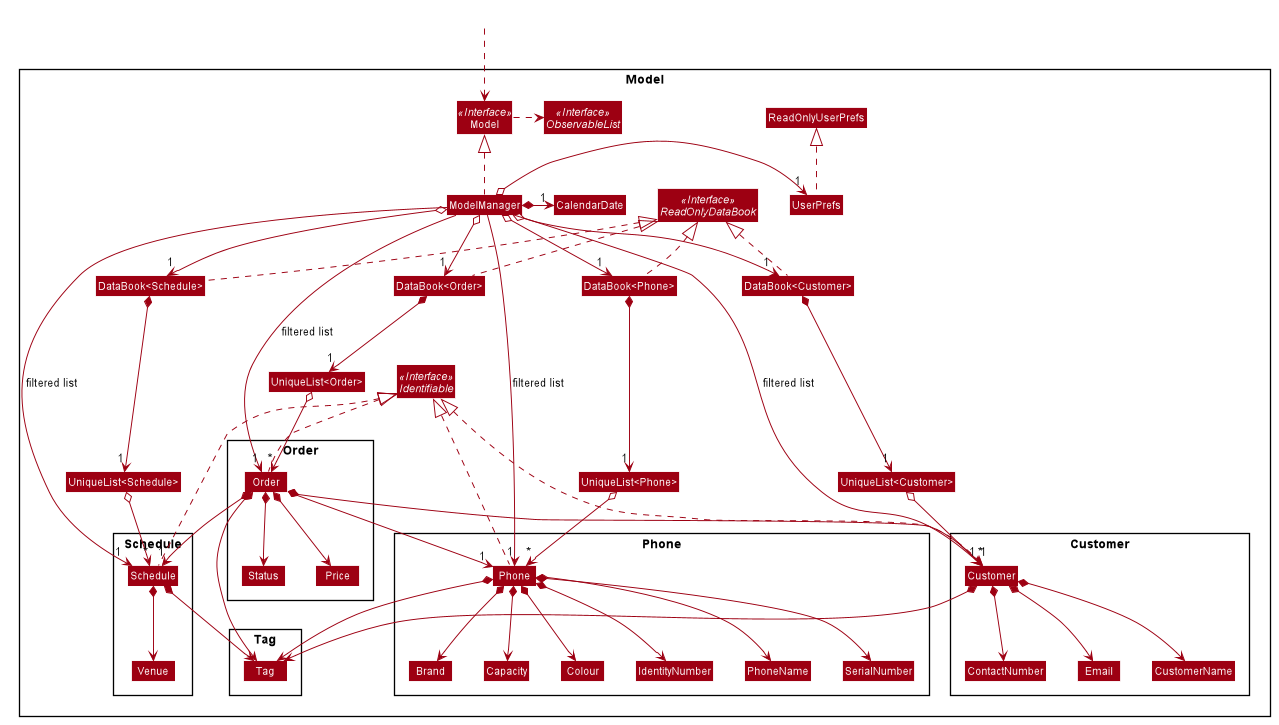
API: Model.java
The Model,
-
stores a
UserPrefobject that represents the user’s preferences. -
stores a
CalendarDateobject that stores date shown on the calendar panel. -
stores
Customer,Phone,OrderandScheduledata in aDataBookeach. -
a
DataBookis backed by an underlyingUniqueListwhich stores subclasses ofIdentifiable. -
the
Identifiableinterfaces exposes anisSameAsmethod which is used to determine if two objects have the same identity. -
exposes 4 unmodifiable
ObservableList<Identifiable>that can be 'observed' e.g. the UI can be bound to this list so that the UI automatically updates when the data in the list change. -
does not depend on any of the other four components.
As a more OOP model, we can store a UniqueList<Tag> in Seller Manager, which Customer / Phone / Order / Schedule can reference.
This would allow Seller Manager to only require one Tag object per unique Tag, instead of each object needing their own Tag.
An example of how such UniqueList<Tag> and UniqueList<Customer> interacts is given below.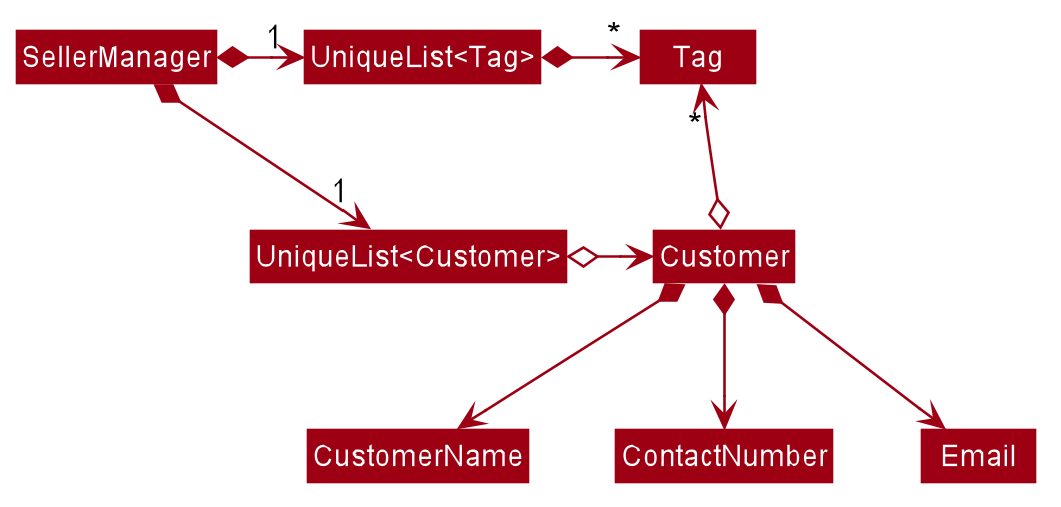
|
2.5. Storage component
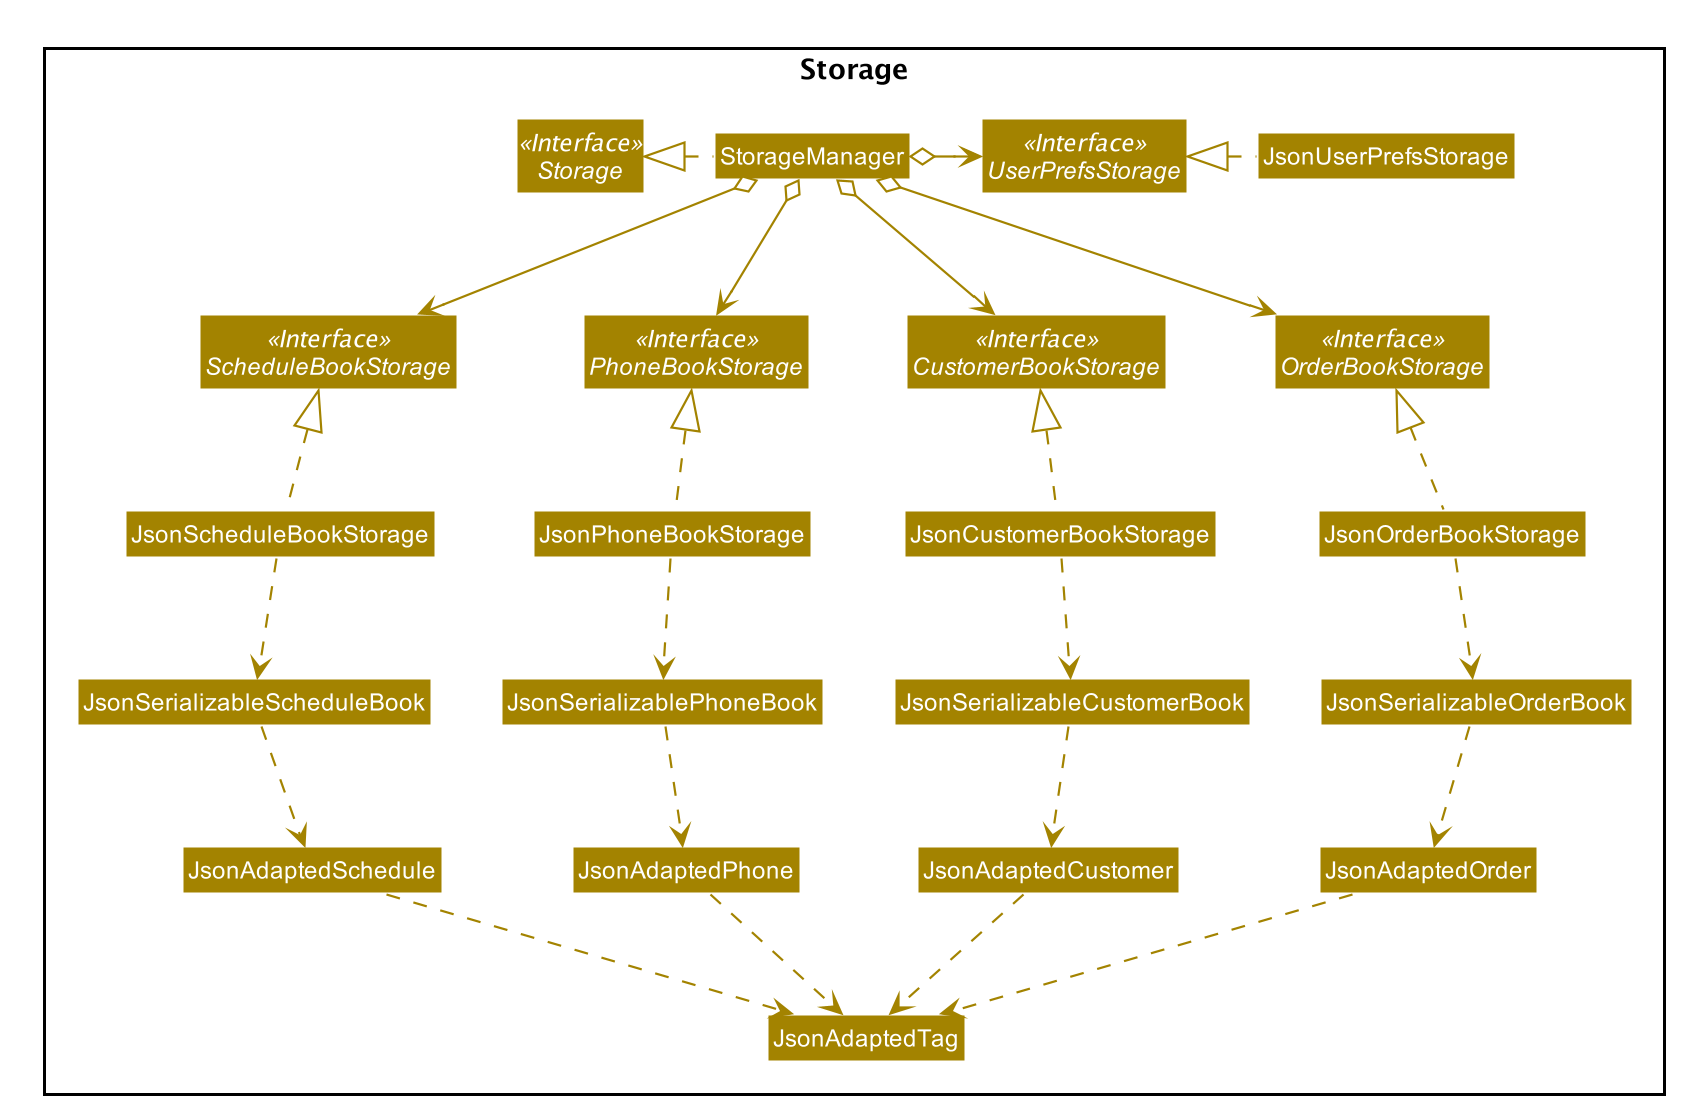
API: Storage.java
The Storage component,
-
can save
UserPrefobjects in JSON format and read it back. -
can save the Customer Book data, Phone Book data, Order Book data and Schedule Book data in JSON format and read them back.
2.6. Common classes
Classes used by multiple components are in the seedu.address.commons package.
3. Implementation
This section describes some noteworthy details on how certain features are implemented.
3.1. Statistics Calculation and Chart generation feature
3.1.1. Implementation
This statistic calculation and chart generation feature extends Seller Manager Lite which allows sellers to quickly
generate total statistics from their DataBooks, through the use of a statistic
module that handles this calculation. There are three type of statistic to be calculated and only on completed orders:
-
ProfitCostRevenue
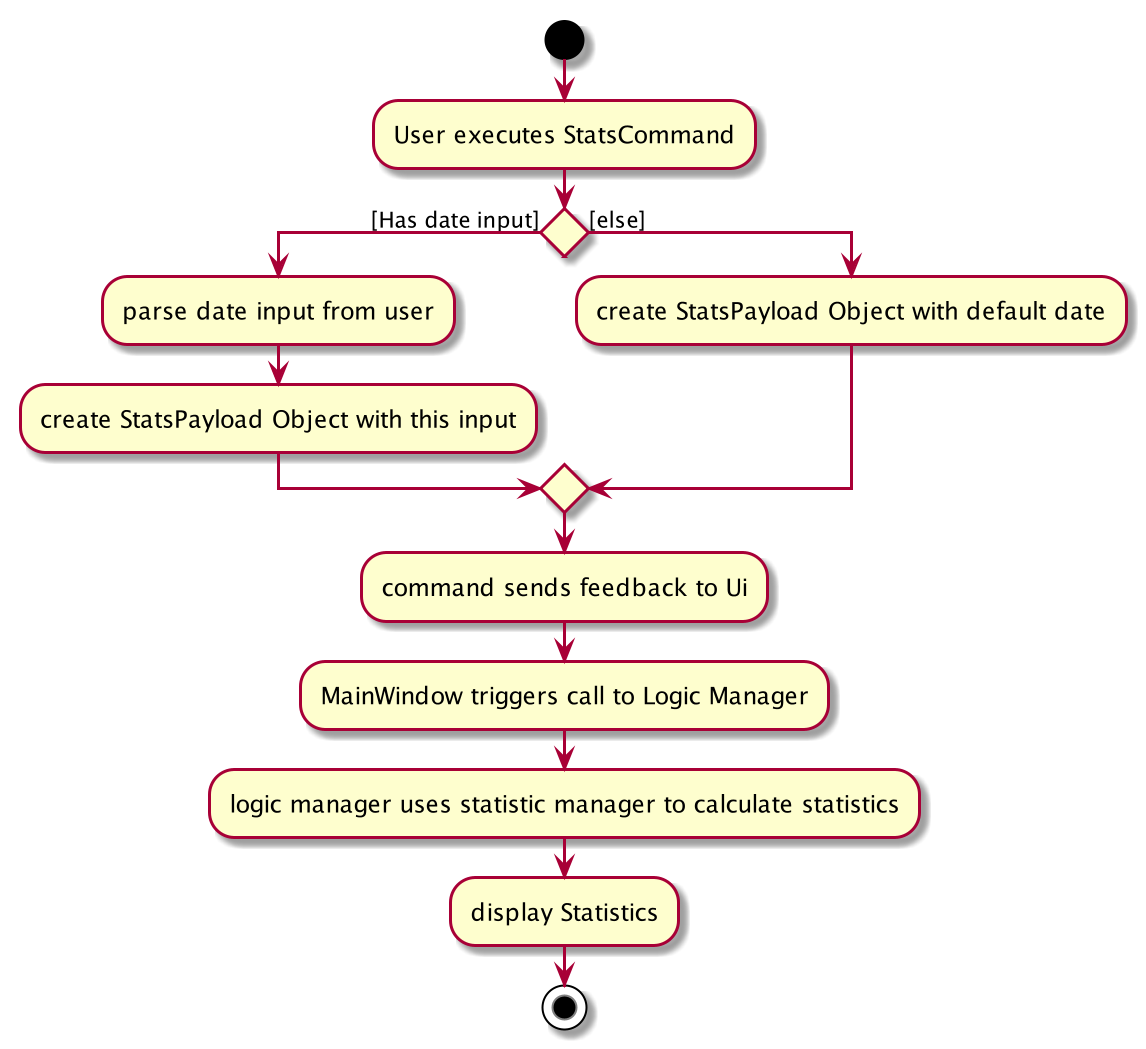
It implements the following mode of operations:
-
default mode with no date input: generates on all completed order total
profit,costorrevenue-
The command enter by the user will be e.g for profit type
generate-s s/PROFIT
-
-
mode with date input from the user: The statistic command takes in 2
dates,starting dateandending dateand generates theprofit,costorrevenueeachmonthbetween this 2 dates.-
command entered by the user will be e.g for profit type`generate-s s/PROFIT s1/YYYY.MM.DD s2/YYYY.MM.DD`
-
Here is the sequence of steps taken by SML when it receives a StatCommand:
Statistic Module
The statistic module exposes the calculation operations in the Statistics interface.
analogous to the output mode, there are 2 types of methods in this module, one that returns a
String and the other a XYChart.Series<String, Number>.
-
Methods that return a
String:-
calculateTotalProfitOnCompleted(…) -
calculateTotalRevenueOnCompleted(…) -
calculateTotalCostOnCompleted(…)
-
-
Methods that return a
XYChart.Series<String, Number>:-
calculateTotalProfitOnCompletedGraph(…) -
calculateTotalRevenueOnCompletedGraph(…) -
calculateTotalCostOnCompletedGraph(…)
-
All methods were written using java8 Stream() feature. This is such that there are no loops in the code to make it more readable and maintainable.
org.apache.commons.math3.stat.StatUtils library is used to calculate the raw data inside a double[] (primitive double array).
While the current v1.4 only use the sum to calculate the exact profit, revenue and cost, v2.0 implementation
will make use of the linear regression / average methods inside the library to generate more advanced statistics.
Design Considerations / Alternative designs considered
Given that the number of orders in a seller database might be scaled to be very large in the future the main focus of this feature was to calculate statistics only when needed.
-
Alternative design :
-
To implement statistics, maintain a few running statistic counters upon loading of the main app, update these counters/values when the calculation is needed and then display it. This implementation would have been easy to implement within the existing AB3 code since it meant extending the
Modelclass with a statistic model as compared to having theUIclass to read from this value.-
Pros: Easy to implement on top of AB3.
-
cons: Seller will be unable to obtain an instance of past statistics at each point without storing the history of the statistics somewhere since any change in the database/models will cause the values to change.
-
-
-
Alternative Design (current design) :
-
Statisticsmodule will exist outside of the current packages and be standalone.Logicwill handle communication with this module fromUI. Respective Statistics will then be obtained fromLogicto be displayed by theStatsWindow.-
Pros: Ensure that the respective tasks are properly abstracted, adhering to the Single Responsibility Principle.
-
Pros: Being standalone means the way of calculating the statistics can be changed without affecting the rest of the codebase.
-
Cons:
Logicwill have to handle more calls and increases its responsibilities.
-
-
Design Decision 1:
Given that consideration, we decided that it will be the UI to trigger this call to Logic for calculation
and then display the result of that call. Thus when Statistics need to be shown, the UI module will query the
Logic for the respective data One of the motivations for this approach was to,
as much as possible, maintain the architecture that is already in place in AB3.
Furthermore, given that this feature requires date input from the user, we will need to find a way to get UI to send
the data to make that query to logic. For the old AB3 implementation, CommandResult only contains feedback to the user
with the actual changes on data done with a call to the model during execute(model).
Design Decision 2:
We decided to extend this command pattern by creating a statsPayload object. This object will hold the user
queries for the statistic calculation (if there is any) and be bundled along with the CommandResult class to the
UI to use in its query to logic. When the Ui executes the command to logic, the CommandResult is returned with
this object, which the UI will then use to communicate to Logic. The resulting change
is that the commandResult type will have slightly different behaviour.
All commands that
are not statsCommand will call the default constructor of the commandResult class, where there is an
Optional.empty() in place of the StatsPayload.
All statsCommand type will have to call the constructor of commandResult class and pass the StatsPayload object in.
The key motivation behind this idea of a payload was to be able to encapsulate details about the calculation inside a
single object, passed it to the appropriate place to be "unwrapped" when needed. This unwrapping is done by the
mainWindow class in the application and subsequently, the data is passed to the statistic module.
A high-level view of the packages working together:
3.1.2. Current Implementation
Step-by-step breakdown
Below is a more in-depth explanation at each step.
Note that this breakdown is for the mode with date input.
For the default mode with no date, the steps are almost the same, except that
DefaultStatisticsWindow is called in place of StatisticsWindow.
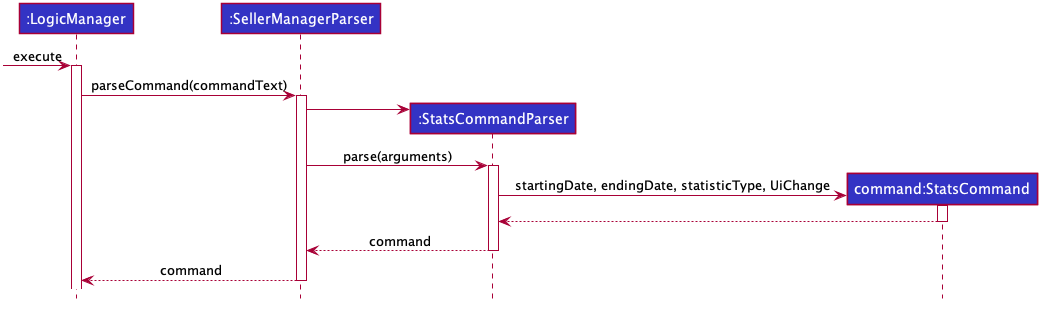
Step 1: User inputs a stats command e.g generate-s s/REVENUE d1/2018.12.13 d2/2019.11.13.
The commandBox executes it and the MainWindow runs its executeCommand(commandText) method.
Referring to the sequence diagram below, this results in logic.execute(commandText) being called and
the statsCommandParser parses the input from the user, returning a
Command object.
Seen here is the sequence diagram of the first step
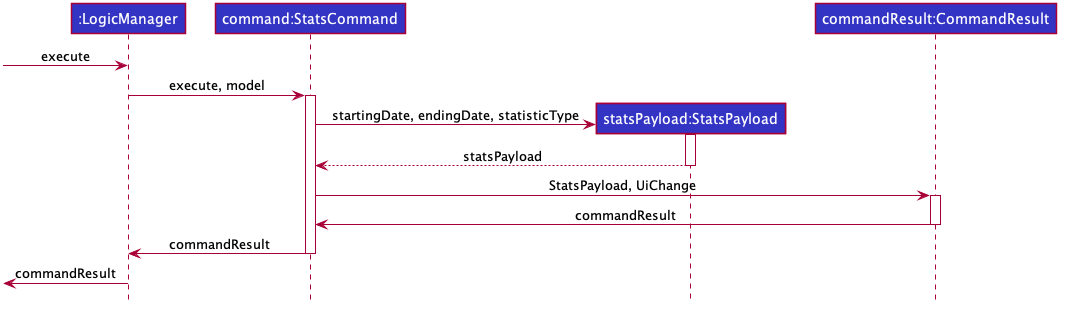
Step 2: the logic then calls command.execute(command).
When this happens, the StatsCommand executes, which triggers a call to create a new StatsPayload. Then this is used to
create a new CommandResult object and returns that to Logic, completing the execution of the user input command.
Seen here is the sequence diagram of the second step.
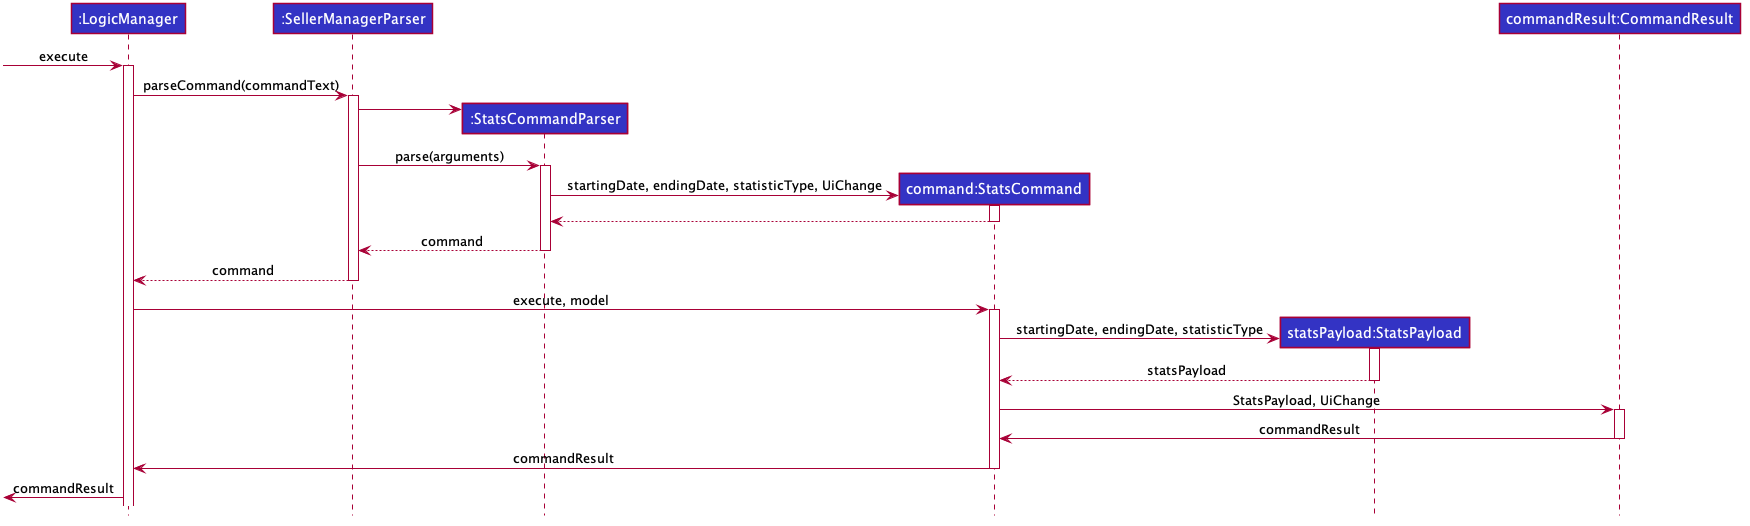
Shown below is a quick summary of step 1-2 (Full complete diagram):
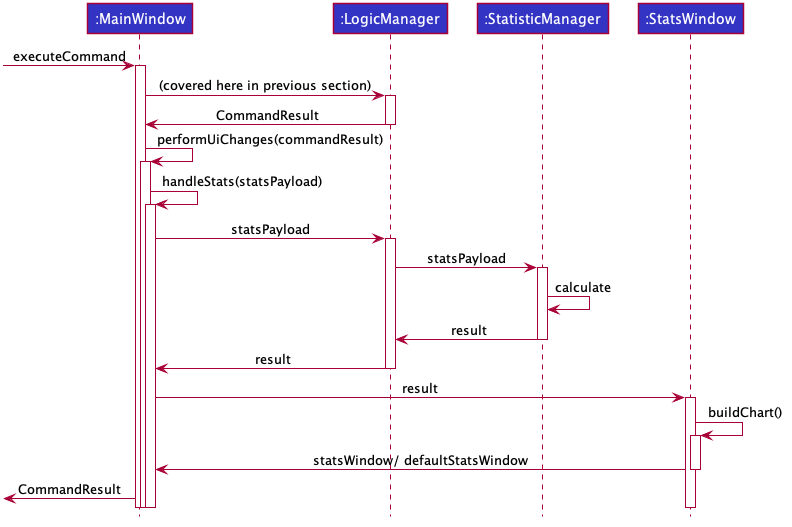
Step 3: After the logic component completes its execution and return a CommandResult, the UI will call
performUiChanges that handles the specific UI change. This then results in the statsPayload class being
passed to Logic class and subsequently the statistics module,
where the appropriate calculation will take place.
Step 4: Statistic Manager calculates the date.
Depending on the input, the Statistic Manager will calculate the value and return that, either in the form of
a String or a XYChart.Series<String, Number>.
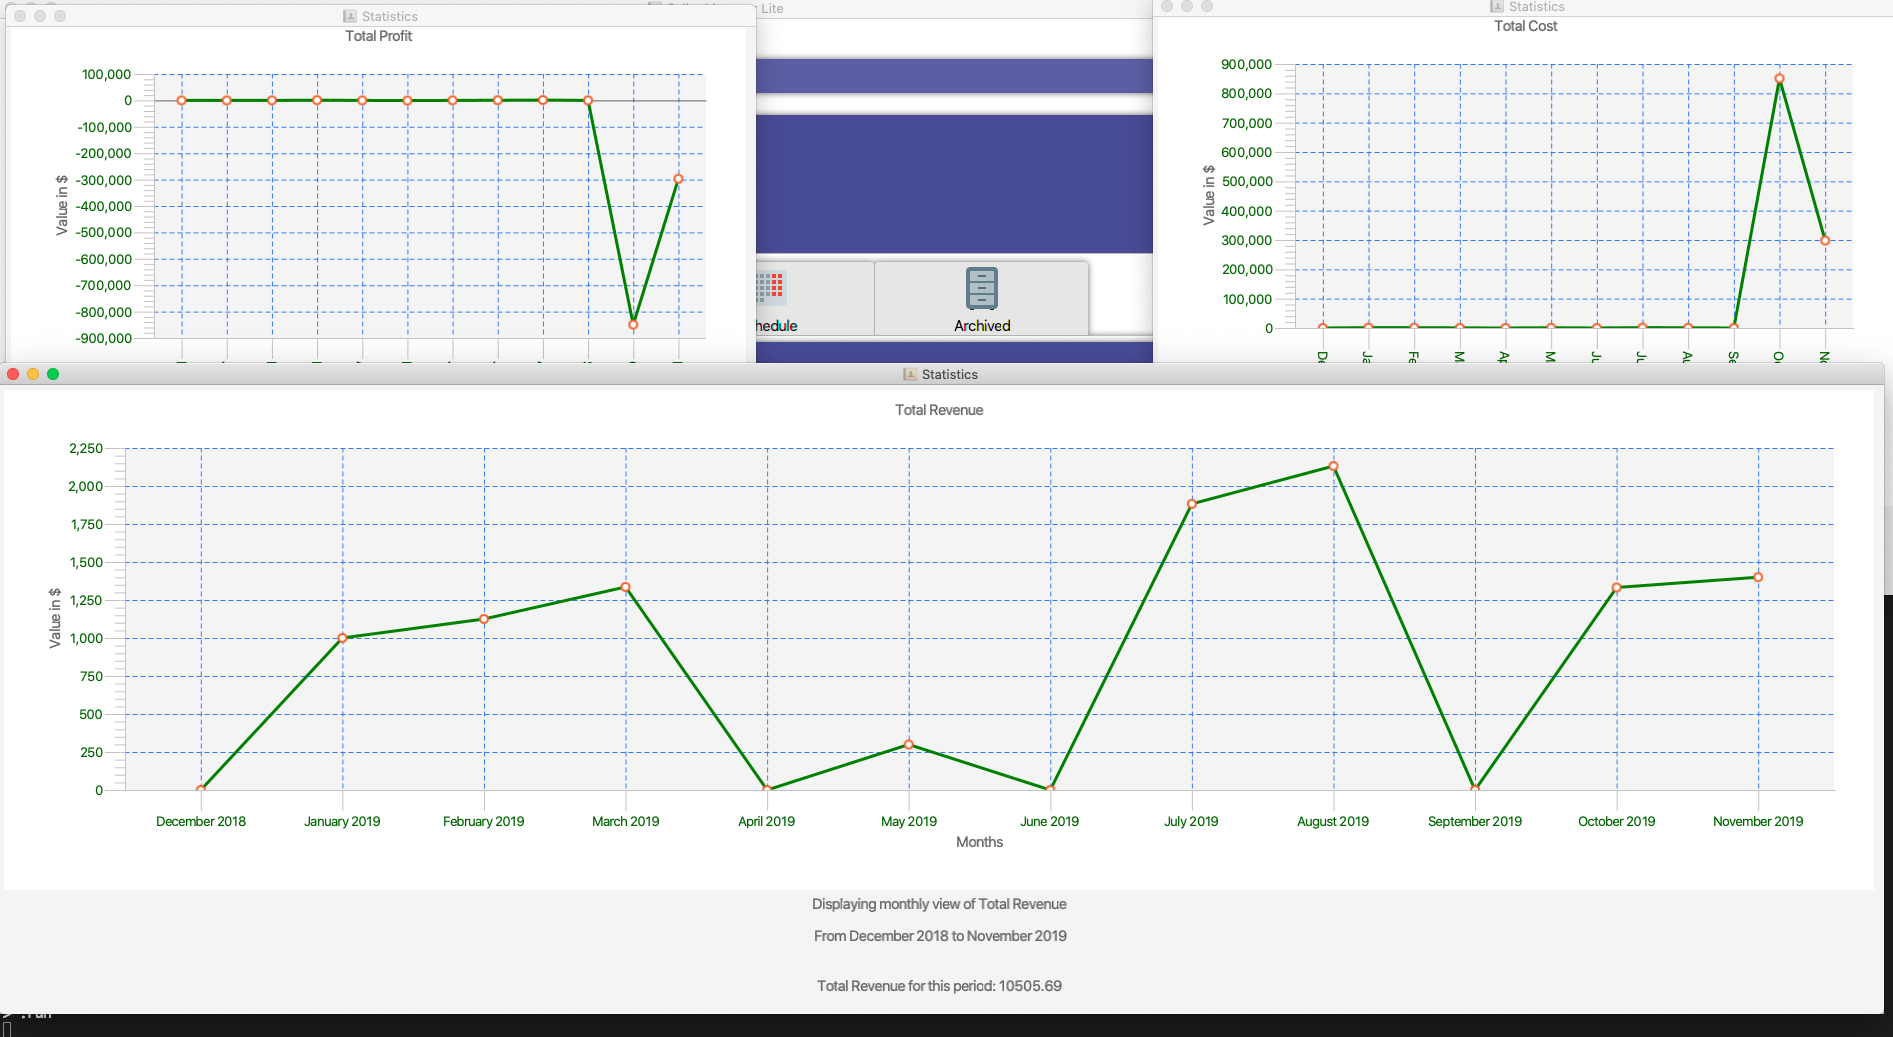
Step 5: with this output from logic, Statistic Window will then handle the displaying of the statistic, be it in chart
form or string form. With this, the feature has finished executing! Attached below is the summary for step 3-5:
3.1.4. Limitations/Note to developers:
Developers working on adding features to this module should take note of these limitations that we have put in place for v1.4 of SML:
-
Date range starts from 1970 onwards
-
Date of year input starts from 1970 onwards. This is enough to fit our use case. Anything lower will be rejected.
-
-
Extension of additional Calculation methods
-
To easily extend the behaviour with additional methods to calculate, reference the current implementation in
StatisticsManager; There are utility methods to help you with extracting the relevant information from your data.
-
-
UI Changes
-
Any additional Ui Changes should be handled by the controllers for the UI classes
StatisticWindowandDefaultStatisticWindowclass.
-
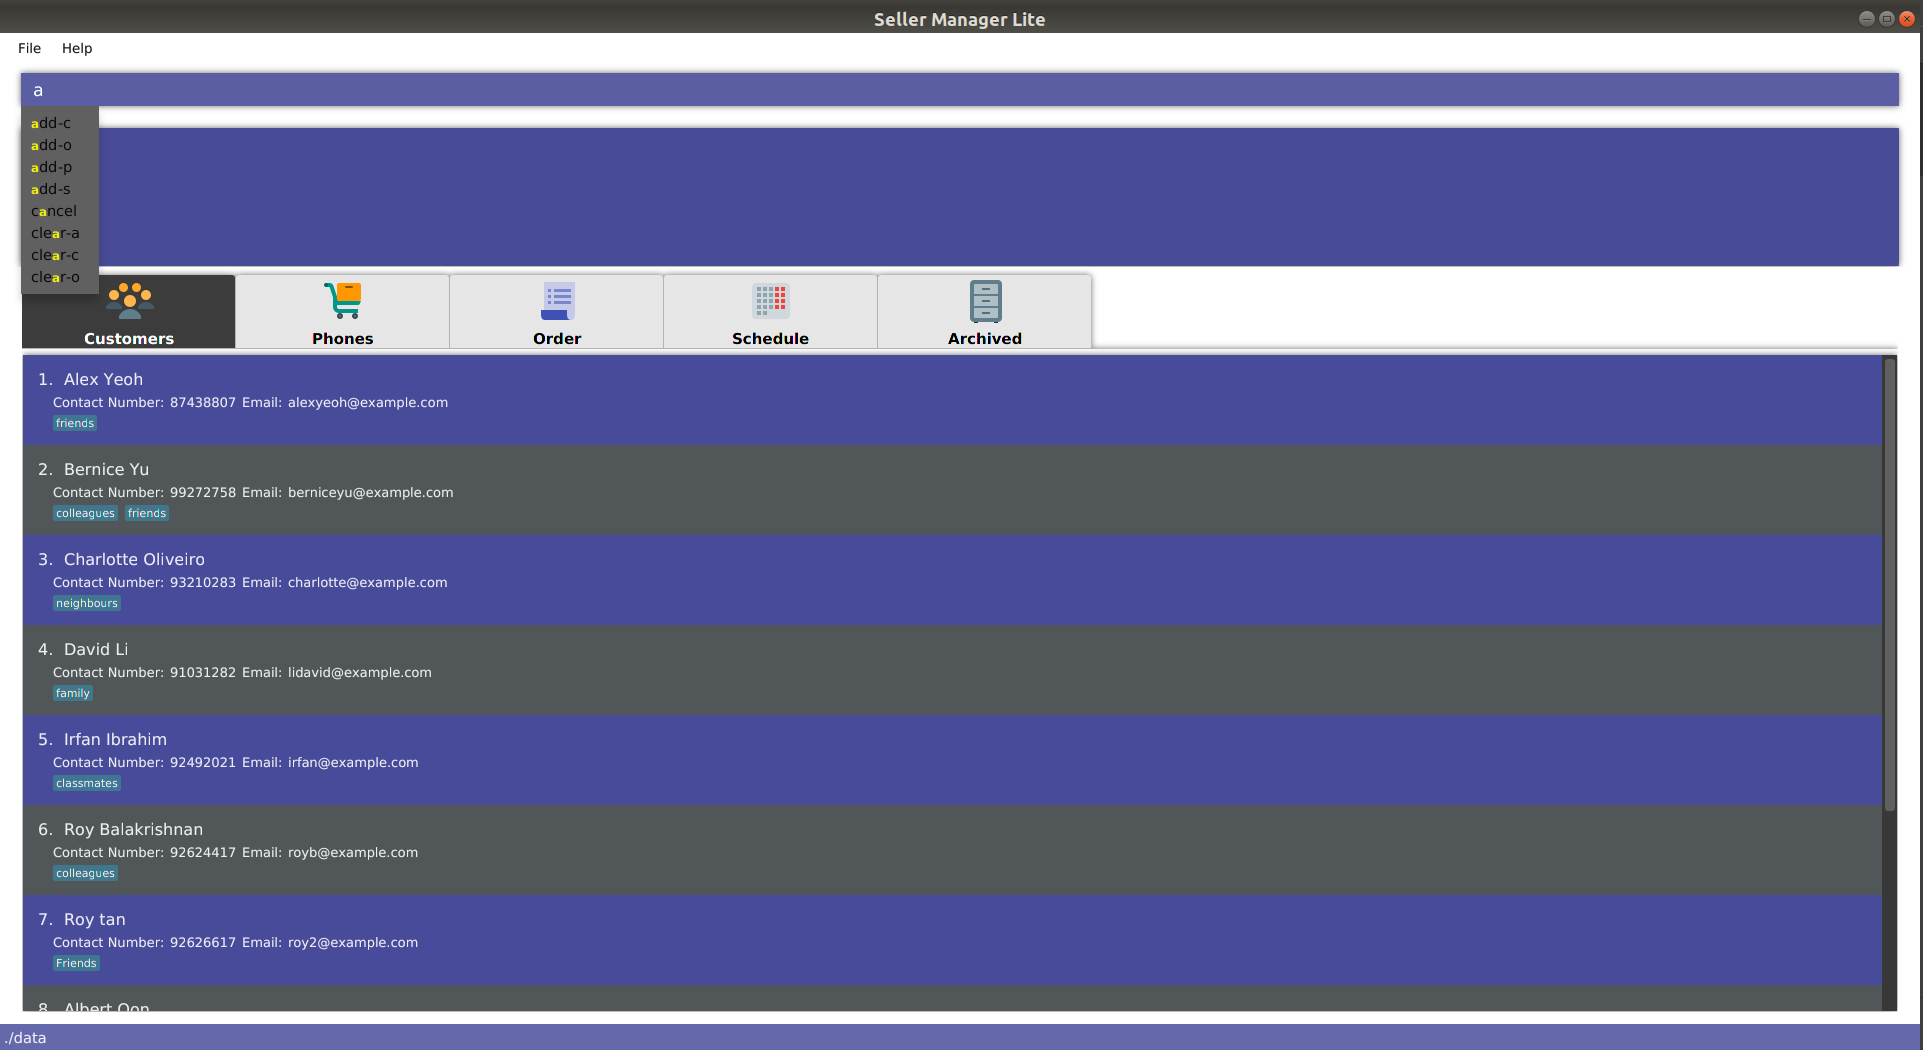
3.2. Autocomplete feature
This feature is visible in the UI as a dropdown menu when the user types into the command box.

3.2.1. Current Implementation
How the UI works
The command box uses a custom AutoCompleteTextField which extends from JavaFX’s
TextField. It stores a reference to a SortedSet of strings. When the input is
changed, it automatically compares the input with this set of suggestions. If any
suggestion matches some region of the input, it will be further compared with other
suggestions to determine which suggestion is more similar to the input. The degree of
similarity is determined by the index of the first character of the matching region.
The smaller the index, the more similar the suggestion is.
In order to customize the suggestions to fit different inputs, the CommandBox
attaches a listener to the AutoCompleteTextField. When the text is changed, the
CommandBox will extract the entered text and query the LogicManager for a set
of suggestions. This query process will be explained below.
Underlying data structures
This feature was designed to display values that are currently in the Model.
For example, the input text add-c n/ would display a list of CustomerName
that already exists in the Customer DataBook.
Directed Graph
In order to achieve this, one of the data structures used is a directed Graph
implemented as a list of Edge, each storing references to a source and destination
Node. Each Node then stores a reference to a List in a DataBook.
These were the design considerations:
-
Enforcement of artificial prefix order: By storing prefixes as edge weights, it is possible to enforce an artificial order. First, initialise a pointer to a starting
Node. Then for each prefix encountered in the input, attempt to traverse an outgoingEdgefrom thisNodeby matching the prefix with the edge weight. This way, if the prefix is out of order, later prefixes will be inaccessible. -
Dynamically updated: By storing references to a set of values that can be backed by
ObservableListin theModel, whenever the user alters any data, it will automatically be reflected in the displayed values. -
Supports optional arguments: By storing the possible prefixes as edge weights, it is possible to represent an optional argument by having an edge to the
Nodecontaining its values, as well as an edge to the nextNode. -
Infinite structure: By having a
TagNodestore a reference to itself, it is possible to endlessly displayt/as a possible prefix at the end of the input text, which is consistent with the unlimited number ofTagaCustomercan hold.
Wrapper for a pointer
The idea here is similar to the above. It can be thought of as a singular
Node. This data structure is used for simple commands which require only
one argument. As there is no need to enforce any order or support an
infinite structure, a Graph would be overkill.
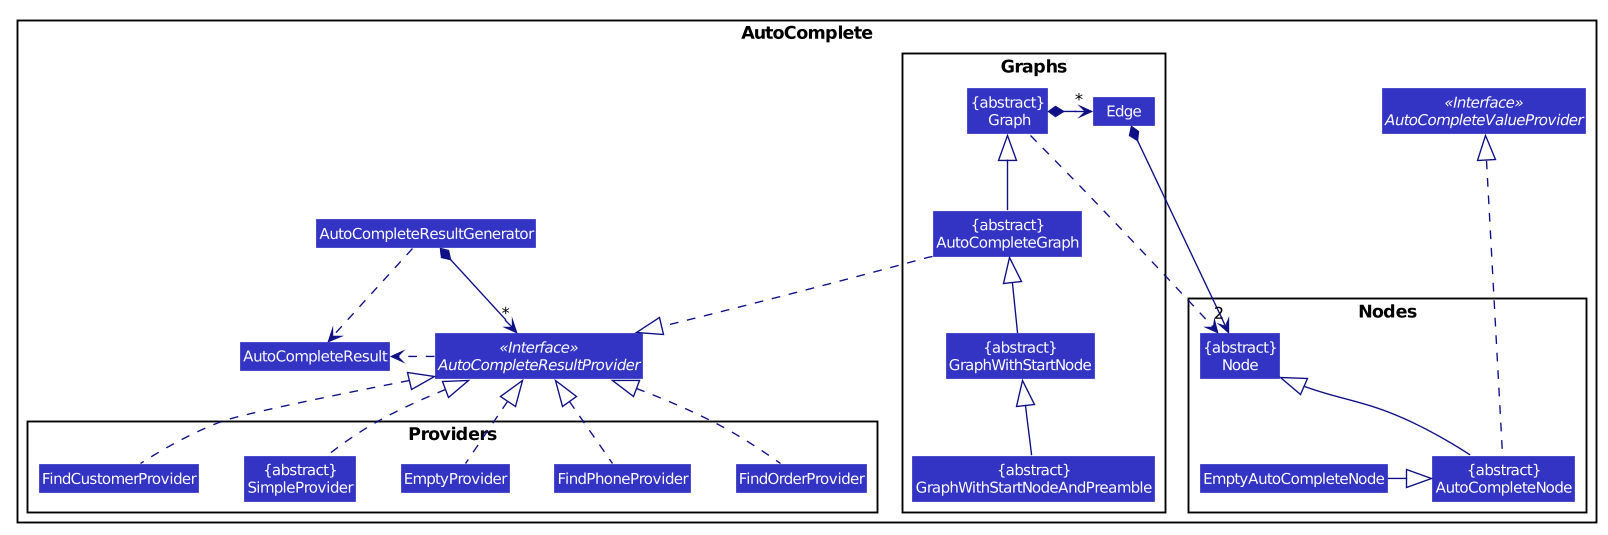
Specifics
This is an example sequence diagram for add-c n/.
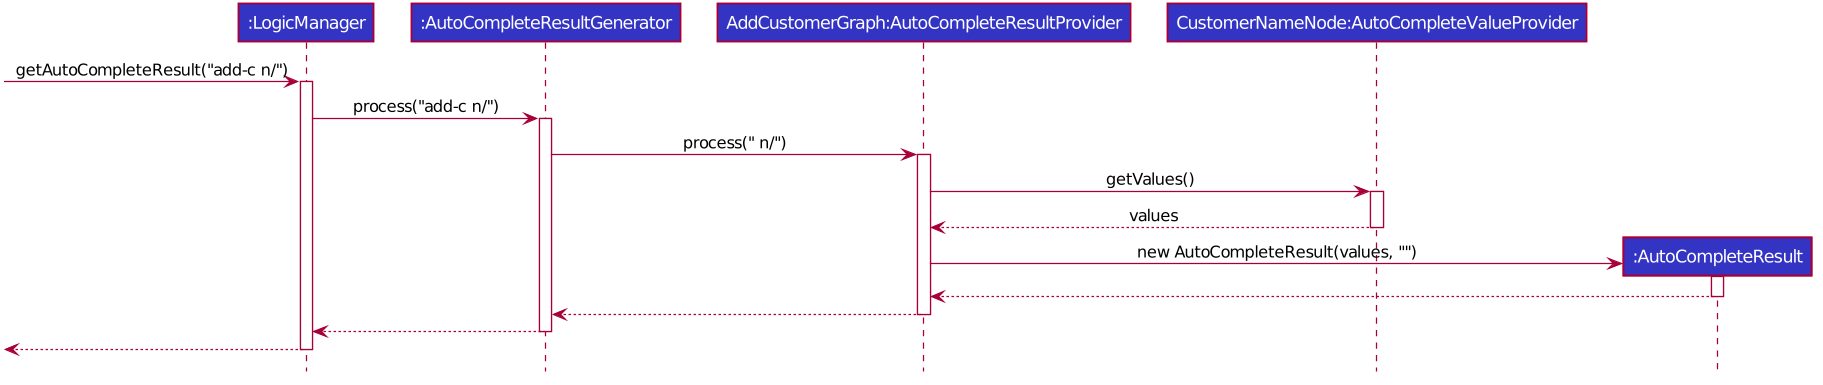
When the UI queries the LogicManager for suggestions, an AutoCompleteResult
is returned, which contains a SortedSet of strings and a separate string to match
with these suggestions.
In order to generate this AutoCompleteResult, the LogicManager requests
a AutoCompleteResultGenerator to process the input.
AutoCompleteResultGenerator contains references to AutoCompleteResultProvider
which have the ability to return AutoCompleteResult.
An example of a AutoCompleteResultProvider would be AddCustomerGraph, which
does the heavy lifting in terms of processing the input string and collating values
from AutoCompleteValueProvider in the form of AutoCompleteNode.
For clarity, here are some class diagrams for the AutoComplete package.


Alternative Designs
An alternative design would be to integrate the system with existing Parser
by making use of ArgumentTokenizer and ArgumentMultimap.
3.3. Calendar / Schedule feature
3.3.1. Implementation
Overview
We decided to incorporate a third-party library, JFXtras’s Agenda, to represent our schedules on a calendar for easy viewing by our users.
The full documentation for Agenda can be found here.
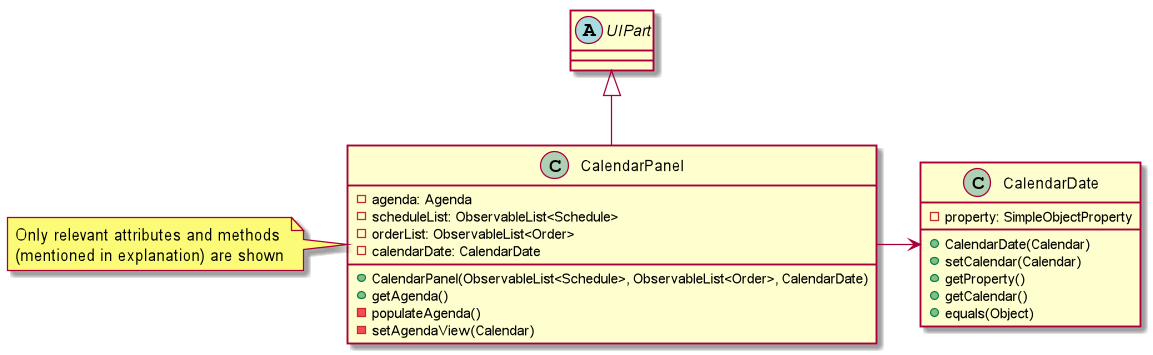
Calendar Panel
CalendarPanel is a wrapper class designed to contain Agenda for rendering events as a calendar.
Here is the class diagram for CalendarPanel:
Integration with SML
-
On instantiation of
CalendarPanel, all the schedules in scheduleList will be converted toAppointmentsand then added toAgendaviapopulateAgenda(). -
To set the display information of the
Scheduleobject, we will find itsOrderin the orderList and retrieve its index. -
Date shown on the calendar will be today’s date by default.
-
Adds a listener to
scheduleList. -
Adds a listener to
calendarDate.
Complementing CRUD commands
SML supports a few main Schedule commands:
-
Add — adds a new schedule into SML, command will be in this format:
add-s ORDER_INDEX cd/DATE ct/TIME v/VENUE [t/TAGS] [-allow] -
Edit — edits an existing schedule in SML, command will be in this format:
edit-s ORDER_INDEX [cd/DATE] [ct/TIME] [v/VENUE] [t/TAGS] [-allow] -
Delete — deletes an existing schedule in SML, command will be in this format:
delete-s ORDER_INDEX -
Schedule — switches the view on the panel to the week containing the date entered, command will be in this format:
schedule cd/DATE
How the display works
The schedules and date in the calendar panel shown are automatically updated depending on the commands executed by the users. For example:
-
If the user adds/edits/deletes a schedule — calendar panel will display the week with the date of the schedule.
-
If the user uses the switch-s command — calendar panel will display the week with today’s date.
-
If the user uses the schedule command — calendar panel will display the week with the date requested by the user.
Changes to the schedules are made in the Model by editing its scheduleList.
CalendarPanel listens to the changes and calls populateAgenda() to generate the updated list of Schedules into Appointments to add to Agenda.
The current date shown on the calendar panel is encapsulated in a CalendarDate object.
The CalendarDate class uses SimpleObjectProperty to keep track of the Calendar (date) to be displayed.
When any of the schedule commands are executed, the model will edit CalendarDate with the updated Calendar (date).
CalendarPanel listens to the changes and calls setAgendaView() to set the new Calendar in CalendarDate accordingly.
Here is an example of what happens when a user adds a schedule (AddScheduleCommand):
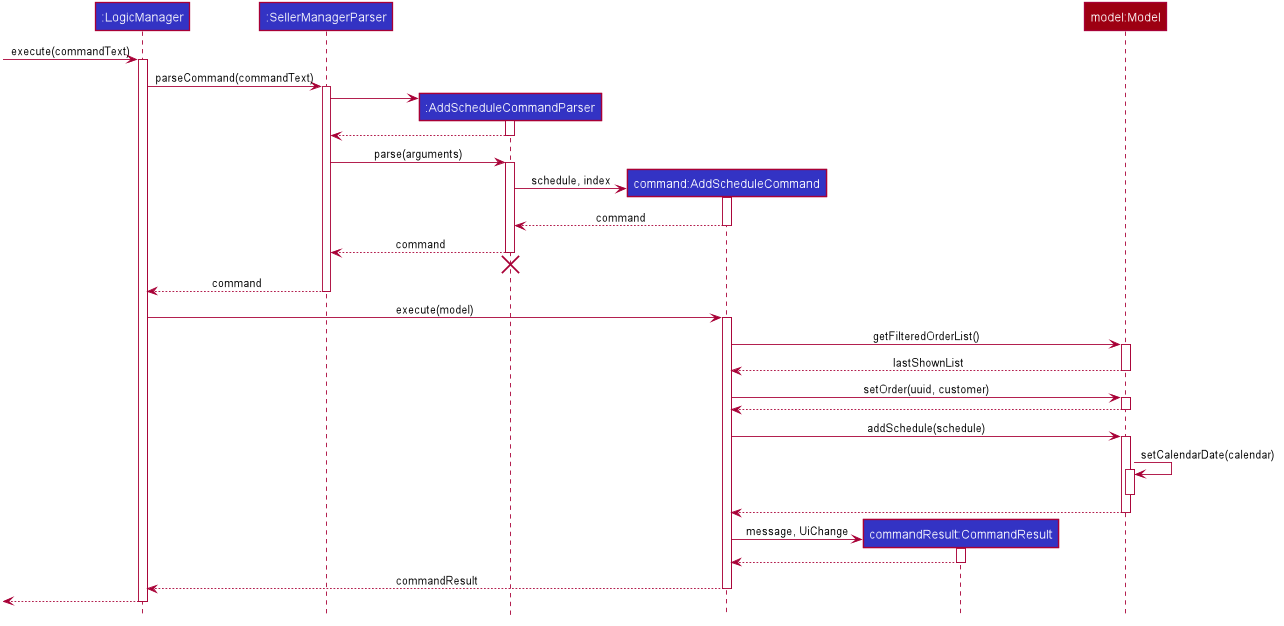
Basically, after the setCalendarDate() method in Model is executed, CalendarPanel listens to it and makes the necessary changes to the agenda view by calling its setAgendaView() method.
3.3.2. Design Considerations / Alternative designs considered
-
Whether schedules should be kept as
Appointmentobjects instead ofScheduleobjects.-
We felt that the existence of our own
Scheduleobject ensures that we can design it the way we want. -
We decided to not keep a list of
AppointmentinCalendarPanelasAppointmentis only used forAgendawhile the rest of our code usesSchedule. -
Instead, we have decided to only convert
ScheduleintoAppointmentwhen needed - during the creation ofCalendarPanelor when there are changes made to theUniqueList<Schedule>variable. Not keeping a list ofAppointmentensures that we do not keep duplicate information.
-
-
Where to store and change the date shown on Calendar Panel.
-
The changes to
CalendarDatewas initially done in theCalendarPanelitself. So,CommandResultwas made to have one more variableOptional<Calendar>. In that case, every time a schedule command was executed, a specificCalendar(if any) will be placed inside the constructor while creating theCommandResultobject. Else, Optional.Empty() will be placed inside. -
When the
MainWindowexecutes the method performUiChanges(CommandResult), it will call the handleSchedule method withCalendar(from CommandResult) as an argument. IfOptional<Calendar>inCommandResultis empty, today’s date and time will be used instead. Then,CalendarPanelwill be called in handleSchedule() to set the agenda view. -
This implementation was however changed because we thought that the date shown on the panel should be updated automatically. Hence, we decided to use a listener instead.
CalendarDateis then placed inModelso that it can be edited immediately whenModelexecutes any schedule-related commands. Also, this ensures thatCommandResultremains unchanged and kept as simple as possible.
-
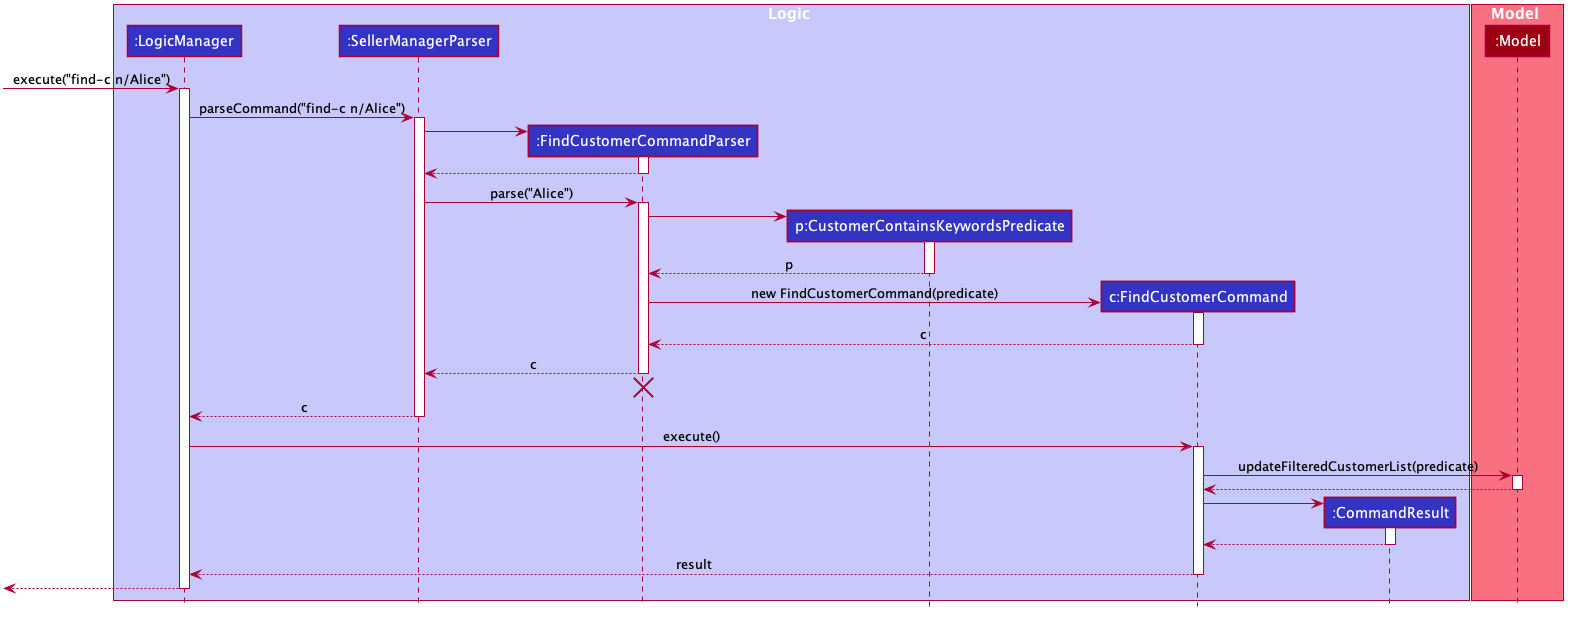
3.4. Find Customer/Phone/Order feature
The find feature allows the user to find the customer/phone/order with matching keywords. We wanted to implement an AND search and so long as the customer/phone/order contained the keyword in its data, it would be shown to the user. For simplicity’s sake, we will only focus on Customer in this section.
The command that we wanted to implement is:
-
e.g.
find-c Alice— would allow the user to find the customer with any data field that matches "Alice".
3.4.1. Current Implementation
To implement this feature, we decided to introduce a new predicate, CustomerContainsKeywordsPredicate.
Similar to AddressBook3’s NameContainsKeywordsPredicate, the customer predicate tests that all keyword matches at least 1 data field of Customer.
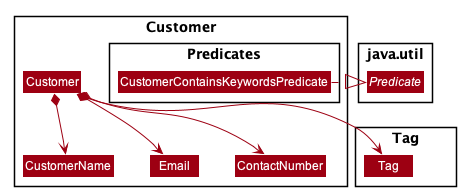
Below is a diagram to show you how find-c Alice runs in the program.
3.4.2. Design Considerations / Alternative designs considered
Alternative 2: The other alternative that we considered in implementing the find feature was allowing the user to specify which field to check for.
First, we create a FindCustomerDescriptor that would store all the strings that were to be searched under the various data fields.
e.g. The a/ prefix would mean to search for all the data fields of Customer. The n/ prefix would mean to search for the name of Customers only.
The FindCustomerCommandParser would store the relevant key-phrases in the FindCustomerDescriptor and generate a different predicate,
CustomerContainsKeyPhrasesPredicate, using the FindCustomerDescriptor and pass it to FindCustomerCommand. FindCustomerCommand would then be executed.
However, the predicate CustomerContainsKeyPhrasesPredicate would do the heavy lifting by doing further parsing of the keywords
and test whether Customer contains the relevant keywords.
We did not implement this as CustomerContainsKeyPhrasesPredicate violated the Single-Responsibility Principle.
It had to do further parsing of the keywords instead of simply testing whether the Customer contains the keywords.
Also, if there was a change to the Customer class, it would be less intuitive to modify CustomerContainsKeywordsPredicate
as one would need to understand the parsing.
-
Alternative 1 (current choice):
CustomerContainsKeywordsPredicate-
Pros: Easy to implement.
-
Cons: Cannot search based on the exact data field.
-
-
Alternative 2:
CustomerContainsKeyPhrasesPredicate-
Pros: Less code written in total.
-
Cons: Harder to maintain.
-
3.5. Export feature
3.5.1. Implementation
The export mechanism is allows user to export current saved Json files into csv files available for import into MSExcel.
We made use of FileReader to read the Json saved data files. The data is used to create JsonObjects and stored into JsonArray and then CSV formatted string using comma delimiters.
Additionally, it implements the following operations:
-
ExportCommand#getCSVString()— Returns CSV formatted string containing the customer data, phone data, order data and schedule data.
How it works.
Given below is an example usage scenario and how the export mechanism behaves at each step.
The user executes export filename command to export current data into a CSV file.
UserPrefs is created and used to get the file path of the data files (i.e. customerbook.json).
The method getCSVString is executed to create FileReader and BufferedReader to read the data files from each of the path.
The string is then used to create JsonObject and then converted to CSV formatted string data representation.
At the end, the strings are appended to get the full CSV file containing the various data.
3.5.2. Design Considerations
-
Alternative 1 (current choice): Converting Json formatted string into CSV formatted string.
-
Pros: Easy to implement.
-
Cons: Customisation to design CSV layout requires re-formatting of the string.
-
-
Alternative 2: Creating CSV formatted string straight from the Model.
-
Pros: Easier to implement on the fly the decided layout of created CSV file.
-
Cons: Harder to maintain. Had to code for the various cases in different data.
-
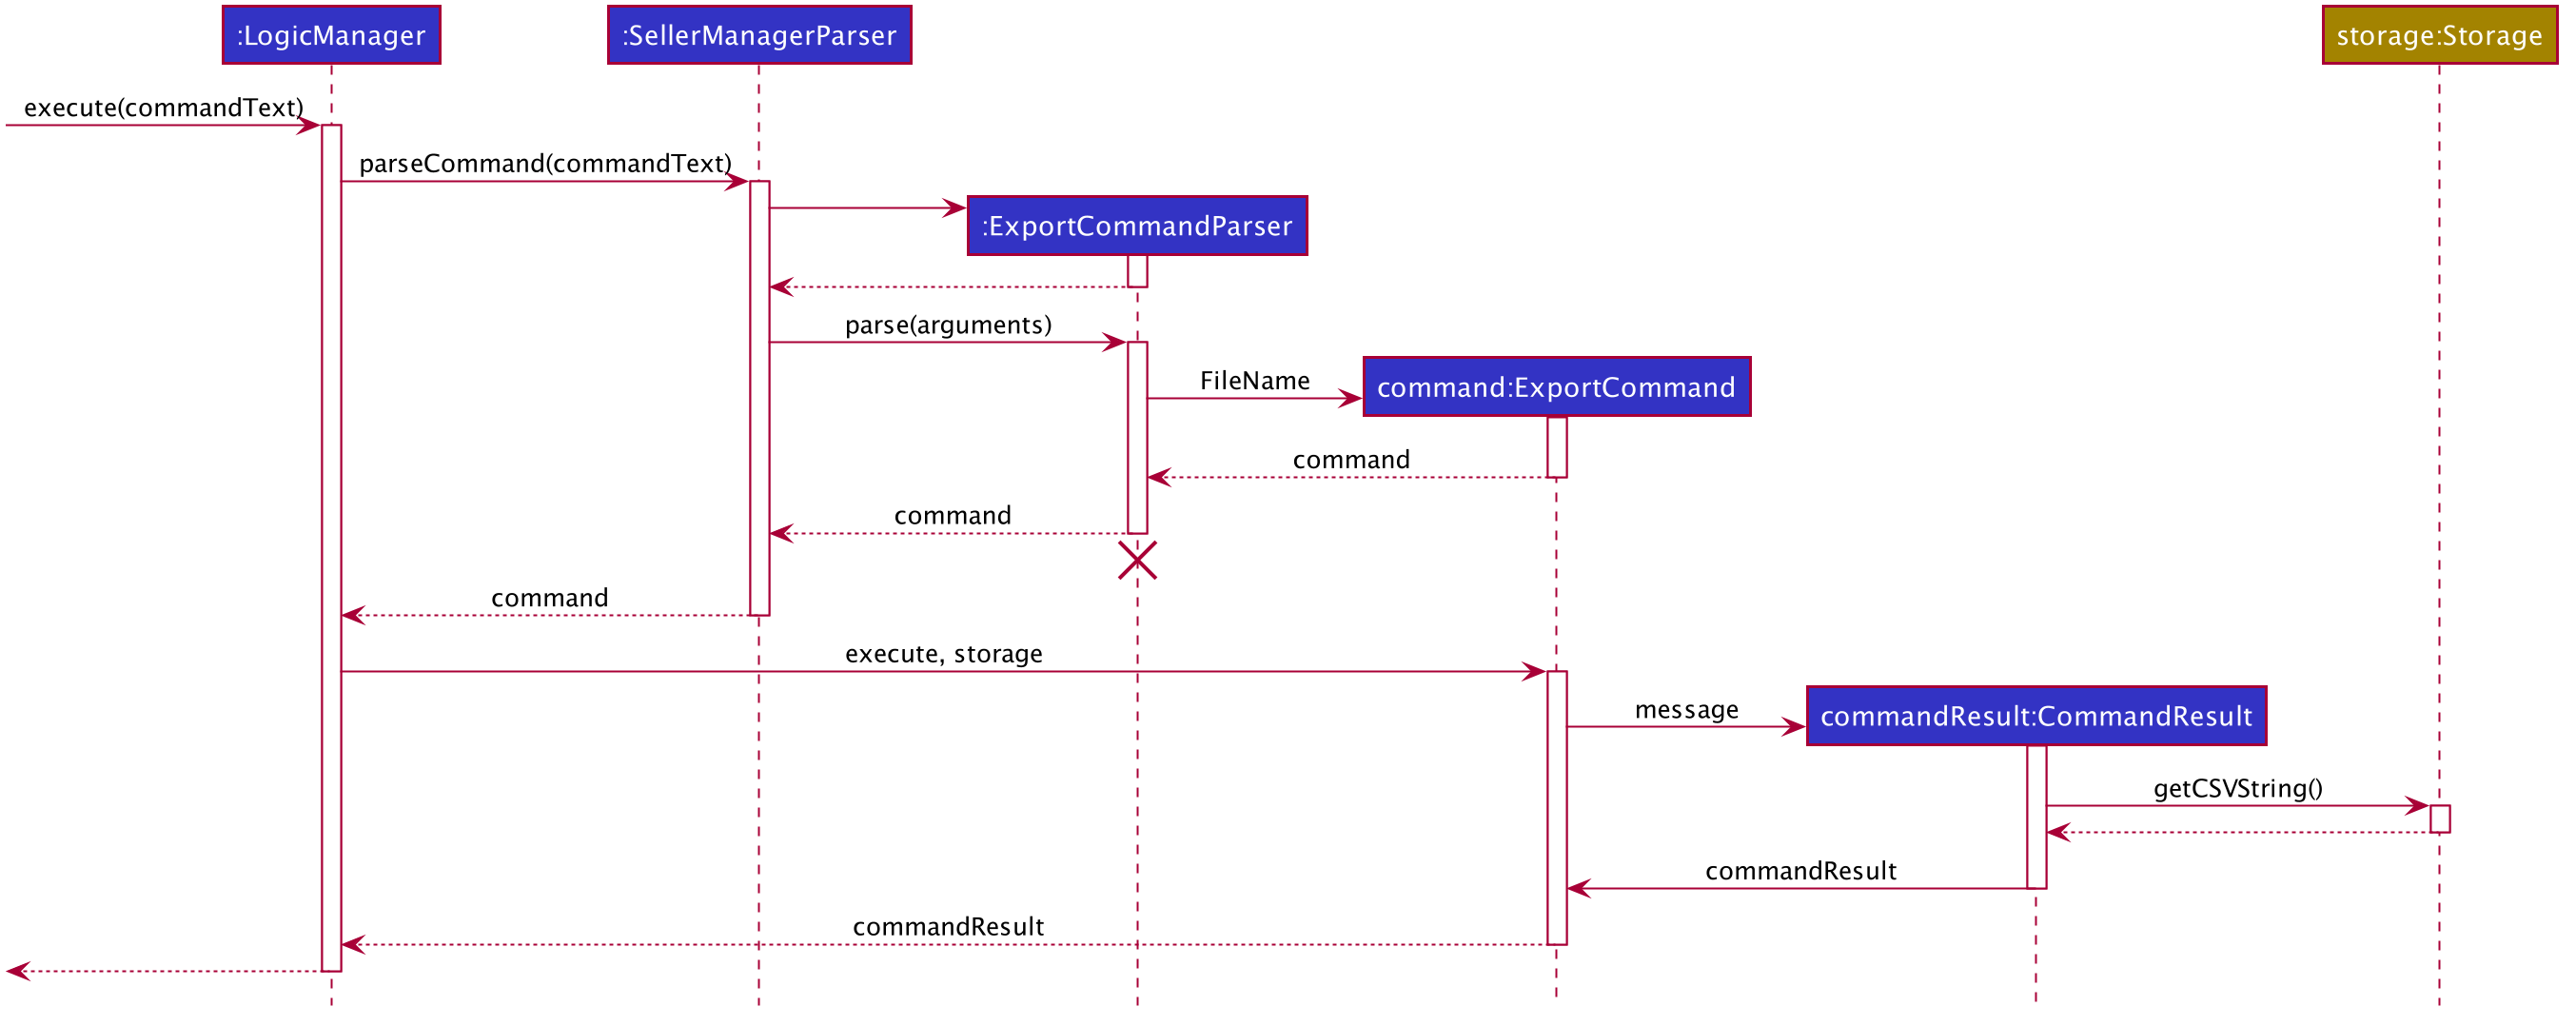
3.5.3. Current Implementation
Break down of the command.
Below is a more in-depth explanation at each step.
Step 1: User inputs a the export command e.g Export FILENAME
The commandBox executes it and the MainWindow runs its executeCommand(commandText) method. Referring to the sequence diagram below, this results in logic.execute(commandText) being called and the ExportParser parses the input from the user, returning a Command object.
Step 2: The logic then calls command.execute(command)
When this happens the ExportCommand execute creates a new CommandResult object and return that to Logic, completing the execution of the user input command.
Step 3: The commandResult executes getCSVString() which accesses JsonFiles in the data folder of Storage to parse the data into CSV strings and returns the data.
Step 4: The commandResult creates CSV file in data folder and returns in the end of execution.
Shown below is a quick summary of step 1-4 (Full complete diagram):
3.5.4. Notes to developer
Developers working on adding features to this module should take note of these limitations that we have put in place for v1.4 of SML:
-
File names are limited to the maximum character limit of Mac and Window users of 255 characters.
-
Simplified handling of file name which only allows file names to be alphanumeric.
3.6. Undo/Redo feature
3.6.1. Current Implementation
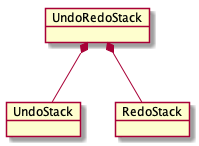
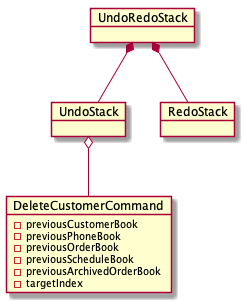
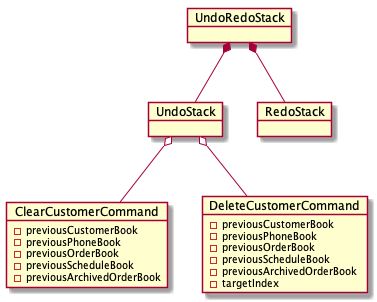
The undo/redo mechanism is facilitated by UndoRedoStack.
UndoRedoStack contains 2 stacks, undoStack and redoStack.
undoStack and redoStack contain commands that are of type UndoableCommand.
UndoableCommand extends Command and has the following attributes and methods.
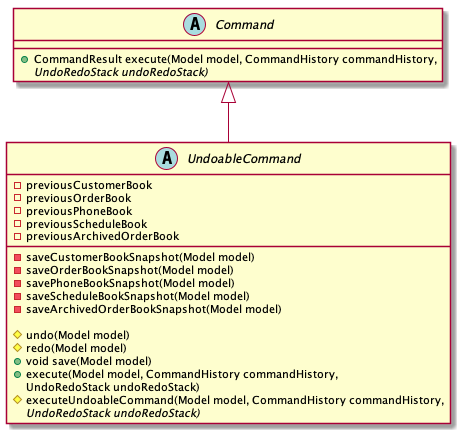
When an UndoableCommand is being executed, the methods saveCustomerBookSnapshot(Model model), savePhoneBookSnapshot(Model model), saveOrderBookSnapshot(Model model), saveScheduleBookSnapshot(Model model)
and saveArchivedOrderBookSnapshot(Model model) will be called. This ensures that the states of all 5 books are being stored.
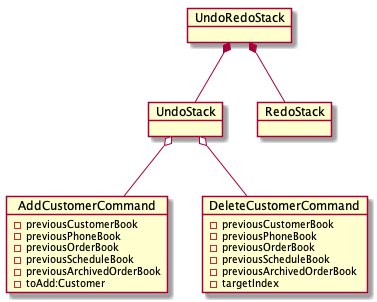
After a command is executed, LogicManager will add it into the UndoRedoStack.
This will be explained in the activity diagram below.

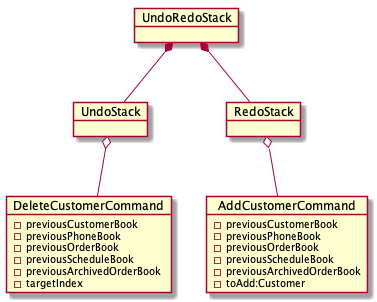
Next, when UndoCommand is being performed, UndoStack will remove the first command in its stack and add it to RedoStack.
It will then call UndoableCommand#undo() of the command that is removed.
The undo() method will then set the model to the previous snapshots of CustomerBook, PhoneBook, OrderBook, ScheduleBook and ArchivedOrderBook.
After which, it will save the original state of the model (e.g. before Undo took place) by calling UndoableCommand#save(Model model).
Likewise, when RedoCommand is being performed, RedoStack will remove the first command in its stack and add it to UndoStack.
It will then call UndoableCommand#redo() of the command that is removed.
The redo() method will then set the model to the previous snapshots of CustomerBook, PhoneBook, OrderBook, ScheduleBook and ArchivedOrderBook.
Given below is an example usage scenario and how the undo/redo mechanism behaves at each step.
Step 1. The user launches the application for the first time. The UndoRedoStack will be initialized.
Step 2. The user executes delete-c 5 command to delete the 5th customer. The delete-c 5 command will be pushed into the UndoRedoStack.
Step 3. The user executes add-c n/David … to add a new customer. The add-c command will save all states of CustomerBook, PhoneBook, OrderBook, ScheduleBook and ArchivedOrderBook.
Step 4. The user now decides that adding the customer was a mistake, and decides to undo that action by executing the undo command.

UndoCommand will check whether if there is any command to be undone by calling the UndoRedoStack#canUndo() method.
|
The following sequence diagram shows how the undo operation works:
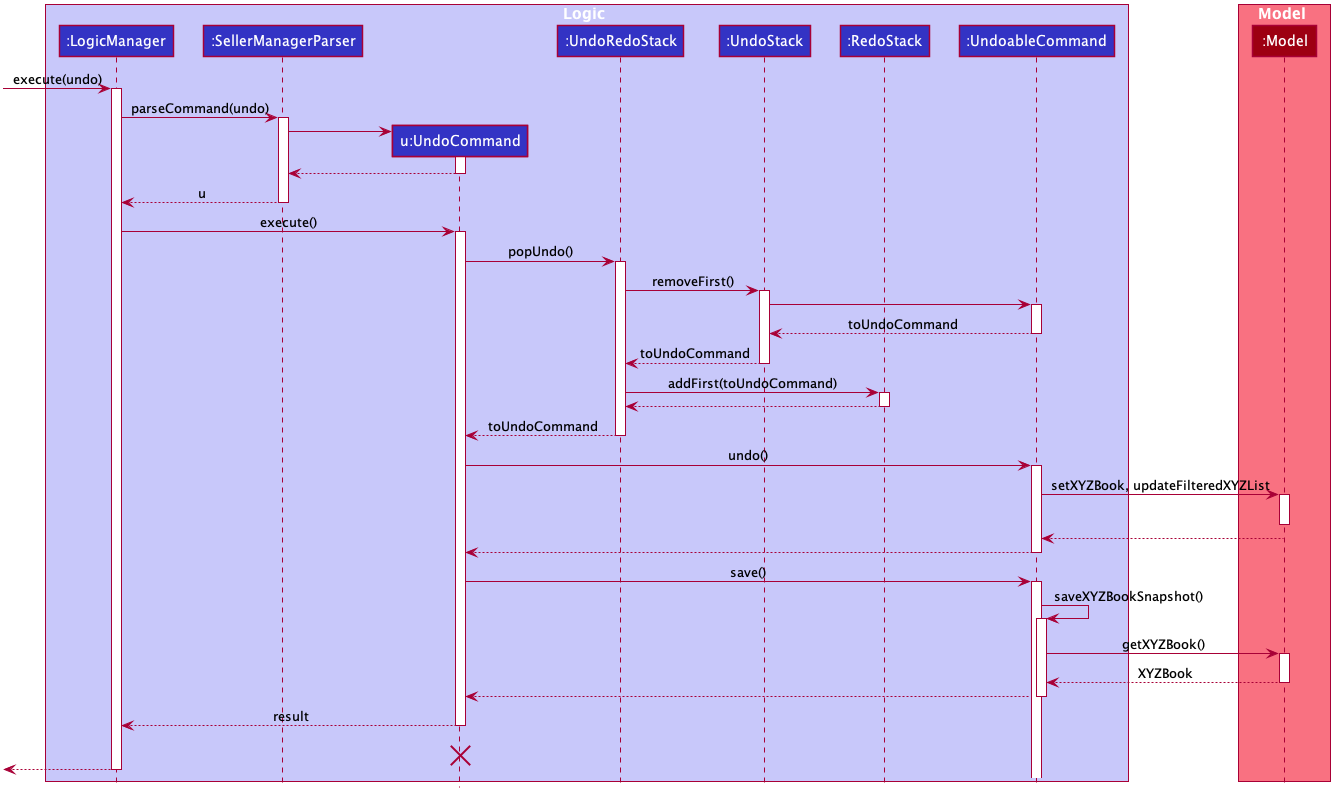
The lifeline for UndoCommand should end at the destroy marker (X) but due to a limitation of PlantUML, the lifeline reaches the end of the diagram.
|
| XYZ here refers to Customer, Phone, Order, Schedule and ArchivedOrder. |
The redo command does the opposite — it calls UndoableCommand#redo().
Step 5. The user then decides to execute the command list-c. Commands that do not modify the 5 books (Customer, Phone, Order, Schedule and Archived Order), such as list-c, do not extend UndoableCommand.
Step 6. The user executes clear-c.
3.6.2. Design Considerations
Aspect: How undo & redo executes
-
Alternative 1 (current choice): Saves the entire model.
-
Pros: Easy to implement.
-
Cons: May have performance issues in terms of memory usage.
-
-
Alternative 2: Individual command knows how to undo/redo by itself.
-
Pros: Will use less memory (e.g. for
delete-c, just save the customer being deleted). -
Cons: We must ensure that the implementation of each command is correct.
-
Aspect: Data structure to support the undo/redo commands
-
Alternative 1 (current choice): Use 2 stacks to store the history of the Models.
-
Pros: Easy to implement.
-
Cons: Logic is duplicated twice. For example, when a command is undone, we must remember to save the previous model state to the command.
-
-
Alternative 2: Use
HistoryManagerfor undo/redo-
Pros: We do not need to maintain a separate list, and just reuse what is already in the codebase.
-
Cons: Requires dealing with commands that have already been undone: We must remember to skip these commands. Violates Single Responsibility Principle and Separation of Concerns as
HistoryManagernow needs to do two different things.
-
3.7. [Proposed] Data Encryption
{Explain here how the data encryption feature will be implemented}
3.8. Logging
We are using java.util.logging package for logging. The LogsCenter class is used to manage the logging levels and logging destinations.
-
The logging level can be controlled using the
logLevelsetting in the configuration file (See Section 3.9, “Configuration”) -
The
Loggerfor a class can be obtained usingLogsCenter.getLogger(Class)which will log messages according to the specified logging level -
Currently log messages are output through:
Consoleand to a.logfile.
Logging Levels
-
SEVERE: Critical problem detected which may possibly cause the termination of the application -
WARNING: Can continue, but with caution -
INFO: Information showing the noteworthy actions by the App -
FINE: Details that is not usually noteworthy but may be useful in debugging e.g. print the actual list instead of just its size
3.9. Configuration
Certain properties of the application can be controlled (e.g user prefs file location, logging level) through the configuration file (default: config.json).
4. Documentation
Refer to the guide here.
5. Testing
Refer to the guide here.
6. Dev Ops
Refer to the guide here.
Appendix A: Product Scope
Target user profile:
-
has a need to manage a significant number of phones, orders and customers.
-
prefer desktop apps over other types
-
is a one-man/two-man handphone re-seller who has multiple phones to sell.
-
likes single view application.
-
can type fast
-
prefers typing over mouse input
-
is reasonably comfortable using CLI apps
Value proposition: Keep track of your phone, orders, schedules and customers faster than a typical mouse/GUI driven application.
Appendix B: User Stories
Priorities: High (must have) - * * *, Medium (nice to have) - * *, Low (unlikely to have) - *
| Priority | As a … | I want to … | So that I can… |
|---|---|---|---|
|
new user |
see usage instructions |
refer to instructions when I forget how to use the App |
|
handphone seller |
schedule my orders |
deconflict and view the schedule of my sales meetings. |
|
handphone seller |
generate an invoice |
give my customers the invoice. |
|
handphone seller |
sort my sales statistics |
find out which products are selling well. |
|
handphone seller |
generate sales report |
track my revenues, profits and costs. |
|
handphone seller |
find my handphone model easily |
not waste time searching for the handphone. |
|
handphone seller |
record and track the number of my phones |
decide when to get more phones. |
|
handphone seller |
copy the email address/handphone number of my customer easily |
email them/text them easily. |
|
handphone seller |
use a price optimization algorithm |
easily price my products. |
|
handphone seller |
find out the market price of the phones |
decide what price to set for my phones. |
|
handphone seller |
generate a visualisation of my meeting schedule |
have a better idea of my schedule |
|
handphone seller |
use an auto-generated mailing list |
keep track of the mails that I have to send out. |
|
handphone seller |
organise my replies in terms of hot, medium, cold |
find out how to best reply to a certain type of customer. |
|
handphone seller |
use the trust meter system |
remember which buyers cheated me before. |
|
handphone seller |
check notification dialog |
see upcoming deadlines |
|
handphone seller |
add images to my handphone |
better visualise my products. |
|
handphone seller |
integrate the app with an e-commerce platform |
automatically update my order in my app and on the platform. |
|
handphone seller |
view customer profile |
see the number of transactions and the types of goods they bought. |
|
handphone seller |
undo and redo |
correct my mistakes. |
|
handphone seller |
import my sales data from csv file |
save the trouble of manual importing. |
|
handphone seller |
add, edit and delete the phones that I have |
update when there is a need to. |
|
handphone seller |
create a new order |
schedule the order. |
|
handphone seller |
cancel order |
reflect the changes made by the customer. |
|
handphone seller |
sort statistics by brand |
find out which brand is the most popular. |
|
handphone seller |
generate statistics for total sales or total profit per month |
find out how much I earn. |
|
handphone seller |
find the details of the order that I want easily |
save time searching for an order. |
|
handphone seller |
delete a phone that I am no longer selling |
get rid of it on the database. |
|
handphone seller |
track my customer age |
know the suitability of my product. |
|
handphone seller |
use an in-built messenger to communicate with my customer |
talk to them without switching to another application. |
Appendix C: Use Cases
(For all use cases below, the System is the SML and the Actor is the user, unless specified otherwise)
Use case: Delete customer (UC01)
MSS
-
User requests to list customer
-
SML shows a list of customers
-
User requests to delete a specific customer in the list
-
SML deletes the customer
Use case ends.
Extensions
-
2a. The list is empty.
Use case ends.
-
3a. The given index is invalid.
-
3a1. SML shows an error message.
Use case resumes at step 2.
-
Use case: Add new phone (UC02)
MSS
-
Actor input phone name and other phone attributes.
-
SML adds a phone to the list of phones.
-
SML shows the new list of phones.
Extensions
-
1a. Actor inputs wrong date format.
Use case ends.
-
1a1. SML requests for correct data.
Use case resumes at step 1.
-
Use case: Add and complete order (UC03)
MSS
-
Actor adds an order to the system. SML displays the new order list.
-
Actor adds a schedule to the order. (UC04)
-
Actor mark order as completed. SML displays completed order message.
Extensions
-
2a. SML is unable to add as the command is missing fields.
Use case ends.
-
2a1. SML shows an error message that command is missing fields.
Use case resumes at step 2.
-
Use case: Actor adds a schedule to existing order (UC04)
MSS
-
Actor adds a schedule to an order.
-
SML check for conflict in timings.
-
SML displays the scheduled order.
Extensions
-
2a. SML finds out that there is a conflict in timing for 2 or more orders.
Use case ends.
-
2a1. SML displays the 2 or more orders that have the same schedule timing.
Use case resumes at step 2.
-
Use case: Actor export data to csv file (UC05)
MSS
-
Actor requests to export data to csv file.
-
SML loads system data into the file.
Extensions
-
1a. Input file name does not follow constraints.
Use case ends.
-
1a1. SML displays an error message and does not create the file.
Use case resumes at step 1.
-
Appendix D: Non Functional Requirements
-
Should work on any mainstream OS as long as it has Java
11or above installed. -
Should be able to hold up to 1000 customers/phones/orders without a noticeable sluggishness in performance for typical usage.
-
A user with above-average typing speed for regular English text (i.e. not code, not system admin commands) should be able to accomplish most of the tasks faster using commands than using the mouse.
-
Single User for each session
-
No internet required
-
Quality and helpful information/feedback upon user action
-
The system should ideally respond within 5 seconds
-
The system allows for wrong input from user and recovers from erroneous input
-
The application can be downloaded and run via a jar file
Appendix E: Glossary
- Mainstream OS
-
Windows, Linux, Unix, OS-X
-
SML
An initialism for our application, Seller Manager Lite. -
Customer
A person who buys from the seller. -
Phone
Multi-purpose mobile computing device. Also known as smartphones. -
Order
A request for goods. -
Schedule
A meetup with a buyer to pass the goods. There can only be 1 schedule associated with an order at any one time.
-
E.1. SML-specific Terms
-
Command
An instruction that will produce an output once entered in SML. -
CustomerBook
A CustomerBook is a list that stores Customer(s) that has been added into SML. Each customer entry comprises of CustomerName, ContactNumber and Email fields and others. -
PhoneBook
A PhoneBook is a list that stores Phone(s) that has been added in SML. Each phone entry comprises of IdentityNumber, SerialNumber, Brand, PhoneName, Colour, Cost and Capacity. -
OrderBook
A OrderBook is a list that stores Order(s) that has been added in SML. Each order entry comprises of a customer, a phone, OrderID, Price and OrderStatus. -
ScheduleBook
A ScheduleBook is a list that stores Schedules(s) that has been added in SML. Each schedule entry comprises a Venue and Calendar with date and time. -
Archived
Archived is a list that stores Completed or Cancelled orders ONLY. -
TabPanel
A view that is similar to web browser Tabs. -
Add
The action of putting an entry into CustomerBook, PhoneBook, OrderBook or ScheduleBook. -
Edit
If you want to make changes to any entry, you can do so with this command. -
Delete
Remove an entry from CustomerBook, PhoneBook or ScheduleBook. -
Find
The action of searching for customers, phones or orders that contains the keywords that you specify. -
Switch
Change the Tab Panel to Customer, Phone, Order, Schedule or Archived. -
Undo
If you’ve made a mistake, you can simply revert to the previous command. -
Redo
The inverse of undoing. -
Copy
The action of copying an entry into the clipboard.
Appendix F: Instructions for Manual Testing
Given below are instructions to test the app manually.
| These instructions only provide a starting point for testers to work on; testers are expected to do more exploratory testing. |
F.1. Launch and Shutdown
-
Initial launch
-
Download the jar file and copy into an empty folder
-
Open your command line prompt/terminal, navigate and input
java -jar [filename]to run the file
Expected: Shows the GUI with a set of sample data. The window size may not be optimum.
-
-
Saving window preferences
-
Resize the window to an optimum size. Move the window to a different location. Close the window.
-
Re-launch the app the same way you launched the application previously.
Expected: The most recent window size and the location is retained.
-
F.2. Adding a phone
-
Adding a phone while all phones are listed
-
Test case:
add-p i/543407158585522 s/A123bcfe29 n/iPhone 11 b/Apple cp/128 cl/Purple $/$900 t/NEW t/Cool
Expected: Phone with the above details is added the list. Details of the phone shown in the status message. -
Test case:
add-p i/543407158585522 s/A123bcfe29 n/iPhone 11 b/Apple cp/128 cl/Purple t/NEW t/Cool
Expected: No phone is added. Error details are shown in the status message. Missing fields. -
Other incorrect add commands to try:
add-c n/Steve Jobs c/12345678, where the email field is missing.
Expected: Similar to previous.
-
F.3. Deleting a customer
-
Deleting a customer while all customers are listed
-
Prerequisites: List all customers using the
list-ccommand. Multiple customers in the list. -
Test case:
delete-c 1
Expected: The first customer is deleted from the list. Details of the deleted customer shown in the status message. -
Test case:
delete-c 0
Expected: No customer is deleted. Error details are shown in the status message. The status bar remains the same. -
Other incorrect delete commands to try:
delete-p,delete-p x(where x is larger than the list size)
Expected: Similar to previous.
-
F.4. Editing an order
-
Edit an order while all orders are listed.
-
Prerequisites: List all customers using the
list-ocommand. There must be at least 1 order in the list. -
Test case:
edit-o 1 $/$1000
Expected: Price of the first order is edited. Details of the edited order are shown in the status message. -
Test case:
edit-o 1
Expected: Nothing is edited. Error details are shown in the status message. No fields to be edited. -
Other incorrect edit commands to try:
edit-c 1 c/abc, c/ is the prefix for contact number but alphabets are entered instead
Expected: Error message shown due to erroneous input.
-
F.5. Undo clear-c
-
Undo clear all orders command.
-
Prerequisites:
clear-omust be the last undoable command that was executed. -
Test case:
undo
Expected: All the orders that were in the OrderBook will be shown.
-
F.6. Saving data
-
Data is automatically saved after every command.
-
If all files are missing, sample data files will be loaded.
-
Dependency flows from schedulebook to orderbook to phonebook and customerbook.
-
If file "a" has dependency on file "b", and file "a" is missing, both empty file "a" and "b" will be loaded.
-
If file is corrupted i.e. wrong string input, sample file will be loaded.
-
F.7. Testing Statistics
-
Display statistics between 2 dates
-
Prerequisites: Ensure that archived order panel has suitable
Completedandscheduledorders. Only these orders will show up in the calculation -
Test case:
generate-s s/revenue d1/2018.12.13 d2/2019.11.13
Expected: Chart is displayed in popup window
-
F.8. Autocomplete
-
add-c -
edit-c -
schedule -
delete-c -
find-c -
export